Morphic
Morphic is the name given to Pharo’s graphical interface. Morphic is written in Smalltalk, so it is fully portable between operating systems; as a consequence, Pharo looks exactly the same on Unix, MacOS and Windows. What distinguishes Morphic from most other user interface toolkits is that it does not have separate modes for “composing” and “running” the interface: all the graphical elements can be assembled and disassembled by the user, at any time.
The history of Morphic
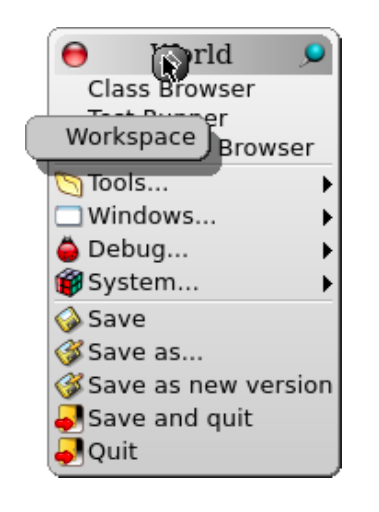
Detaching a morph, here the Workspace menu item, to make it an independent button.
To create a morph to represent a string object, execute the following code in a workspace.
'Morph' asMorph openInWorld
Open a browser on the Color class and add the following method to it:
Getting a morph for an instance of Color.
Color >>
asMorph
    ^ Morph new color: self
Now execute Color orange asMorph openInWorld in a workspace. Instead of the string-like morph, you get an orange rectangle!
Manipulating morphs
Every morph, even if it is not currently open on the screen, has a position and a size. For convenience, all morphs are considered to occupy a rectangular region of the screen; if they are irregularly shaped, their position and size are those of the smallest rectangular “box” that surrounds them, which is known as the morph’s bounding box, or just its “bounds”. The position method returns a Point that describes the location of the morph’s upper left corner (or the upper left corner of its bounding box). The origin of the coordinate system is the screen’s upper left corner, with y coordinates increasing down the screen and x coordinates increasing to the right. The extent method also returns a point, but this point specifies the width and height of the morph rather than a location.
Type the following code into a workspace and
do it:
joe := Morph new color: Color blue.
joe openInWorld.
bill := Morph new color: Color red .
bill openInWorld.
Then type joe position and print it . To move joe, execute joe position: (joe position + (10@3)) repeatedly.
To make bill follow joe, you can repeatedly execute this code:
bill position: (joe position + (100@0))
Composing morphs
One way of creating new graphical representations is by placing one morph inside another. This is called composition; morphs can be composed to any depth. You can place a morph inside another by sending the message addMorph: to the container morph.
Try adding a morph to another one:
star := StarMorph new color: Color yellow.
joe := Morph new color: Color blue.
joe addMorph: star.
star position: joe position.
joe openInWorld .
star openInWorld.
The last line positions the star at the same coordinates as joe. Notice that the coordinates of the contained morph are still relative to the screen, not to the containing morph. There are many methods available to position a morph; browse the geometry protocol of class Morph to see for yourself. For example, to center the star inside joe, execute star center: joe center.
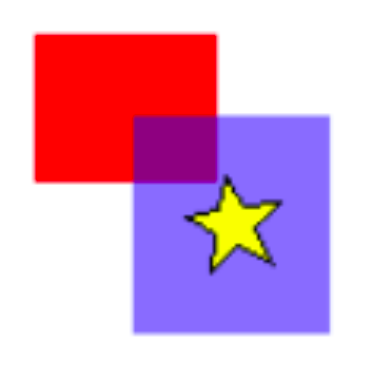
The star is contained inside joe, the translucent blue morph.
Creating and drawing your own morphs
While it is possible to make many interesting and useful graphical representations by composing morphs, sometimes you will need to create something completely different. To do this you define a subclass of Morph and override the drawOn: method to change its appearance.
The morphic framework sends the message drawOn: to a morph when it needs to redisplay the morph on the screen. The parameter to drawOn: is a kind of Canvas; the expected behaviour is that the morph will draw itself on that canvas, inside its bounds. Let’s use this knowledge to create a cross-shaped morph.
Using the browser, define a new class CrossMorph inheriting from Morph:
Defining CrossMorph
Morph subclass: #CrossMorph
    instanceVariableNames: ''
    classVariableNames: ''
    poolDictionaries: ''
    category: 'PBE−Morphic'
We can define the drawOn: method like this:
Drawing a CrossMorph.
drawOn: aCanvas
    | crossHeight crossWidth horizontalBar verticalBar |
    crossHeight := self height / 3.0 .
    crossWidth := self width / 3.0 .
    horizontalBar := self bounds insetBy: 0 @ crossHeight.
    verticalBar := self bounds insetBy: crossWidth @ 0.
    aCanvas fillRectangle: horizontalBar color: self color.
    aCanvas fillRectangle: verticalBar color: self color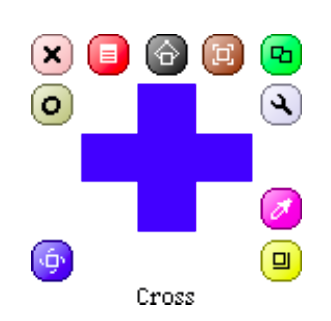
A CrossMorph with its halo; you can resize it as you wish.
Sending the bounds message to a morph answers its bounding box, which is an instance of Rectangle. Rectangles understand many messages that create other rectangles of related geometry; here we use the insetBy: message with a point as its argument to create first a rectangle with reduced height, and then another rectangle with reduced width.
To test your new morph, execute CrossMorph new openInWorld.
Define the following method in class CrossMorph:
Shaping the sensitive zone of the CrossMorph.
containsPoint: aPoint
    | crossHeight crossWidth horizontalBar verticalBar |
    crossHeight := self height / 3.0.
    crossWidth := self width / 3.0.
    horizontalBar := self bounds insetBy: 0 @ crossHeight.
    verticalBar := self bounds insetBy: crossWidth @ 0.
    ^ (horizontalBar containsPoint: aPoint)
        or: [verticalBar containsPoint: aPoint]
horizontalBar.
horizontalBar
    | crossHeight |
    crossHeight := self height / 3.0.
    ^ self bounds insetBy: 0 @ crossHeight
verticalBar.
verticalBar
    | crossWidth |
    crossWidth := self width / 3.0.
    ^ self bounds insetBy: crossWidth @ 0
We can then define both drawOn: and containsPoint: using these methods:
Refactored CrossMorph » drawOn:.
drawOn: aCanvas
    aCanvas fillRectangle: self horizontalBar color: self color.
    aCanvas fillRectangle: self verticalBar color: self color
Refactored CrossMorph » containsPoint:.
containsPoint: aPoint
    ^ (self horizontalBar containsPoint: aPoint)
        or: [self verticalBar containsPoint: aPoint]
m := CrossMorph new bounds: (0@0 corner: 300@300).
m openInWorld.
m color: (Color blue alpha: 0.3).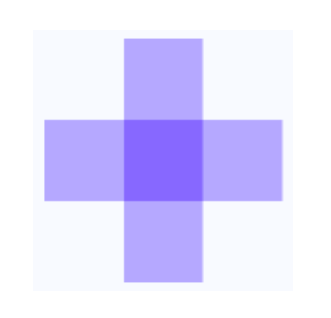
The center of the cross is filled twice with the colour.
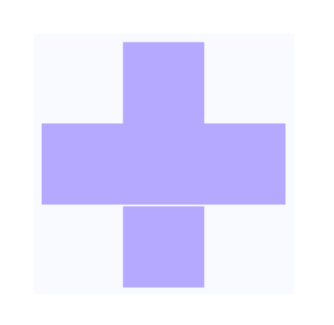
The cross-shaped morph, showing a row of unfilled pixels.
The revised drawOn: method, which fills the center of the cross once.
drawOn: aCanvas
    | topAndBottom |
    aCanvas fillRectangle: self horizontalBar color: self color.
    topAndBottom := self verticalBar areasOutside: self horizontalBar.
    topAndBottom do: [ :each | aCanvas fillRectangle: each color: self color]
CrossMorph»horizontalBar with explicit rounding.
horizontalBar
    | crossHeight |
    crossHeight := (self height / 3.0) rounded.
    ^ self bounds insetBy: 0 @ crossHeight
CrossMorph»verticalBar with explicit rounding.
verticalBar
    | crossWidth |
    crossWidth := (self width / 3.0) rounded.
    ^ self bounds insetBy: crossWidth @ 0
Interaction and animation
To build live user-interfaces using morphs, we need to be able to interact with them using the mouse and the keyboard. Moreover, the morphs need to be able respond to user input by changing their appearance and position — that is, by animating themselves.
Mouse events
When a mouse button is pressed, Morphic sends each morph under the mouse pointer the message handlesMouseDown:. If a morph answers true, then Morphic immediately sends it the mouseDown: message; it also sends the mouseUp: message when the user releases the mouse button. If all morphs answer false, then Morphic initiates a drag-and-drop operation. As we will discuss below, the mouseDown: and mouseUp: messages are sent with an argument — a MouseEvent object — that encodes the details of the mouse action.
Let’s extend CrossMorph to handle mouse events. We start by ensuring that all crossMorphs answer true to the handlesMouseDown: message.
Add this method to CrossMorph:
Declaring that CrossMorph will react to mouse clicks.
CrossMorph >>
handlesMouseDown: anEvent
    ^ true
Suppose that when we click on the cross, we want to change the color of the cross to red, and when we action-click on it, we want to change the color to yellow.
Reacting to mouse clicks by changing the morph’s color.
CrossMorph >>
mouseDown: anEvent
    anEvent redButtonPressed "click"
        ifTrue: [self color: Color red].
    anEvent yellowButtonPressed "action−click"
        ifTrue: [self color: Color yellow].
    self changed
Notice that in addition to changing the color of the morph, this method also sends self changed. This makes sure that morphic sends drawOn: in a timely fashion. Notealsothatoncethemorphhandlesmouseevents,youcanno longer grab it with the mouse and move it. Instead you have to use the halo: meta-click on the morph to make the halo appear and grab either the brown move handle fullscreen or the black pickup handle home at the top of the morph.
The anEvent argument of mouseDown: is an instance of MouseEvent, which is a subclass of MorphicEvent. MouseEvent defines the redButtonPressed and yellowButtonPressed methods. Browse this class to see what other methods it provides to interrogate the mouse event.
Keyboard events
To catch keyboard events, we need to take three steps.
- Give the “keyboard focus” to a specific morph: for instance we can give focus to our morph when the mouse is over it.
- Handle the keyboard event itself with the handleKeystroke: method: this message is sent to the morph that has keyboard focus when the user presses a key.
- Release the keyboard focus when the mouse is no longer over our morph.
Let’s extend CrossMorph so that it reacts to keystrokes. First, we need to arrange to be notified when the mouse is over the morph. This will happen if our morph answers true to the handlesMouseOver: message
Declare that CrossMorph will react when it is under the mouse pointer.
We want to handle “mouse over” events.
CrossMorph >>
handlesMouseOver: anEvent
    ^ true
This message is the equivalent of handlesMouseDown: for the mouse position. When the mouse pointer enters or leaves the morph, the mouseEnter: and mouseLeave: messages are sent to it.
Define two methods so that CrossMorph catches and releases the keyboard focus, and a third method to actually handle the keystrokes.
Getting the keyboard focus when the mouse enters the morph.
CrossMorph >>
mouseEnter: anEvent
    anEvent hand newKeyboardFocus: self
Handing back the focus when the pointer goes away.
CrossMorph >>
mouseLeave: anEvent
    anEvent hand newKeyboardFocus: nil
Receiving and handling keyboard events.
CrossMorph >>
handleKeystroke: anEvent
    | keyValue |
    keyValue := anEvent keyValue.
    keyValue = 30 "up arrow"
        ifTrue: [self position: self position - (0 @ 1)].
    keyValue = 31 "down arrow"
        ifTrue: [self position: self position + (0 @ 1)].
    keyValue = 29 "right arrow"
        ifTrue: [self position: self position + (1 @ 0)].
    keyValue = 28 "left arrow"
        ifTrue: [self position: self position - (1 @ 0)]
We have written this method so that you can move the morph using the arrow keys. Note that when the mouse is no longer over the morph, the handleKeystroke: message is not sent, so the morph stops responding to keyboard commands. To discover the key values, you can open a Transcript window and add Transcript show: anEvent keyValue to method 11.17. The anEvent argument of handleKeystroke: is an instance of KeyboardEvent, another subclass of MorphicEvent. Browse this class to learn more about keyboard events.
Morphic animations
Morphic provides a simple animation system with two main methods: step is sent to a morph at regular intervals of time, while stepTime specifies the time in milliseconds between steps. In addition, startStepping turns on the stepping mechanism, while stopStepping turns it off again; isStepping can be used to find out whether a morph is currently being stepped.
Make CrossMorph blink by defining these methods as follows:
Defining the animation time interval.
CrossMorph >>
stepTime
    ^ 100
Making a step in the animation.
CrossMorph >>
step
    (self color diff: Color black) < 0.1
        ifTrue: [self color: Color red]
        ifFalse: [self color: self color darker]
To start things off, you can open an inspector on a CrossMorph (using the debug handle settings in the morphic halo), type self startStepping in the small workspace pane at the bottom, and do it . Alternatively, you can modify the handleKeystroke: method so that you can use the + and - keys to start and stop stepping.
handleKeystroke: anEvent
    | keyValue |
    keyValue := anEvent keyValue.
    keyValue = 30 "up arrow"
        ifTrue: [self position: self position - (0 @ 1)].
    keyValue = 31 "down arrow"
        ifTrue: [self position: self position + (0 @ 1)].
    keyValue = 29 "right arrow"
        ifTrue: [self position: self position + (1 @ 0)].
    keyValue = 28 "left arrow"
        ifTrue: [self position: self position - (1 @ 0)].
    keyValue = $+ asciiValue ifTrue: [self startStepping].
    keyValue = $- asciiValue ifTrue: [self stopStepping].
Interactors
To prompt the user for input, the UIManager class provides a large number of ready-to-use dialog boxes. For instance, the request:initialAnswer: method returns the string entered by the user.
UIManager default request: 'What''s your name?' initialAnswer: 'no name'
An input dialog.
To display a popup menu, use one of the various chooseFrom: methods
UIManager default
chooseFrom: #('circle' 'oval' 'square' 'rectangle' 'triangle') lines: #(2 4) message: 'Choose a shape'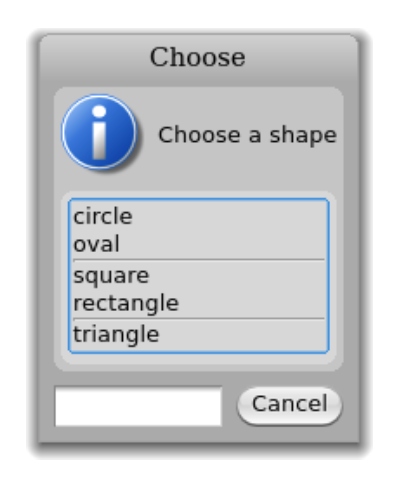
Pop-up menu.
Drag-and-drop
Morphic also supports drag-and-drop. Let’s examine a simple example with two morphs, a receiver morph and a dropped morph. The receiver will accept a morph only if the dropped morph matches a given condition: in our example, the morph should be blue. If it is rejected, the dropped morph decides what to do.
Let’s first define the receiver morph:
Defining a morph on which we can drop other morphs
Morph subclass: #ReceiverMorph
    instanceVariableNames: ''
    classVariableNames: ''
    poolDictionaries: ''
    category: 'PBE−Morphic'
Now define the initialization method in the usual way:
Initializing ReceiverMorph.
ReceiverMorph >>
initialize
    super initialize.
    color := Color red.
    bounds := 0 @ 0 extent: 200 @ 200
How do we decide if the receiver morph will accept or repel the dropped morph? In general, both of the morphs will have to agree to the interaction. The receiver does this by responding to wantsDroppedMorph:event:; the first argument is the dropped morph, and the second the mouse event, so that the receiver can, for example, see if any modifier keys were held down at the time of the drop. The dropped morph is also given the opportunity to check and see if it likes the morph onto which it is being dropped; it is sent the message wantsToBeDroppedInto:. The default implementation of this method (in class Morph) answers true.
Accept dropped morphs based on their color.
ReceiverMorph >>
wantsDroppedMorph: aMorph event: anEvent
    ^ aMorph color = Color blue
What happens to the dropped morph if the receiving morph doesn’t want it? The default behaviour is for it to do nothing, that is, to sit on top of the receiving morph, but without interacting with it. A more intuitive behavior is for the dropped morph to go back to its original position. This can be achieved by the receiver answering true to the message repelsMorph:event: when it doesn’t want the dropped morph:
Changing the behaviour of the dropped morph when it is rejected.
ReceiverMorph >>
repelsMorph: aMorph event: ev
    ^ (self wantsDroppedMorph: aMorph event: ev) not
That’s all we need as far as the receiver is concerned.
Create instances of ReceiverMorph and EllipseMorph in a workspace:
ReceiverMorph new openInWorld.
EllipseMorph new openInWorld.
Try to drag-and-drop the yellow EllipseMorph onto the receiver. It will be rejected and sent back to its initial position.
To change this behaviour, change the color of the ellipse morph to Color blue using an inspector. Blue morphs should be accepted by the ReceiverMorph.
Let’s create a specific subclass of Morph, named DroppedMorph, so we can experiment a bit more:
Defining a morph we can drag-and-drop onto ReceiverMorph
Morph subclass: #DroppedMorph
    instanceVariableNames: ''
    classVariableNames: '' poolDictionaries: ''
    category: 'PBE−Morphic'
Initializing DroppedMorph.
DroppedMorph >>
initialize
    super initialize.
    color := Color blue.
    self position: 250@100
Now we can specify what the dropped morph should do when it is rejected by the receiver; here it will stay attached to the mouse pointer:
Reacting when the morph was dropped but rejected.
DroppedMorph >>
rejectDropMorphEvent: anEvent
    |h|
    h := anEvent hand.
    WorldState addDeferredUIMessage: [h grabMorph: self].
    anEvent wasHandled: true
Sending the hand message to an event answers the hand, an instance of HandMorph that represents the mouse pointer and whatever it holds. Here we tell the World that the hand should grab self, the rejected morph.
Create two instances of DroppedMorph, and then drag-and-drop them onto the receiver.
ReceiverMorph new openInWorld.
(DroppedMorph new color: Color blue) openInWorld.
(DroppedMorph new color: Color green) openInWorld.
The green morph is rejected and therefore stays attached to the mouse pointer.
A complete example
Let’s design a morph to roll a die. Clicking on it will display the values of all sides of the die in a quick loop, and another click will stop the animation.
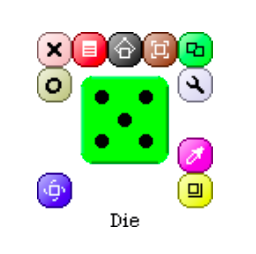
The die in Morphic.
Define the die as a subclass of BorderedMorph instead of Morph, because we will make use of the border.
Defining the die morph
BorderedMorph subclass: #DieMorph
    instanceVariableNames: 'faces dieValue isStopped'
    classVariableNames: ''
    poolDictionaries: ''
    category: 'PBE−Morphic'
The instance variable faces records the number of faces on the die; we allow dice with up to 9 faces! dieValue records the value of the face that is currently displayed, and isStopped is true if the die animation has stopped running. To create a die instance, we define the faces: n method on the class side of DieMorph to create a new die with n faces.
Creating a new die with the number of faces we like.
DieMorph class >>
faces: aNumber
    ^ self new faces: aNumber
The initialize method is defined on the instance side in the usual way; remember that new sends initialize to the newly-created instance.
Initializing instances of DieMorph.
DieMorph >>
initialize
    super initialize.
    self extent: 50 @ 50.
    self useGradientFill;
        borderWidth: 2;
        useRoundedCorners.
    self setBorderStyle: #complexRaised.
    self fillStyle direction: self extent.
    self color: Color green.
    dieValue := 1.
    faces := 6.
    isStopped := false
We use a few methods of BorderedMorph to give a nice appearance to the die: a thick border with a raised effect, rounded corners, and a color gradient on the visible face. We define the instance method faces: to check for a valid parameter as follows:
Setting the number of faces of the die.
DieMorph >>
faces: aNumber
    "Set the number of faces"
    (aNumber isInteger
        and: [aNumber > 0]
        and: [aNumber <= 9])
    ifTrue: [faces := aNumber]
It may be good to review the order in which the messages are sent when a die is created. For instance, if we start by evaluating DieMorph faces: 9:
- The class method DieMorph class»faces: sends new to DieMorph class.
- The method for new (inherited by DieMorph class from Behavior) creates the new instance and sends it the initialize message.
- The initialize method in DieMorph sets faces to an initial value of 6.
- DieMorph class»new returns to the class method DieMorph class»faces:, which then sends the message faces: 9 to the new instance.
- The instance method DieMorph»faces: now executes, setting the faces instance variable to 9.
Before defining drawOn:, we need a few methods to place the dots on the displayed face:
Nine methods for placing points on the faces of the die.
DieMorph >>
face1
    ^ {0.75@0.75}

DieMorph >>
face2
    ^ {0.75@0.75 . 0.5@0.5}

DieMorph >>
face3
    ^ {0.75@0.25 . 0.75@0.75 . 0.25@0.75}

DieMorph >>
face4
    ^ {0.75@0.25 . 0.75@0.75 . 0.25@0.75 . 0.5@0.5}

DieMorph >>
face5
    ^ {0.75@0.25 . 0.75@0.75 . 0.25@0.75 . 0.25@0.5 . 0.75@0.5}

DieMorph >>
face6
    ^ {0.75@0.25 . 0.75@0.75 . 0.25@0.75 . 0.25@0.5 . 0.75@0.5 . 0.5@0.5}

DieMorph >>
face7
    ^ {0.75@0.25 . 0.75@0.75 . 0.25@0.75 . 0.25@0.5 . 0.75@0.5 . 0.5@0.5 . 0.5@0.25}

DieMorph >>
face8
    ^ {0.25@0.25 . 0.75@0.25 . 0.75@0.75 . 0.25@0.75 . 0.25@0.5 . 0.75@0.5 . 0.5@0.5 . 0.5@0.25}

DieMorph >>
face9
    ^ {0.25@0.25 . 0.75@0.25 . 0.75@0.75 . 0.25@0.75 . 0.25@0.5 . 0.75@0.5 . 0.5@0.5 . 0.5@0.25 . 0.5@0.75}
These methods define collections of the coordinates of dots for each face. The coordinates are in a square of size 1 ◊ 1; we will simply need to scale them to place the actual dots.
The drawOn: method does two things: it draws the die background with the super-send, and then draws the dots.
Drawing the die morph.
DieMorph >>
drawOn: aCanvas
    super drawOn: aCanvas.
    (self perform: ('face' , dieValue asString) asSymbol)
        do: [:aPoint | self drawDotOn: aCanvas at: aPoint]
The second part of this method uses the reflective capacities of Smalltalk. Drawing the dots of a face is a simple matter of iterating over the collection given by the faceX method for that face, sending the drawDotOn:at: message for each coordinate. To call the correct faceX method, we use the perform: method which sends a message built from a string, here (’face’, dieValue asString) asSymbol. You will encounter this use of perform: quite regularly.
Drawing a single dot on a face.
DieMorph >>
drawDotOn: aCanvas at: aPoint aCanvas
    fillOval: (Rectangle
        center: self position + (self extent * aPoint)
        extent: self extent / 6)
    color: Color black
Since the coordinates are normalized to the [0:1] interval, we scale them to the dimensions of our die: self extent * aPoint.
We can already create a die instance from a workspace:
(DieMorph new faces: 6) openInWorld.To change the displayed face, we create an accessor that we can use as myDie dieValue: 4:
Setting the current value of the die.
DieMorph >>
dieValue: aNumber
    (aNumber isInteger
        and: [aNumber > 0]
        and: [aNumber <= faces])
    ifTrue:
        [dieValue := aNumber.
        self changed]
Now we will use the animation system to show quickly all the faces:
Animating the die.
DieMorph >>
stepTime
    ^ 100

DieMorph >>
step
    isStopped ifFalse: [self dieValue: (1 to: faces) atRandom]
Now the die is rolling!
To start or stop the animation by clicking, we will use what we learned previously about mouse events. First, activate the reception of mouse events:
Handling mouse clicks to start and stop the animation.
DieMorph >>
handlesMouseDown: anEvent
    ^ true

DieMorph >>
mouseDown: anEvent
    anEvent redButtonPressed
        ifTrue: [isStopped := isStopped not]
Now the die will roll or stop rolling when we click on it.
More about the canvas
The drawOn: method has an instance of Canvas as its sole argument; the canvas is the area on which the morph draws itself. By using the graphics methods of the canvas you are free to give the appearance you want to a morph. If you browse the inheritance hierarchy of the Canvas class, you will see that it has several variants. The default variant of Canvas is FormCanvas; you will find the key graphics methods in Canvas and FormCanvas. These methods can draw points, lines, polygons, rectangles, ellipses, text, and images with rotation and scaling.
It is also possible to use other kinds of canvas, to obtain transparent morphs, more graphics methods, antialiasing, and so on. To use these features you will need an AlphaBlendingCanvas or a BalloonCanvas. But how can you obtain such a canvas in a drawOn: method, when drawOn: receives an instance of FormCanvas as its argument? Fortunately, you can transform one kind of canvas into another.
To use a canvas with a 0.5 alpha-transparency in DieMorph, redefine drawOn: like this:
Drawing a translucent die.
DieMorph >>
drawOn: aCanvas
    | theCanvas |
    theCanvas := aCanvas asAlphaBlendingCanvas: 0.5.
    super drawOn: theCanvas.
    (self perform: ('face' , dieValue asString) asSymbol)
        do: [:aPoint | self drawDotOn: theCanvas at: aPoint]
That’s all you need to do!
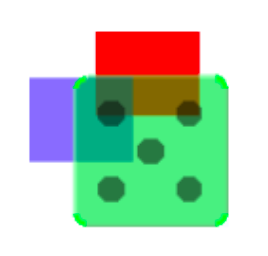
The die displayed with alpha-transparency.
Chapter summary
Morphic is a graphical framework in which graphical interface elements can be dynamically composed.
- You can convert an object into a morph and display that morph on the screen by sending it the messages asMorph openInWorld.
- You can manipulate a morph by meta-clicking on it and using the handles that appear. (Handles have help balloons that explain what they do.)
- You can compose morphs by embedding one onto another, either by drag and drop or by sending the message addMorph:.
- You can subclass an existing morph class and redefine key methods, like initialize and drawOn:.
- You can control how a morph reacts to mouse and keyboard events by redefining the methods handlesMouseDown:, handlesMouseOver:, etc.
- You can animate a morph by defining the methods step (what to do) and stepTime (the number of milliseconds between steps). DieMorph»drawOn: aCanvas
- theCanvas | theCanvas := aCanvas asAlphaBlendingCanvas: 0.5. super drawOn: theCanvas. (self perform: (‘face’ , dieValue asString) asSymbol) do: [:aPoint | self drawDotOn: theCanvas at: aPoint]
- Various pre-defined morphs, like PopUpMenu and FillInTheBlank, are avail- able for interacting with users.