原文: Unit Testing Tutorial: Mocking Objects
Who needs unit tests? Not you — your code is perfect. Umm…so you’re just reading this tutorial for your “friend” who needs to learn more about writing unit tests in Swift, right? Right. :]
谁需要单元测试?不是你——你的代码是完美的。嗯…所以你只是阅读本教程对你的“朋友”谁需要了解更多关于迅速编写单元测试,对吗?当然是这样(绝对不是)。:]
Unit tests are a great way to write better code; tests help you find most of the bugs early on in the process, but more importantly, writing code in a test-based development mindset helps you write modular code that’s easy to maintain. As a rule of thumb: if your code isn’t easy to test, it’s not going to be easy to maintain or debug.
单元测试是一个伟大的方式编写更好的代码,测试帮助你在早期就能找到大多数bug,但更重要的是,在基于开发的心态能帮助你编写代码编写模块代码更易于维护。作为一个经验法则:如果你的代码不容易测试,那么同样不容易维护或调试。
Unit tests deal with isolated “micro features”. Often you need to mock classes — that is, provide fake yet functional implementations — to isolate a specific micro feature so it can be tested. In Objective-C there are several third-party frameworks that help with mocking and stubbing. But those rely on introspection, which isn’t yet available on Swift. Someday, hopefully! :]
单元测试处理孤立的“微(小)功能”。你经常需要模拟类——也就是说,提供假的但功能实现——隔离一个具体的微观特性,所以可以进行测试。在objective-c中有几个第三方框架,帮助模拟和桩。但那些依赖于内省,尚未在.swift。有一天,希望!:]
Mock
mock除了保证stub的功能之外,还可深入的模拟对象之间的交互方式,如:调用了几次、在某种情况下是否会抛出异常。
Stub
stub存在的意图是为了让测试对象可以正常的执行,其实现一般会硬编码一些输入和输出。
In this tutorial you’ll learn how to write your own mocks, fakes and stubs to test a simple app that helps you remember your friends birthdays.
在本教程中,您将了解如何编写自己的模拟,假货和桩来测试一个简单的应用程序,可以帮助你记住你的朋友的生日。
Getting Started
准备开始
Download the starter project here; this is a basic contacts app that can be hooked up to a web backend. You won’t work on the core app functionality; rather, you’ll write some tests for it to make sure it behaves as expected.
在这里下载启动项目,这是一个基本的接触可以连接到一个web应用程序的后端。你不会工作的核心应用程序功能;相反,你会为它编写一些测试以确保它的行为。
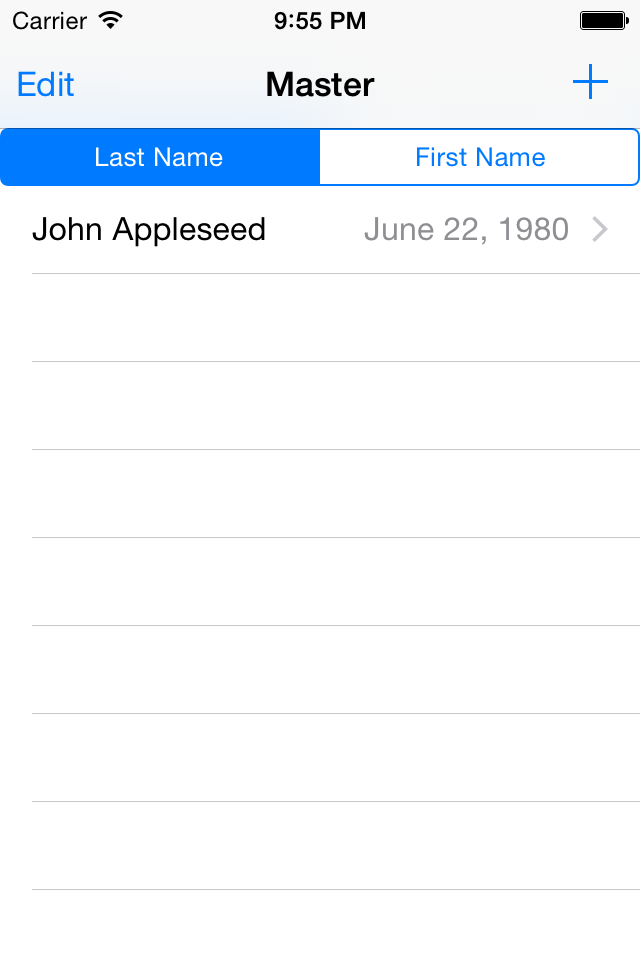
Build and run your app to see how it works. Tap the plus sign and add good ol’ John Appleseed to your list:
构建和运行您的应用程序看到它是如何工作的。点击加号和添加好ol’ John Appleseed 到你的列表:
The sample app uses Core Data to store your contacts.
示例应用程序使用 Core Data 存储你的联系人。
Don’t panic! :] You don’t need any experience with Core Data for this tutorial; there’s no rocket science involved.
别慌!:你不需要任何经验与本教程的核心数据;没有涉及火箭科学(应该是没有像研究造火箭那么困难吧)。
Note: If you do want to become a Core Data master, you can get started by reading this Core Data: Getting Started tutorial.
注意:如果你想成为一个熟练掌握 Core Data 的人,你可以开始通过阅读这个Core Data:入门教程。
Advantages and Disadvantages of Unit Tests 单元测试的优缺点
When it comes to testing, there’s good news, and bad news. The bad news is that there can be disadvantages to unit tests, like the following:
测试时,有好消息,也有坏消息。坏消息是单元测试有如下缺点:
- More code: In projects with high test coverage it’s possible to have more test code than functional code.
- 更多的代码:在项目使用覆盖率高的测试会编写比功能代码要多的测试代码。
- More to maintain: When there is more code, there is more to maintain.
- 更多的维护:当有更多的代码也要更多的维护。
- No silver bullet: Unit tests don’t (and can’t) ensure that your code is free of bugs.
- 没有银弹:单元测试不会(也不能)确保您的代码是没有缺陷的。
- Takes longer: Writing tests takes time — time you could spend learning new exciting stuff on raywenderlich.com!
- 需要更长的时间:编写测试需要时间——你可以花时间学习新的令人兴奋的东西在raywenderlich.com上!
Although there is no silver bullet, there is a silver lining — testing has the following advantages:
虽然没有银弹,但有一线希望——测试具有以下优点:
- Confidence: You can demonstrate that your code works.
- 信心:你可以证明你的代码能够工作。
- Quick feedback: You can use unit tests to quickly validate code that is buried many layers deep in your app navigation — things that are cumbersome to test manually.
- 快速反馈:您可以使用单元测试快速验证多层深埋在你的应用程序的代码导航——事情繁琐的手动测试。
- Modularity: Unit tests help keep you focused on writing more modular code.
- 模块化:单元测试帮助你保持专注于编写更模块化的代码。
- Focus: Writing tests for micro features keep you focused on the small details.
- 专注:编写测试微特性让你只关注小细节。
- Regression: Be sure that the bugs you fixed stay fixed — and aren’t broken by subsequent fixes.
- 回归:确保你固定保持固定的缺陷,不打破的后续补丁。
- Refactoring: Until Xcode gets smart enough to refactor your code on its own, you’ll need unit tests to validate your refactoring.
- 重构:直到Xcode变得足够聪明能无错误的重构你的代码,否则你还是需要单元测试来验证你的重构。
- Documentation: Unit tests describe what you think the code should do; they serve as another way to document your code.
- 单元测试文档:描述你认为的代码应该做什么;他们作为另一种方式来记录您的代码。
The Basic App Structure
基本的应用程序结构
A lot of the code in the sample app is based on the Master-Detail Application template with Core Data enabled. But there are some significant improvements over the template code. Open the sample project in Xcode and have a look at the project navigator:
大量的示例应用程序中的代码是基于主从复合结构应用程序启用了核心数据的模板。但也有一些重大改进的模板代码。在Xcode中打开示例项目,看看项目导航器:
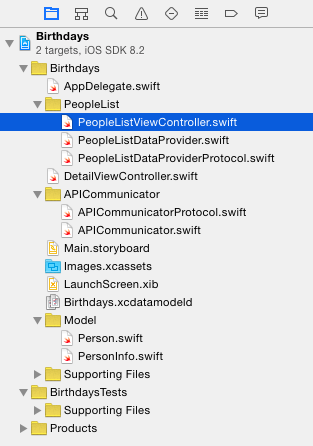
Take note of the following details:
注意以下细节:
There is a Person.swift and a PersonInfo.swift file. The Person class is an NSManagedObject that contains some basic information about each person. The PersonInfo struct contains the same information but can instanced from the address book.
这里有一个 Person.swift 和 PersonInfo.swift 的文件。Person类是一个NSManagedObject,包含关于每个人的一些基本信息。PersonInfo结构包含相同的信息,但可以从地址簿得到实例。
The folder PeopleList has three files: A view controller, a data provider and a data provider protocol.
文件夹PeopleList有三个文件:一个视图控制器,数据提供者和数据供应商协议。
The file collection in PeopleList is an attempt to avoid massive view controllers. It’s good practice to avoid massive view controllers by moving some responsibilities into other classes that communicate with the view controllers via a simple protocol. You can learn more about massive view controllers and how to avoid them by reading this interesting albeit older article.
文件收集PeopleList试图避免大规模视图控制器。这是好的做法,以避免大规模视图控制器通过移动一些责任到其他类与视图控制器通过一个简单的通信协议。您可以了解更多关于大规模视图控制器和如何避免它们通过阅读这个有趣但过时的文章。
In this case, the protocol is defined in PeopleListDataProviderProtocol.swift; open it and have a look. A class conforming to this protocol must have the properties managedObjectContext and tableView and must define the methods addPerson(_:) and fetch(). In addition, it must conform to the UITableViewDataSource protocol.
在这种情况下,协议是PeopleListDataProviderProtocol.swift中定义。打开它看看。类符合该协议必须属性managedObjectContext tableView和方法必须定义addPerson(_:)和fetch()。此外,它必须符合需要的协议。
The view controller PeopleListViewController has a property dataProvider, which conforms to PeopleListDataProviderProtocol. This property is set to an instance of PeopleListDataProvider in AppDelegate.swift.
视图控制器PeopleListViewController 包含一个 dataProvider属性,符合PeopleListDataProviderProtocol。这个属性设置为在AppDelegate.swift 中的一个PeopleListDataProvider的实例。
You add people to the list using ABPeoplePickerNavigationController. This class lets you, the developer, access the user’s contacts without requiring explicit permission.
你使用ABPeoplePickerNavigationController添加人到列表。开发人员,这个类允许您访问用户的联系人而不需要明确的许可。
PeopleListDataProvider is responsible for filling the table view and for talking to the Core Data persistent store.
PeopleListDataProvider负责填充表视图和与核心数据持久存储。
Note: Several classes and methods in the starter project are declared as public; this is so the test target can access those classes and methods. The test target is outside of the app module. If you don’t add any access modifier the classes and methods are defined as internal. This means they are only accessible within the same module. To access them from outside the module (for example from the test target) you need to add the public access modifier.
注意:起动器的几个类和方法声明为公共项目;这是所以测试目标可以访问这些类和方法。测试目标之外的应用程序模块。如果你不添加任何访问修饰符的类和方法被定义为内部。这意味着他们只能在同一个模块中进行访问。从外部访问它们模块(例如从测试目标)您需要添加公共访问修饰符。
That’s enough overview — time to start writing some tests!
概述了解够了——开始编写一些测试!
Writing Mocks
编写模拟
Mocks let you check if a method call is performed or if a property is set when something happens in your app. For example, in viewDidLoad() of PeopleListViewController, the table view is set to the tableView property of the dataProvider.
模拟让你检查是否执行方法调用或者属性设置当事情发生在你的应用程序。例如,在PeopleListViewController()中的viewDidLoad方法里,表视图设置为tableView的数据提供 dataProvider属性。
You’ll write a test to check that this actually happens.
您将编写一个测试来检查,这到底会不会发生。
Preparing Your App for Testing
准备你的应用程序进行测试
First, you need to prepare the project to make testing possible.
首先,你需要准备项目使测试成为可能。
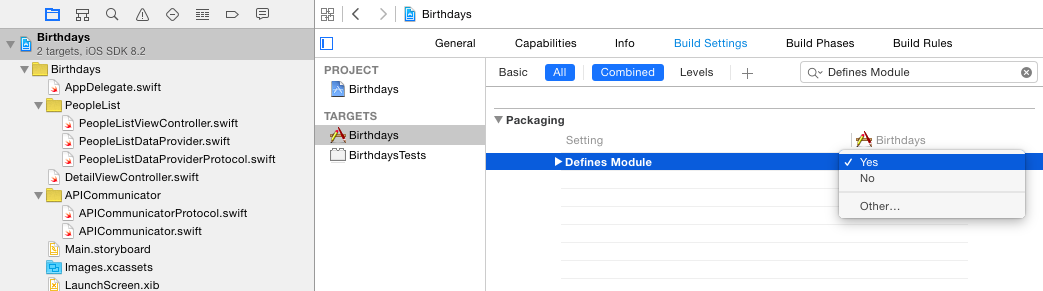
Select the project in the project navigator, then select Build Settings in the Birthdays target. Search for Defines Module, and change the setting to Yes as shown below:
选择项目在项目导航器,然后选择在生日的目标建立设置。搜索定义模块,改变设置为Yes,如下所示:
Next, select the BirthdaysTests folder and go to File\New\File…. Select a iOS\Source\Test Case Classtemplate, click Next, name it PeopleListViewControllerTests, ensure you’re creating a Swift file, click Next, then finally click Create.
接下来,选择BirthdaysTests文件夹, 文件\新建\新文件…。选择一个iOS\源码\测试用例Classtemplate,单击Next,名字改为PeopleListViewControllerTests,确保你创建一个.swift文件,单击Next,然后单击Create。
If Xcode prompts you to create a bridging header, select No. This is a bug in Xcode that occurs when there is no file in the target and you add a Swift file.
如果Xcode提示您创建一个连接头,选择No。这是一个Bug。在Xcode,发生在没有文件在目标和你swift 添加一个文件。
Open the newly created PeopleListViewControllerTests.swift. Import the module you just enabled by adding the import Birthdays statement right after the other import statements as shown below:
打开新创建的PeopleListViewControllerTests.swift。您刚启用导入模块通过添加导入生日声明之后其他导入语句如下所示:
import UIKit
import XCTest
import Birthdays
Remove the following two template test methods:
删除以下两个模板测试方法:
func testExample() {
    // This is an example of a functional test case.
    XCTAssert(true, "Pass")
}

func testPerformanceExample() {
    // This is an example of a performance test case.
    self.measureBlock() {
        // Put the code you want to measure the time of here.
    }
}
You now need an instance of PeopleListViewController so you can use it in your tests.
你现在需要一个实例PeopleListViewController才可以使用它在你的测试。
Add the following line to the beginning of PeopleListViewControllerTests:
添加以下行PeopleListViewControllerTests的开始:
var viewController: PeopleListViewController!Replace the setUp() method with the following code:
用以下代码替换setUp()方法:
override func setUp() {
    super.setUp()

    viewController = UIStoryboard(name: "Main", bundle: nil).instantiateViewControllerWithIdentifier("PeopleListViewController") as! PeopleListViewController
}
This uses the main storyboard to create an instance of PeopleListViewController and assigns it to viewController.
它使用的主要故事板创建viewController PeopleListViewController并赋予它的一个实例。
Select Product\Test; Xcode builds the project and runs any existing tests. Although you don’t have any tests yet, this is a good way to ensure everything is set up correctly. After a few seconds, Xcode should report that all tests succeeded.
选择产品\测试;Xcode项目构建和运行任何现有的测试。虽然你还没有任何测试,这是一个很好的方式,以确保一切都正确设置。几秒钟后,Xcode应该报告,所有测试成功了。
You’re now ready to create your first mock.
你现在准备好创建您的第一个模拟。
Writing Your First Mock
编写你的第一个模拟
Since you’re going to be working with Core Data, add the following import to the top of PeopleListViewControllerTests.swift, right below import Birthdays:
因为你将要使用核心数据,添加以下入口在PeopleListViewControllerTests.swift 的顶部。
import CoreDataNext, add the following code within the class definition of PeopleListViewControllerTests:
接下来,添加下面的代码在PeopleListViewControllerTests的类定义:
class MockDataProvider: NSObject, PeopleListDataProviderProtocol {
    var managedObjectContext: NSManagedObjectContext?
    weak var tableView: UITableView!

    func addPerson(personInfo: PersonInfo) {  }
        func fetch() {  }
        func tableView(tableView: UITableView, numberOfRowsInSection section: Int) -> Int { return 1  }
        func tableView(tableView: UITableView, cellForRowAtIndexPath indexPath: NSIndexPath) -> UITableViewCell {
            return UITableViewCell()
        }
}
This looks like a quite complicated mock class. However, this is just the bare minimum required, as you’re going to set an instance of this mock class to the dataProvider property of PeopleListViewController. Your mock class also has to conform to the PeopleListDataProviderProtocol as well as the UITableViewDataSource protocol.
这看起来像一个相当复杂的模拟类。然而,这仅仅是所需的最低限度,当你去设置这个模拟类的一个实例PeopleListViewController的dataProvider属性。模拟类还必须符合PeopleListDataProviderProtocol以及需要显示协议。
Select Product\Test; your project will compile again and your zero tests will run with zero failures. Sorry — that doesn’t count at a 100% pass rate. :] But now you have everything set up for the first unit test using a mock.
选择产品\测试;要再次编译您的项目和你零测试将运行零故障。对不起,那不算通过率为100%。:]但现在你一切设置第一单元测试使用模拟。
It’s good practice to separate the unit tests in three parts called given, when and then. ‘Given’, sets up the environment; ‘when’ executes the code you want to test; and ‘then’ checks for the expected result.
是个好习惯独立的单元测试在三个部分,然后。“给予”,设置环境;“当”执行您想要测试的代码,为预期的结果和随后的检查。
Your test will check that the tableView property of the data provider is set after viewDidLoad() has been executed.
您的测试将检查数据提供者的tableView属性设置后viewDidLoad()被执行。
Add the following test to PeopleListViewControllerTests:
PeopleListViewControllerTests添加以下测试:
func testDataProviderHasTableViewPropertySetAfterLoading() {
    // given
    // 1
    let mockDataProvider = MockDataProvider()

    viewController.dataProvider = mockDataProvider

    // when
    // 2
    XCTAssertNil(mockDataProvider.tableView, "Before loading the table view should be nil")

    // 3
    let _ = viewController.view

    // then
    // 4
    XCTAssertTrue(mockDataProvider.tableView != nil, "The table view should be set")
    XCTAssert(mockDataProvider.tableView === viewController.tableView,
    "The table view should be set to the table view of the data source")
}
Here is what the above test is doing:
这是上面的测试在做什么:
Creates an instance of MockDataProvider and sets it to the dataProvider property of the view controller.
MockDataProvider创建一个实例,并设置它的dataProvider属性视图控制器。
Asserts that the tableView property is nil before the test.
断言tableView财产零前测试。
Accesses the view to trigger viewDidLoad().
访问视图来触发viewDidLoad()。
Asserts that the test class’ tableView property is not nil and that it is set to the tableView of the view controller.
断言测试类的tableView属性不为空,它是tableView视图控制器。
Select Product\Test again; once the tests have finished, open the test navigator (Cmd+5 is a handy shortcut). You should see something like the following:
选择产品\再次测试,一旦测试完成后,打开Test navigator(Cmd + 5是一个方便的快捷方式)。您应当会看到类似如下:
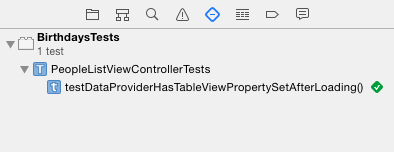
Your first test with a mock passed with flying colors! :]
你的第一个测试模拟以优异的成绩通过了!:]
Testing addPerson(_:)
测试addPerson(_:)
The next test is to ensure selecting a contact from the list calls addPerson(_:) of the data provider.
下一个测试是为了确保从列表中选择一个联系人电话addPerson(_:)的数据提供者。
Add the following property to the MockDataProvider class:
MockDataProvider类添加以下属性:
var addPersonGotCalled = falseNext, change addPerson(_:) to the following:
接下来,改变addPerson(_:)如下:
func addPerson(personInfo: PersonInfo) { addPersonGotCalled = true }Now when you call addPerson(_:), you’ll register this in an instance of MockDataProvider by setting addPersonGotCalled to true.
现在当你调用addPerson(_:),您将在一个实例注册这个addPersonGotCalled MockDataProvider的设置为true。
You’ll have to import the AddressBookUI framework before you can add a method to test this behavior.
你必须导入AddressBookUI框架之前,您可以添加一个方法来测试这种行为。
Add the following import right below the other imports in PeopleListViewControllerTests.swift:
添加以下导入正确的其他进口PeopleListViewControllerTests.swift以下:
import AddressBookUINow add the following test method with the rest of the test cases:
现在添加以下测试方法与测试用例:
func testCallsAddPersonOfThePeopleDataSourceAfterAddingAPersion() {
    // given
    let mockDataSource = MockDataProvider()

    // 1
    viewController.dataProvider = mockDataSource

    // when
    // 2
    let record: ABRecord = ABPersonCreate().takeRetainedValue()
    ABRecordSetValue(record, kABPersonFirstNameProperty, "TestFirstname", nil)
    ABRecordSetValue(record, kABPersonLastNameProperty, "TestLastname", nil)
    ABRecordSetValue(record, kABPersonBirthdayProperty, NSDate(), nil)

    // 3
    viewController.peoplePickerNavigationController(ABPeoplePickerNavigationController(),
    didSelectPerson: record)

    // then
    // 4
    XCTAssert(mockDataSource.addPersonGotCalled, "addPerson should have been called")
}
So what’s going on here?
这里发生了什么?
First you set the data provider of the view controller to an instance of your mock data provider.
首先设置数据提供者视图控制器的模拟数据提供者的一个实例。
Then you create a contact by using ABPersonCreate().
然后您创建一个接触通过ABPersonCreate()。
Here you manually call the delegate method peoplePickerNavigationController(_:didSelectPerson:). Normally, calling delegate methods manually is a code smell, but it’s fine for testing purposes.
在这里你手动调用委托方法peoplePickerNavigationController(_:didSelectPerson:)。正常情况下,手动调用委托方法代码味道,但它很好用于测试目的。
Finally you assert that addPerson(_:) was called by checking that addPersonGotCalled of the data provider mock is true.
最后你断言addPerson(_:)被称为通过检查addPersonGotCalled数据提供者的模拟是正确的。
Select Product\Test to run the tests — they should all pass. Hey, this testing thing is pretty easy!
选择产品\测试运行测试,他们都应该通过。嗨,这个测试是非常容易!
But wait! How do you know that the tests actually test what you think they’re testing?
但是等等!你怎么知道测试实际测试你认为他们正在测试什么?

Testing Your Tests 测试您的测试
A quick way to check that a test is actually validating something is to remove the entity that the test validates.
一个快速的方法来检查一个测试是验证是删除实体的东西,测试验证。
Open PeopleListViewController.swift and comment out the following line
打开PeopleListViewController.swift并注释掉以下行
in peoplePickerNavigationController(_:didSelectPerson:):
dataProvider?.addPerson(person)Run the tests again; the last test you wrote should now fail. Cool — you now know that your test is actually testing something. It’s good practice to test your tests; at the very least you should test your most complicated tests to be sure they
再次运行测试,最后测试你写现在应该失败。很酷,你现在知道你的测试实际上是测试的东西。良好的实践测试测试,至少你应该测试你最复杂的测试,以确保他们的工作。
Un-comment the line to get the code back to a working state; run the tests again to make sure everything is working.
取消一行的注释的代码恢复到工作状态,再次运行测试,确保一切工作。
Mocking Apple Framework Classes
模拟苹果框架类
You may have used singletons such as NSNotificationCenter.defaultCenter() and NSUserDefaults.standardUserDefaults() — but how would you test that a notification is actually sent or that a default is set? Apple doesn’t allow you to inspect the state of these classes.
你可以使用单例如NSNotificationCenter.defaultCenter()和NSUserDefaults.standardUserDefaults(),但是你怎么测试,实际发送或通知默认设置吗?苹果不允许你检查这些类的状态。
You could add the test class as an observer for the expected notifications. But this might cause your tests to become slow and unreliable since they depend on the implementation of those classes. Or the notification could be sent from another part of your code, and you wouldn’t be testing an isolated behavior.
您可以添加的测试类作为观察员预计通知。但这可能导致您的测试变得缓慢和不可靠的,因为他们依赖于这些类的实现。或通知可以发送另一个代码的一部分,和你不会测试一个孤立的行为。
To get around these limitations, you can use mocks in place of these singletons.
为了解决这些限制,您可以使用模拟的单例。
Note: When you replace Apple’s classes with mocks, it’s very important to only test the interaction with that class, not the behavior of that class, as implementation details could change at any point.
注意:当你用模拟取代苹果的类,这是非常重要的只有测试交互的类,类的行为,实现细节可以改变在任何时候。
Build and run your app; add John Appleseed and David Taylor to the list of people and toggle the sorting between ‘Last Name’ and ‘First Name’. You’ll see that the order of the contacts in the list depends on the sort order of the table view.
构建和运行应用程序;约翰苹果子和大卫泰勒添加到列表的人之间切换排序“姓氏”和“名字”。你会发现联系人列表的顺序取决于表视图的排序顺序。
The code that’s responsible for sorting lives in changeSort() in PeopleListViewController.swift:
代码负责排序住在changeSort PeopleListViewController.swift():
@IBAction func changeSorting(sender: UISegmentedControl) {
userDefaults.setInteger(sender.selectedSegmentIndex, forKey: "sort")
dataProvider?.fetch()
}
This adds the selected segment index for the key sort to the user defaults and calls fetch() on the data provider. fetch() should read this new sort order from the user defaults and update the contact list, as demonstrated in PeopleListDataProvider:
这种添加选中的部分指数关键用户默认值并调用获取数据提供者()。fetch()应该阅读这个新的排序顺序从用户违约和更新联系人列表,在PeopleListDataProvider:
public func fetch() {
    let sortKey = NSUserDefaults.standardUserDefaults().integerForKey("sort") == 0 ? "lastName" : "firstName"

    let sortDescriptor = NSSortDescriptor(key: sortKey, ascending: true)
    let sortDescriptors = [sortDescriptor]

    fetchedResultsController.fetchRequest.sortDescriptors = sortDescriptors
    var error: NSError? = nil
    if !fetchedResultsController.performFetch(&error) {
        println("error: \(error)")
    }
    tableView.reloadData()
}
PeopleListDataProvider uses an NSFetchedResultsController to fetch data from the Core Data persistent store. To change the sorting of the list, fetch() creates an array with sort descriptors and sets it to the fetch request of the fetched results controller. Then it performs a fetch to update the list and call reloadData() on the table view.
PeopleListDataProvider使用NSFetchedResultsController获取核心数据持久存储的数据。改变列表的排序,取()创建了一个数组类型描述符和获取结果集的获取请求的控制器。然后执行获取更新列表和电话reloadData()在表视图。
You’ll now add a test to ensure the user’s preferred sort order is correctly set in NSUserDefaults.
现在,您将添加一个测试,以确保用户的首选NSUserDefaults排序顺序是正确的组。
Open PeopleListViewControllerTests.swift and add the following class definition right below the class definition of MockDataProvider:
PeopleListViewControllerTests开放。.swift和添加以下类定义正确的低于MockDataProvider的类定义:
class MockUserDefaults: NSUserDefaults {
    var sortWasChanged = false
    override func setInteger(value: Int, forKey defaultName: String) {
        if defaultName == "sort" {
            sortWasChanged = true
        }
    }
}
MockUserDefaults is a subclass of NSUserDefaults; it has a boolean property sortWasChanged with a default value of false. It also overrides the method setInteger(_:forKey:) that changes the value of sortWasChanged to true.
MockUserDefaults NSUserDefaults的子类,它有一个布尔属性sortWasChanged默认值为false。还覆盖方法setInteger(_:forKey:),改变sortWasChanged的值为true。
Add the following test below the last test in your test class:
下面添加以下测试最后测试在测试类:
func testSortingCanBeChanged() {
    // given
    // 1
    let mockUserDefaults = MockUserDefaults(suiteName: "testing")!
    viewController.userDefaults = mockUserDefaults

    // when
    // 2
    let segmentedControl = UISegmentedControl()
    segmentedControl.selectedSegmentIndex = 0
    segmentedControl.addTarget(viewController, action: "changeSorting:", forControlEvents: .ValueChanged)
    segmentedControl.sendActionsForControlEvents(.ValueChanged)

    // then
    // 3
    XCTAssertTrue(mockUserDefaults.sortWasChanged, "Sort value in user defaults should be altered")
}
Here’s the play-by-play of this test:
这个测试的比赛详情如下:
You first assign an instance of MockUserDefaults to userDefaults of the view controller; this technique is known as dependency injection).
你第一次分配的实例MockUserDefaults userDefaults视图控制器;这种技术被称为依赖注入)。
You then create an instance of UISegmentedControl, add the view controller as the target for the .ValueChanged control event and send the event.
然后UISegmentedControl创建一个实例,添加的视图控制器作为目标。ValueChanged控制事件和发送事件。
Finally, you assert that setInteger(_:forKey:) of the mock user defaults was called. Note that you don’t check if the value was actually stored in NSUserDefaults, since that’s an implementation detail.
最后,你断言setInteger(_:forKey)被称为模拟用户的默认值。注意,你不检查如果值实际上是存储在NSUserDefaults,因为这是一个实现细节。
Run your suite of tests — they should all succeed.
运行您的测试套件,他们都应该成功。
What about the case when you have a really complicated API or framework underneath your app, but all you really want to do is test a small feature without delving deep into the framework?
这种情况下,当你有一个非常复杂的API或框架下应用程序,但你真正想做的是测试一个小功能,没有深入深入框架?
That’s when you “fake” it ’till you make it! :]
你可以先“伪造”它,直到你让实现它!:]
Writing Fakes
伪造
Fakes behave like a full implementation of the classes they are faking. You use them as stand-ins for classes or structures that are too complicated to deal with for the purposes of your test.
假货的像一个完整的实现类那是假的。您使用它们作为替身类或结构太复杂,处理您的测试的目的。
In the case of the sample app, you don’t want to add records to and fetch them from the real Core Data persistent store in your tests. So instead, you’ll fake the Core Data persistent store.
在示例应用程序的情况下,你不想添加记录,获取他们的真正核心数据持久存储在你的测试。所以,你假的核心数据持久存储。
Select the BirthdaysTests folder and go to File\New\File…. Choose an iOS\Source\Test Case Class template and click Next. Name your class it PeopleListDataProviderTests, click Next and then Create.
选择BirthdaysTests文件夹和文件\ \新文件…。选择一个iOS源\ \测试用例类模板,然后单击Next。你的类名PeopleListDataProviderTests,单击Next,然后创建。
Again remove the following demo tests in the created test class:
演示测试后再删除创建的测试类:
func testExample() {
    // ...
}

func testPerformanceExample() {
    // ...
}
Add the following two imports to your class:
添加以下两个进口类:
import Birthdays
import CoreData
Now add the following properties:
现在添加以下属性:
var storeCoordinator: NSPersistentStoreCoordinator!
var managedObjectContext: NSManagedObjectContext!
var managedObjectModel: NSManagedObjectModel!
var store: NSPersistentStore!

var dataProvider: PeopleListDataProvider!
Those properties contain the major components that are used in the Core Data stack. To get started with Core Data, check out our tutorial, Core Data Tutorial: Getting Started
这些属性包含的主要组件中使用核心数据堆栈。开始使用核心数据,看看我们的教程,教程:核心数据开始
Add the following code to setUp():
添加以下代码来设置():
// 1
managedObjectModel = NSManagedObjectModel.mergedModelFromBundles(nil)
storeCoordinator = NSPersistentStoreCoordinator(managedObjectModel: managedObjectModel)
store = storeCoordinator.addPersistentStoreWithType(NSInMemoryStoreType,
configuration: nil, URL: nil, options: nil, error: nil)

managedObjectContext = NSManagedObjectContext()
managedObjectContext.persistentStoreCoordinator = storeCoordinator

// 2
dataProvider = PeopleListDataProvider()
dataProvider.managedObjectContext = managedObjectContext
Here’s what’s going on in the code above:
这是发生了什么在上面的代码:
setUp() creates a managed object context with an in-memory store. Normally the persistent store of Core Data is a file in the file system of the device. For these tests, you are creating a ‘persistent’ store in the memory of the device.
setUp()创建一个管理对象上下文与内存中的存储。通常核心数据的持久化存储设备的文件系统中的一个文件。对于这些测试,您创建一个“持续”存储在内存的设备。
Then you create an instance of PeopleListDataProvider and the managed object context with the in-memory store is set as its managedObjectContext. This means your new data provider will work like the real one, but without adding or removing objects to the persistent store of the app.
然后你创建一个实例PeopleListDataProvider和管理对象上下文内存中的存储设置managedObjectContext。这意味着你的新数据提供者将像真正的工作,但没有添加或删除对象的持久性存储应用程序。
Add the following two properties to PeopleListDataProviderTests:
PeopleListDataProviderTests添加以下两个属性:
var tableView: UITableView!
var testRecord: PersonInfo!
Now add the following code to the end of setUp():
现在添加以下代码的设置():
let viewController = UIStoryboard(name: "Main", bundle: nil).instantiateViewControllerWithIdentifier("PeopleListViewController") as! PeopleListViewController
viewController.dataProvider = dataProvider

tableView = viewController.tableView

testRecord = PersonInfo(firstName: "TestFirstName", lastName: "TestLastName", birthday: NSDate())
This sets up the table view by instantiating the view controller from the storyboard and creates an instance of PersonInfo that will be used in the tests.
这个设置表视图的实例化视图控制器PersonInfo的故事板和创建一个实例,将用于测试。
When the test is done, you’ll need to discard the managed object context.
当测试完成后,你需要丢弃管理对象上下文。
Replace tearDown() with the following code:
用以下代码替换tearDown():
override func tearDown() {
    managedObjectContext = nil

    var error: NSError? = nil
    XCTAssert(storeCoordinator.removePersistentStore(store, error: &error),
    "couldn't remove persistent store: \(error)")

    super.tearDown()
}
This code sets the managedObjectContext to nil to free up memory and removes the persistent store from the store coordinator. This is just basic housekeeping. You want to start each test with a fresh test store.
这段代码集managedObjectContext零释放内存的持久性存储和删除存储协调员。这只是基本的家务。你想开始用新的测试存储每个测试。
Now — you can write the actual test! Add the following test to your test class:
现在,你可以写实际的测试!以下测试添加到您的测试类:
func testThatStoreIsSetUp() {
    XCTAssertNotNil(store, "no persistent store")
}
This tests checks that the store is not nil. It’s a good idea to have this check here to fail early in case the store could not be set up.
这个测试检查store不为空。这里是一个好主意这张支票早失败,以防store不能成立。
Run your tests — everything should pass.
运行您的测试,一切都应该通过。
The next test will check whether the data source provides the expected number of rows.
下一个测试将检查是否数据源提供了预期的行数。
Add the following test to the test class:
以下测试添加到测试类:
func testOnePersonInThePersistantStoreResultsInOneRow() {
    dataProvider.addPerson(testRecord)

    XCTAssertEqual(tableView.dataSource!.tableView(tableView, numberOfRowsInSection: 0), 1, "After adding one person number of rows is not 1")
}
First, you add a contact to the test store, then you assert that the number of rows is equal to 1.
首先,你将联系人添加到测试store,然后你断言的行数等于1。
Run the tests — they should all succeed.
运行测试,他们都应该成功。
By creating a fake “persistent” store that never writes to disk, you can keep your tests fast and your disk clean, while maintaining the confidence that when you actually run your app, everything will work as expected.
通过创建一个假的“持久性”store,没有写入磁盘,你可以保持你的测试速度和磁盘清洁,同时保持信心,当你实际运行应用程序,一切都会正常工作。
In a real test suite you could also test the number of sections and rows after adding two or more test contacts; this all depends on the level of confidence you’re attempting to reach in your project.
在实际测试套件还可以测试部分的数量和行添加两个或两个以上的测试接触之后,这一切都取决于水平的信心你试图达到您的项目。
If you’ve ever worked with several teams at once on a project, you know that not all parts of the project are ready at the same time — but you still need to test your code. But how can you test a part of your code against something that may not exist, such as a web service or other back-end provider?
如果你曾经使用过几个团队项目,你知道,并不是所有地区的项目准备好了在同一时间,但你仍然需要测试你的代码。但你怎么能测试你的代码的一部分对可能不存在的东西,比如web服务或其他后端提供者?
Stubs to the rescue! :]
桩救援!:]
Writing Stubs
编写桩
Stubs fake a response to method calls of an object. You’ll use stubs to test your code against a web service that isn’t yet finished.
桩假响应对象的方法调用。您将使用桩来测试您的代码与一个web服务,它还没有完成。
The web team for your project has been tasked with building a website with the same functionality of the app. The user creates an account on the website and can then synchronize the data between the app and the website. But the web team hasn’t even started – and you’re nearly done. Looks like you’ll have to write a stub to stand-in for the web backend.
web团队为您的项目一直肩负着建设一个网站相同的功能的应用程序。用户在网站上创建一个帐户,然后应用程序和网站之间的数据同步。但网络团队甚至还没有开始,你差不多了。看来你得写一个桩替身web端。
In this section you will focus on two test methods: one for fetching contacts added to the website, and one to post contacts from your app to the website. In a real-world scenario you’d also need some kind of login mechanism and error handling, but that’s beyond the scope of this tutorial.
在本节中,您将重点关注两个测试方法:一个用于获取联系人添加到网站,和一个,联系人从应用程序发布到网站上去。在真实的场景中你也需要某种类型的登录和错误处理机制,但这超出了本教程的范围。
Open APICommunicatorProtocol.swift; this protocol declares the two methods for getting contacts from the web service and for posting contacts to the web service.
APICommunicatorProtocol开放。.swift;这协议声明了两个方法从web服务获取联系和接触到web服务。
You could pass around Person instances, but this would require you to use another managed object context. Using a struct is simpler in this case.
你可以通过在Person实例,但这需要你使用另一个管理对象上下文。在这种情况下使用一个结构比较简单。
Now open APICommunicator.swift. APICommunicator conforms to APICommunicatorProtocol, but right now there’s just enough implementation to keep the compiler happy.
现在APICommunicator.swift开放。APICommunicator符合APICommunicatorProtocol,但是现在只是有足够让编译器实现幸福。
You’ll now create stubs to support the interaction of the view controller with an instance of APICommunicator.
现在您将创建桩支持交互视图控制器的APICommunicator的实例。
Open PeopleListViewControllerTests.swift and add the following class definition within the PeopleListViewControllerTests class:
PeopleListViewControllerTests开放。.swift和添加以下PeopleListViewControllerTests类中的类定义:
// 1
class MockAPICommunicator: APICommunicatorProtocol {
    var allPersonInfo = [PersonInfo]()
    var postPersonGotCalled = false

    // 2
    func getPeople() -> (NSError?, [PersonInfo]?) {
        return (nil, allPersonInfo)
    }

    // 3
    func postPerson(personInfo: PersonInfo) -> NSError? {
        postPersonGotCalled = true
        return nil
    }
}
There are few things to note here:
这里有几点需要注意:
Even though APICommunicator is a struct, the mock implementation is a class. It’s more convenient to use a class in this case because your tests require you to mutate data. This is a little easier to do in a class than in a struct.
尽管APICommunicator结构,模拟实现一个类。它更方便地使用类在这种情况下,因为您的测试需要变异的数据。这是一个小更容易在一个类结构。
getPeople() returns what is stored in allPersonInfo. Instead of going out on the web and having to download or parse data, you just store contact information in a simple array.
getPeople()返回存储在allPersonInfo什么。在网络上,而不是出去,必须下载或解析数据,你只联系信息存储在一个简单的数组。
postPerson(_:) sets postPersonGotCalled to true.
postPerson(_)集postPersonGotCalled为true。
You’ve just created your “web API” in under 20 lines of code! :]
你刚刚创建的web API在20行代码!:]
Now it’s time to test your stub API by ensuring all contacts that come back from the API are added to the persistent store on the device when you call addPerson().
现在是时候测试你的桩API通过确保所有联系人回来从API添加到持久存储在设备上,当你调用addPerson()。
Add the following test method to PeopleListViewControllerTests:
添加以下PeopleListViewControllerTests测试方法:
func testFetchingPeopleFromAPICallsAddPeople() {
    // given
    // 1
    let mockDataProvider = MockDataProvider()
    viewController.dataProvider = mockDataProvider

    // 2
    let mockCommunicator = MockAPICommunicator()
    mockCommunicator.allPersonInfo = [PersonInfo(firstName: "firstname", lastName: "lastname",
    birthday: NSDate())]
    viewController.communicator = mockCommunicator

    // when
    viewController.fetchPeopleFromAPI()

    // then
    // 3
    XCTAssert(mockDataProvider.addPersonGotCalled, "addPerson should have been called")
}
Here’s what going on in the above code:
以下是在上面的代码:
First you set up the mock objects mockDataProvider and mockCommunicator you’ll use in the test.
首先建立了模拟对象mockDataProvider mockCommunicator你将使用在测试。
Then you set up some fake contacts and call fetchPeopleFromAPI() to make a fake network call.
然后你设置一些假的接触和调用fetchPeopleFromAPI()做一个假的网络电话。
Finally you test that addPerson(_:) was called.
最后测试,addPerson(_:)。
Build and run your tests — all should pass.
构建和运行您的测试,所有应通过。
Where to Go From Here? 接下来去哪?
Download the final project here; this version also includes some extra tests that didn’t make it into the tutorial.
下载最后的项目在这里,这个版本还包括一些额外的测试,没有进入教程。
You’ve learned how to write mocks, fakes and stubs to test micro features in your app, along with getting a sense how XCTest works in Swift.
您已经了解了如何编写模拟,假货和桩来测试微特性在您的应用程序,以及在迅速感觉XCTest是如何工作的。
The tests in this tutorial are only a starter; I’m sure you already have ideas for tests in your own projects.
本教程中的测试只是一个起动器;我相信你已经测试的想法在自己的项目中。
For more on unit testing, check out Test Driven Development (TDD) and Behavior Driven Development (BDD). Both are development methodologies (and, frankly, a whole new mindset) where you write the tests before you write the code.
更多关于单元测试、检查测试驱动开发(TDD)和行为驱动开发(BDD)。都是开发方法(坦率地说,一个全新的心态),您编写测试,然后再编写代码。
You can listen to tutorial team member Ellen Shapiro discuss unit testing in the official Ray Wenderlich podcast.
你可以听听教程团队成员艾伦·夏皮罗在官方讨论单元测试雷Wenderlich播客。
Unit Tests are only one part of a complete test suite; integration tests are the next logical step. An easy way to start working with integration tests is UIAutomation. It’s well worth the read if you’re serious about testing your apps — and you should be! :]
单元测试是唯一一个完整的测试套件的一部分,集成测试是下一个合乎逻辑的步骤。一个简单的方法来集成测试是UIAutomation开始工作。是值得的如果你真的了解测试你的应用程序,您应该!:]
If you have any comments or questions about this tutorial, feel free to join the discussion in the forum below!
如果你有任何意见或疑问本教程,请加入下面的讨论论坛!