Improving the user experience 改善用户体验
There are a few small features I’d like to add, just to polish the app a little more. After all, you’re building a real app here – if you want to make top-notch apps, you have to pay attention to those details.
我想添加一些小功能以让我们的应用更加完美。毕竟,你正在构建一个真正的应用程序——如果你想做一流的应用程序,你必须注意这些细节。
Showing the number of to-do items remaining 显示剩下待办事项的数量
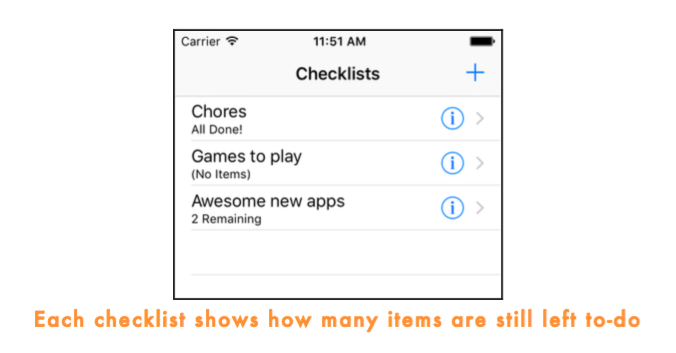
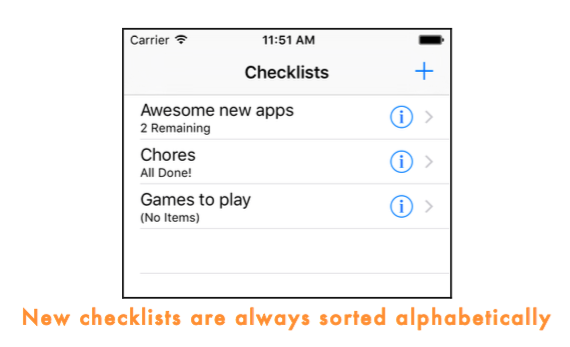
In the main screen, for each checklist the app will show the number of to-do items that do not have checkmarks yet:
在主屏幕上,为应用程序上每一个清单将显示待办事项中没有检查标记(标记完成)的数量:
Add the following method to Checklist.swift:
func countUncheckedItems() -> Int {
    var count = 0
    for item in items where !item.checked {
        count += 1
    }

    return count
}
With this method you can ask any Checklist object how many of its ChecklistItem objects do not yet have their checkmark set. The method returns this count as an Int value.
用这种方法你可以问任何清单对象多少ChecklistItem对象还没有它们的选中标记集。这个算方法返回一个Int值。
You use a for in to loop through the ChecklistItem objects from the items array. If an item object has its checked property set to false, you increment the local variable count by 1.
你用一个循环遍历ChecklistItem条目数组对象。如果一个待办事项的 Checked(完成)属性设置为false,你本地变量数加1。
When the loop is over and you’ve looked at all the objects, you return the total value of the count to the caller.
当循环结束并且你也查看了所有的对象,你将返回总值给调用者。
Exercise: What would happen if you used let instead of var to make the count variable?
炼习: 如果使用 let 代替 var 去保存总数会怎么样?
Answer: When count is a constant, Swift won’t let you change its value, so the line that does += 1 gives an error message.
解答: 当 count 声明成一个 常量,Swift 将不允许更改值,所以 +1 那行会报错。
By the way, you could also have written the loop as follows:
顺便说一下,你也可以按如下方式实现循环:
for item in items {
    if !item.checked {
        count += 1
    }
}
This uses the more familiar if-statement instead. Personally, I like the brevity of the for in where loop, but using an if-statement is just as correct.
它使用更熟悉的 for语句。就我个人而言,我喜欢简洁 for-in-where 循环,当然使用 for语句 也是正确的。
Go to AllListsViewController.swift and change cellForTableView to:
func cellForTableView(tableView: UITableView) -> UITableViewCell {
let cellIdentifier = "Cell"
if let cell = tableView.dequeueReusableCellWithIdentifier(cellIdentifier) {
return cell
} else {
return UITableViewCell(style:
/* new */
.Subtitle
/* end */
, reuseIdentifier: cellIdentifier)
}
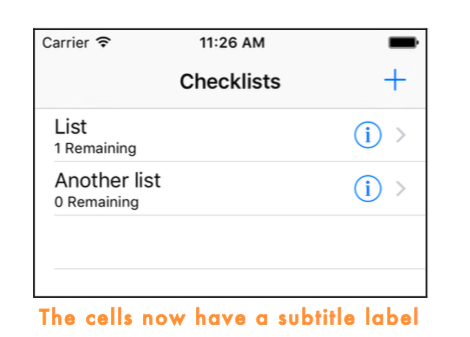
}Most of the code stays the same, except you now use .Subtitle for the cell style instead of .Default. The “subtitle” cell style adds a second, smaller label below the main label. You can use the cell’s detailTextLabel property to access this subtitle label.
大部分的代码保持不变,除了你现在使用.Subtitle(副标题)为Cell 样式,而不是.Default(默认)样式。“副标题” Cell 样式在第一行主标签下添加一行小标签。您可以使用 Cell 的 detailTextLabel 属性来访问这个副标题标签。
That happens in tableView(cellForRowAtIndexPath):
override func tableView(tableView: UITableView, cellForRowAtIndexPath indexPath: NSIndexPath) -> UITableViewCell {
    let cell = cellForTableView(tableView)

    let checklist = dataModel.lists[indexPath.row]
    cell.textLabel!.text = checklist.name
    cell.accessoryType = .DetailDisclosureButton

    /* new */
    cell.detailTextLabel!.text =   "\(checklist.countUncheckedItems()) Remaining"
    /* */

    return cell
}
You call the countUncheckedItems() method on the Checklist object and put the count into a new string that you place into the detailTextLabel. Notice that you can even call methods inside interpolated strings. Sweet!
你可以调用 countUncheckedItems() 对统计没有标记完成总数,并把它转换成一个新字符串显示到 detailTextLabel上。请注意,你甚至可以在插入字符串调用方法。酷毙了!
One problem: The to-do count never changes. If you toggle a checkmark on or off, or add new items, the “to do” count remains the same. That’s because you create these table view cells once and never update their labels. (Try it out!)
一个新问题: 当你更改待办事项时,未完成数没有发生变化
Exercise: Think of all the situations that will cause this “still to do” count to change.
解答: 考虑所有发改变 “still to do” 的情况。
Answer: 答案(CURD,Create, read, update and delete,增删改查)
- The user toggles a checkmark on an item. When the checkmark is set, the count goes down. When the checkmark gets removed, the count goes up again.(更新操作)
- The user adds a new item. New items don’t have their checkmark set, so adding a new item should increment the count. (新增操作)
- The user deletes an item. The count should go down but only if that item had no checkmark.(删除操作)
These changes all happen in the ChecklistViewController but the “still to do” label is shown in the AllListsViewController. So how do you let the All Lists View Controller know about this?
If you thought, “That’s easy, let’s use a delegate(代理)!”, then you’re starting to get the hang of this. You could make a new ChecklistViewControllerDelegate protocol that sends messages when the following things happen:
- the user toggles a checkmark on an item(改)
- the user adds a new item(增)
- the user deletes an item(删)
But what would the delegate – which would be AllListsViewController – do in return? It would simply set a new text on the cell’s detailTextLabel in all cases.
This approach sounds good, only you’re going to cheat and not use a delegate at all. There is a simpler solution and a smart programmer always picks the simplest way to solve a problem.
这里有一种简单方便的解决方案,并且一个聪明的程序员总是会选择最简单的方式解决问题。
Go to AllListsViewController.swift and add the viewWillAppear() method to do the following:
override func viewWillAppear(animated: Bool) {
    super.viewWillAppear(animated)

    tableView.reloadData()
}
Don’t confuse (混淆) this method with viewDidAppear(). The difference is in the verb(动词): will versus(VS) did. viewWillAppear() is called before viewDidAppear(), when the view is about to become visible but the animation hasn’t started yet. viewDidAppear() is called once the view is visible on the screen and the animation has completed. There may be half a second or so difference between them as the animation takes place.
viewWillAppear() 在 viewDidAppear() 之前,当视图既将可见但动画还没有开始前调用。viewDidAppear() 在视图已经在屏幕上可见并且动画已经完成后调用。它们之间可能有半秒左右发生动画。
The iOS API often does this: there is a “will” method that is invoked before something happens and a “did” method that is invoked after that something happened. Sometimes you need to do things before, sometimes after, and having two methods gives you the ability to choose whichever situation works best for you.
iOS API经常这样的:在事情发生之前有一个 will 方法调用,和事情发生之后的 did 方法调用。你需要处理的方法在事情发生有时前,有时后,有两种方法可以调用,你可以选择最适合你的方式。
API (a-pee-eye) stands for Application Programming Interface. When people say “the iOS API” they mean all the frameworks, objects, protocols and functions that are provided by iOS that you as a programmer can use to write apps.
API 指 应用程序接口。当人们提到 “the iOS API”, 它们指的是iOS 提供的所有 框架,对象,协议和函数供编程人员编写应用时调用。
The iOS API consists of everything from UIKit, Foundation, Core Graphics, and so on. Likewise, when people talk about “the Facebook API” or “the Google API”, they mean the services that these companies provide that allow you to write apps for those platforms.
Sometimes a delegate is the best solution; sometimes you can simply reload the entire table.
有时一个委托是最好的解决方案,有时可以简单地重新加载整个表。
Exercise. Change the label to read “All Done!” when there are no more to-do items left to check.
Answer: Change the relevant code in tableView(cellForRowAtIndexPath) to:
let count = checklist.countUncheckedItems()
if count == 0 {
    cell.detailTextLabel!.text = "All Done!"
} else {
    cell.detailTextLabel!.text = "\(count) Remaining"
}
You put the count into a local constant because you refer to it twice. Calculating the count once and storing it into a temporary constant is more optimal than doing the calculation twice.
你把 count 计数 保存到一个本地常数,因为你两次引用它。计数一次并将其存储到一个临时常数比计算两次更加优化。
Exercise: Now update the label to say “No Items” when the list is empty.
Answer:
let count = checklist.countUncheckedItems()
if checklist.items.count == 0 {
cell.detailTextLabel!.text = "(No Items)"
} else if count == 0 {
cell.detailTextLabel!.text = "All Done!"
} else {
cell.detailTextLabel!.text = "\(count) Remaining"
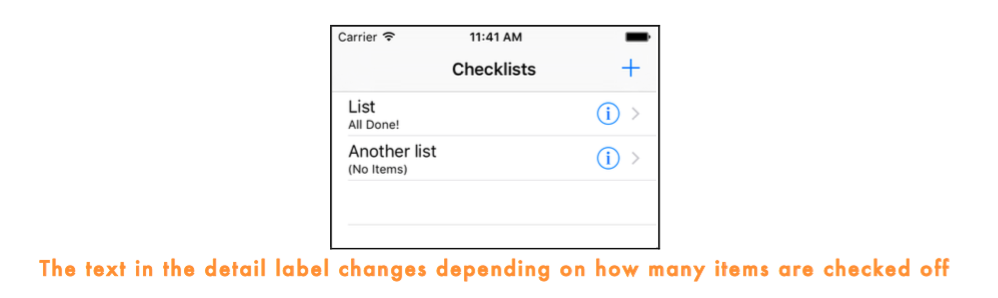
}Just looking at the result of countUncheckedItems() is not enough. If this returns 0, you don’t know whether that means all items are checked off or if the list has no items at all. You also need to look at the total number of items in the checklist, with checklist.items.count.
只看结果countUncheckedItems()是不够的。如果它返回0,你不知道这是否意味着所有项目已经标记为完成 或者 本来就没有项目列表。您还需要看看该清单中的条目的总数 checklist.items.count。
A short diversion into Functional Programming
Swift is primarily an object-oriented(面向对象) language, but there is another style of writing software that has become quite popular in recent years: functional programming(函数式编程).
The term “functional” means that programs can be expressed purely in terms of mathematical functions that transform data.
Unlike the methods and functions in Swift, these mathematical functions are not allowed to have “side effects”. For any given inputs, a function should always produce the same output. Methods are much less strict.
和 Siwft 中的方法和函数不同,这些数学函数不允许有“副作用”。对于任何给定的输入,一个函数应该产生相同的输出。方法则不太严格。
Even though Swift is not a purely functional language, it does let you use certain functional programming techniques in your apps. They can really make your code a lot shorter.
For example, let’s look at countUncheckedItems() again:
func countUncheckedItems() -> Int {
    var count = 0
    for item in items where !item.checked {
        count += 1
    }
    return count
}
That’s quite a bit of code for something that’s fairly simple. You can actually write this in a single line of code:
func countUncheckedItems() -> Int {
    return items.reduce(0) { cnt, item in cnt + (item.checked ? 0 : 1) }
}
reduce() is a method that looks at each item and performs the code in the { } block. Initially, the cnt variable contains the value 0, but after each item it is incremented by either 0 or 1, depending on whether the item was checked.
reduce()方法(分解,归纳)依次查看每一项并且执行{ }块中的代码。最初,变量包含0的值,但在之后的每一项要么增加0,要么增加1,取决于项是否标记过。
When reduce() is done, its return value is the total count of unchecked items.
You don’t have to remember any of this for now, but it’s pretty cool to see that Swift allows you to express this kind of algorithm very succinctly.
Sorting the lists 排序
Another thing you often need to do with lists is sort them in some particular order.
Let’s sort the list of checklists by name. Currently when you add a new checklist it is always appended to the end of the table, regardless of alphabetical order.
Before we figure out how to sort an array, let’s think about when you need to perform this sort:
- When a new checklist is added
- When a checklist is renamed
There is no need to re-sort when a checklist is deleted because that doesn’t have any impact on the order of the other objects.
添加或者重命名事项后要重新排序,删除项则不需要
Currently you handle these two situations in AllListsViewController’s implementation of didFinishAddingChecklist and didFinishEditingChecklist.
Change these methods to the following:
func listDetailViewController(controller: ListDetailViewController, didFinishAddingChecklist checklist: Checklist) {
    dataModel.lists.append(checklist)
    dataModel.sortChecklists()
    tableView.reloadData()
    dismissViewControllerAnimated(true, completion: nil)
}

func listDetailViewController(controller: ListDetailViewController, didFinishEditingChecklist checklist: Checklist) {
    dataModel.sortChecklists()
    tableView.reloadData()
    dismissViewControllerAnimated(true, completion: nil)
}
You were able to remove a whole bunch of stuff from both methods because you now always do reloadData() on the table view.
It is no longer necessary to insert the new row manually, or to update the cell’s textLabel. Instead you simply call tableView.reloadData() to refresh the entire table’s contents.
Again, you can get away with this because the table will only hold a handful of rows. If this table held hundreds of rows, a more advanced approach might be necessary. (You could figure out where the new or renamed Checklist object should be inserted and just update that row.)
The sortChecklists() method on DataModel is new and you still need to add it. But before that, we need to have a short discussion about how sorting works.
When you sort a list of items, the app will compare the items one-by-one to figure out what the proper order is. But what does it mean to compare two Checklist objects?
In our app we obviously want to sort them by name, but we need some way to tell the app that’s what we mean.
Add the following method to DataModel.swift:
func sortChecklists() {
    lists.sortInPlace({ checklist1, checklist2 in return checklist1.name.localizedStandardCompare(checklist2.name) == .OrderedAscending })
}
Here you tell the lists array that the Checklists it contains should be sorted using some formula(公式).
That formula is provided in the shape of a closure(闭包形式). You can tell by the { } brackets around the sorting code; they are what makes it into a closure(闭包):
lists.sortInPlace({ /* the sorting code goes here */ })Just to make sure the existing lists are also sorted in the right order, you should also call sortChecklists() when the plist file is loaded:
func loadChecklists() {
    let path = dataFilePath()
    if NSFileManager.defaultManager().fileExistsAtPath(path) {
        if let data = NSData(contentsOfFile: path) {
            // ...

            /* new */
            sortChecklists()
            /* end */
        }
    }
}
Run the app and add some new checklists. Change their names and notice that the list is always sorted alphabetically.
Adding icons to the checklists
Because true iOS developers can’t get enough of view controllers and delegates, let’s add a new property to the Checklist object that lets you choose an icon. We’re really going to cement these principles in your mind.
When you’re done, the Add/Edit Checklist screen will look like this:
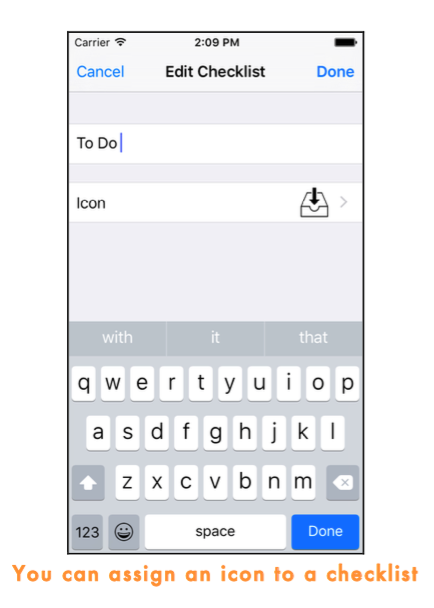
You are going to add a row to the Add/Edit Checklist screen that opens a new screen for picking an icon.
This icon picker is a new view controller. You won’t show it modally this time but push it on the navigation stack so it slides into the screen.
The Resources folder for this tutorial contains a folder named Checklist Icons with a selection of PNG images that depict different categories.

Add the images from this folder to the asset catalog. Select Assets.xcassets in the project navigator, click the + button at the bottom and choose Import…
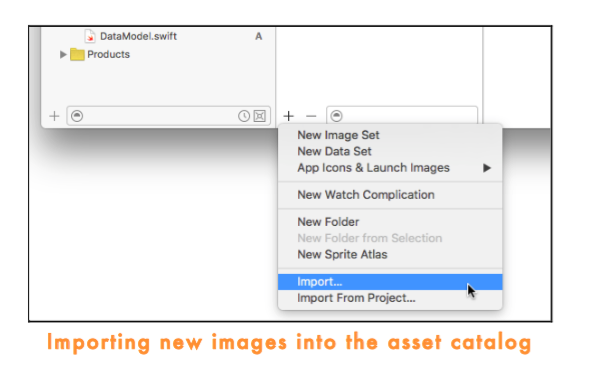
Navigate to the Checklist Icons folder and select all the files inside:

Note: Make sure to select the actual image files, not just the folder.
Click Open to import the images. The asset catalog should now look like this:
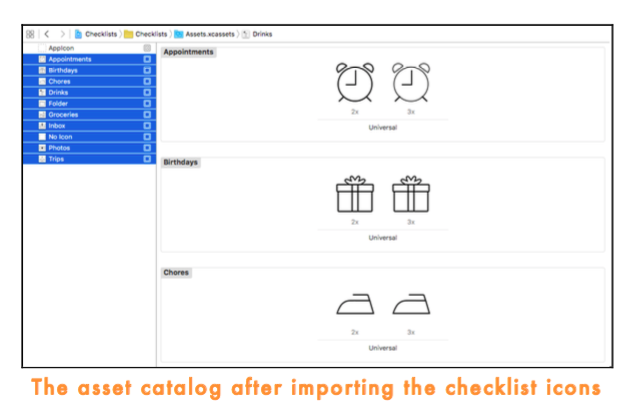
Each image comes with a 2x version for Retina devices and a 3x version for the iPhone 6 Plus with its incredible Retina HD screen.
As I pointed out in the previous tutorial, you don’t need low-resolution 1x graphics, unless your app is universal or iPad-only, or if you want to support iOS versions before 8.0. All iPhones and iPod touch devices that can run iOS 9 have Retina 2x or 3x screens.
Add the following property to Checklist.swift:
var iconName: StringThe iconName variable holds the filename of the icon image.
Extend init?(coder) and encodeWithCoder() to respectively load and save this icon name in the Checklists.plist file:
required init?(coder aDecoder: NSCoder) {
    name = aDecoder.decodeObjectForKey("Name") as! String
    items = aDecoder.decodeObjectForKey("Items") as! [ChecklistItem]
    /* new */
    iconName = aDecoder.decodeObjectForKey("IconName") as! String
    /* end */
    super.init()
}

func encodeWithCoder(aCoder: NSCoder) {
    aCoder.encodeObject(name, forKey: "Name")
    aCoder.encodeObject(items, forKey: "Items")
    /* new */
    aCoder.encodeObject(iconName, forKey: "IconName")
    /* end */
}
Just in case you feel like extending this app with new features of your own, remember that this is something you need to do for every new property that you add to this object. Otherwise it won’t get saved to the plist file.
Xcode now complains about the init(name) method. Apparently it doesn’t like that “Property self.iconName is not initialized at super.init call”.
That means iconName doesn’t have a value yet if the Checklist object is initialized with init(name) instead of init?(coder). And as you know by now, all variables that are not optionals must always have a value.
Update init(name) to the following:
init(name: String) {
    self.name = name
    iconName = "Appointments"

    super.init()
}
This will give all new checklists the “Appointments(指定)” icon.
At this point you just want to see that you can make an icon – any icon – show up in the table view. When that works you can worry about letting the user pick their own icons.
Change tableView(cellForRowAtIndexPath) in AllListsViewController.swift to put the icon into the table view cell:
override func tableView(tableView: UITableView, cellForRowAtIndexPath indexPath: NSIndexPath) -> UITableViewCell {
    // ...

    cell.imageView!.image = UIImage(named: checklist.iconName)
    return cell
}
Cells using the standard .Subtitle cell style come with a built-in UIImageView on the left. You can simply give it the image and it will automatically appear. Easy peasy.
Before running the app, remove the Checklists.plist file or reset the Simulator, because you’ve modified the file format again (you added the “IconName” field in init?(coder) and encodeWithCoder). You don’t want any weird crashes…
Run the app and now each checklist should have an alarm clock icon in front of its name.
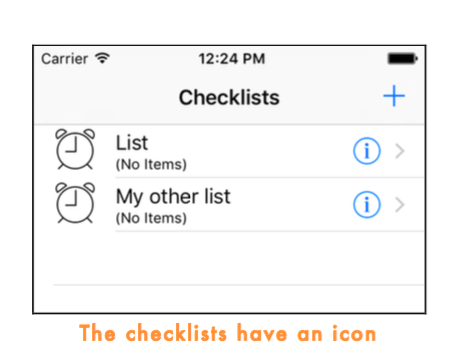
Satisfied that this works, you can now change Checklist’s init(name) to give each Checklist object an icon named “No Icon” by default.
In Checklist.swift, in init(name) change the line that sets iconName to:
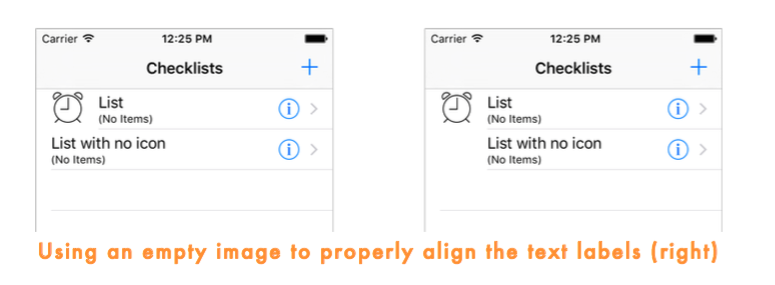
iconName = "No Icon"The “No Icon” image is a fully transparent PNG image with the same dimensions as the other icons. Using a transparent image is necessary to make all the checklists line up properly, even if they have no icon.
If you were to set iconName to an empty string instead, the image view in the table view cell would remain empty and the text would align with the left margin of the screen. That looks bad when other cells do have icons:
Let’s create the icon picker screen.
Add a new Swift file to the project. Name it IconPickerViewController.
Replace the contents of IconPickerViewController.swift with:
import UIKit
protocol IconPickerViewControllerDelegate: class {
    func iconPicker(picker: IconPickerViewController, didPickIcon iconName: String)
}

class IconPickerViewController: UITableViewController {
    weak var delegate: IconPickerViewControllerDelegate?
}
This defines the IconPickerViewController object, which is a table view controller, and a delegate protocol that it uses to communicate with other objects in the app.
Add a constant (inside the class brackets) to hold the array of icons:
let icons = [
    "No Icon",
    "Appointments",
    "Birthdays",
    "Chores",
    "Drinks",
    "Folder",
    "Groceries",
    "Inbox",
    "Photos",
    "Trips" ]
This is an array that contains a list of icon names. These strings are both the text you will show on the screen and the name of the PNG file inside the asset catalog.
The icons array is the data model for this table view. Note that it is a non-mutable array (it is defined with let and arrays are “value” types), because the user cannot add or delete icons.
This new view controller is a UITableViewController, so you have to implement the data source methods for the table view.
Add the following methods to the source file:
override func tableView(tableView: UITableView, numberOfRowsInSection section: Int) -> Int {
    return icons.count
}
This simply returns the number of icons in the array.
override func tableView(tableView: UITableView, cellForRowAtIndexPath indexPath: NSIndexPath) -> UITableViewCell {
    let cell = tableView.dequeueReusableCellWithIdentifier("IconCell", forIndexPath: indexPath)

    let iconName = icons[indexPath.row]
    cell.textLabel!.text = iconName
    cell.imageView!.image = UIImage(named: iconName)

    return cell
}
Here you obtain a table view cell and give it text and an image. You will design this cell in the storyboard momentarily.
It will be a prototype cell with the cell style “Default” (or “Basic” as it is called in Interface Builder). Cells with this style already contain a text label and an image view, which is very convenient.
Open the storyboard. Drag a new Table View Controller from the Object Library and place it next to the List Detail View Controller (the one that says “Add Checklist”).
In the Identity inspector, change the class of this new table view controller to IconPickerViewController.
Select the prototype cell and set its Style to *Basic * and its (re-use) Identifier to IconCell.
That takes care of the design for the icon picker. Now you need to have some place to call it from. To do this, you will add a new row to the Add/Edit Checklist screen.
Go to the List Detail View Controller and add a new section to the table view. You can do this by changing the Sections field in the Attributes inspector for the table view from 1 to 2. This will duplicate the existing section.
Delete the Text Field from the new cell; you don’t need it.
Add a Label to this cell and name it Icon.
Set the cell’s Accessory to Disclosure Indicator. That adds a gray chevron.
Add an Image View to the right of the cell. Make it 36 × 36 points big. (Tip: use the Size inspector for this.)
Use the Assistant Editor to add an outlet property for this image view to ListDetailViewController.swift and name it iconImageView.
Now that you’ve finished the designs for both screens, you can connect them with a segue.
Ctrl-drag from the “Icon” table view cell to the Icon Picker View Controller and add a segue, pick Selection Segue – show. (Make sure you’re dragging from the Table View Cell, not its Content View or any of the other subviews.)
Give the segue the identifier PickIcon.
Thanks to the segue, the new view controller has been given a navigation bar.
Double-click that navigation bar and change its title to Choose Icon.
Note: If Xcode won’t let you change the navigation title, you may first need to drag a Navigation Item from the Object Library into the view controller. Xcode is supposed to add this Navigation Item for you, but for some reason (bug?) it doesn’t.
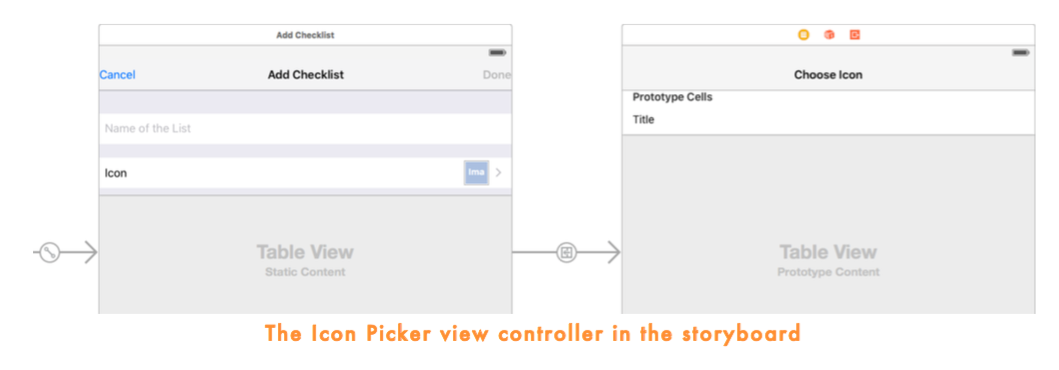
This part of the storyboard should now look like this:
In ListDetailViewController.swift, change the willSelectRowAtIndexPath table view delegate method to:
override func tableView(tableView: UITableView, willSelectRowAtIndexPath indexPath: NSIndexPath) -> NSIndexPath? {
    if indexPath.section == 1 {
        return indexPath
    } else {
        return nil
    }
}
This is necessary otherwise you cannot tap the “Icon” cell to trigger the segue.
Previously this method always returned nil, which meant tapping on rows was not possible. Now, however, you want to allow the user to tap the Icon cell, so this method should return the index-path for that cell.
Because the Icon cell is the only row in the second section, you only have to check indexPath.section. There is no need to check the row number too. Users still can’t select the cell with the text field (from section 0).
Run the app and verify that there is now an Icon row in the Add/Edit Checklist screen. Tapping it will open the Choose Icon screen and show a list of icons.
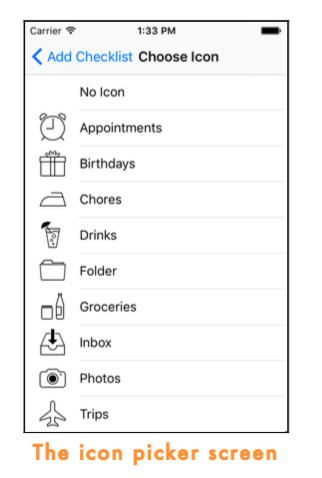
You can press the back button to go back but selecting an icon doesn’t do anything yet. It just colors the row gray but doesn’t put the icon into the checklist.
To make this work, you have to hook up the icon picker to the Add/Edit Checklist screen through its own delegate protocol.
First, add an instance variable in ListDetailViewController.swift:
var iconName = "Folder"You use this variable to keep track of the chosen icon name.
Even though the Checklist object now has an iconName property, you cannot keep track of the chosen icon in the Checklist object for the simple reason that you may not always have a Checklist object, i.e. when the user is adding a new checklist.
So you’ll store the icon name in a temporary variable and copy that into the Checklist’s iconName property at the right time.
You should initialize the iconName variable with something reasonable. Let’s go with the folder icon. This is only necessary for new Checklists, which get the Folder icon by default.
Update viewDidLoad() to the following:
override func viewDidLoad() {
    super.viewDidLoad()

    if let checklist = checklistToEdit {
        title = "Edit Checklist"
        textField.text = checklist.name
        doneBarButton.enabled = true
        /* new */
        iconName = checklist.iconName
        /* end */
    }
        /* new */
        iconImageView.image = UIImage(named: iconName)
        /* end */
}
This has two new lines: If the checklistToEdit optional is not nil, then you copy the Checklist object’s icon name into the iconName instance variable. You also load the icon’s image file into a new UIImage object and set it on the iconImageView so it shows up in the Icon row.
Earlier you created a push segue named “PickIcon”. You still need to implement prepareForSegue(sender) in order to tell the IconPickerViewController that this screen is now its delegate.
Add the following method to ListDetailViewController.swift:
override func prepareForSegue(segue: UIStoryboardSegue, sender: AnyObject?) {
    if segue.identifier == "PickIcon" {
        let controller = segue.destinationViewController as! IconPickerViewController
        controller.delegate = self
    }
}
This should have no big surprises for you.
Of course, Xcode has found something to complain about: it does not like that you wrote “controller.delegate = self”, because (and I quote),
Cannot assign a value of type 'ListDetailViewController' to a value of type 'IconPickerViewControllerDelegate?'
Exercise: What did we forget?
Answer: You haven’t made the view controller conform to the delegate protocol yet, so Swift won’t let ListDetailViewController become the delegate of the icon picker!
Add the name of that protocol to the class line:
class ListDetailViewController: UITableViewController,
UITextFieldDelegate,
/* new */
IconPickerViewControllerDelegate
/* end */
{
And add the implementation of the method from that delegate protocol somewhere inside the ListDetailViewController class:
func iconPicker(picker: IconPickerViewController, didPickIcon iconName: String) {
    self.iconName = iconName
    iconImageView.image = UIImage(named: iconName)
    navigationController?.popViewControllerAnimated(true)
}
This puts the name of the chosen icon into the iconName variable to remember it, and also updates the image view with the new image.
You don’t call dismissViewController() here but popViewControllerAnimated() because the Icon Picker is on the navigation stack. When creating the segue you used the segue style “show” instead of “present modally”, which pushes the new view controller on the navigation stack. To return you need to “pop” it off again. (dismissViewController() is for modal screens only, not for push screens.)
Recall that navigationController is an optional property of the view controller, so you need to use ? (or !) to access the actual UINavigationController object.
Note: You’ve seen self used to refer to the object itself. Here you’ve written: self.iconName = iconName
The reason is that iconName can refer to two different things here: 1) the second parameter from the delegate method, and 2) the instance variable.
To remove the ambiguity, you prefix the instance variable with “self.”, so it’s clear to the compiler which of the two iconNames you intended to use.
Change the done() action so that it puts the chosen icon name into the Checklist object when the user closes the screen:
@IBAction func done() {
    if let checklist = checklistToEdit {
        checklist.name = textField.text!

        /* new */
        checklist.iconName = iconName
        /* end */

        delegate?.listDetailViewController(self, didFinishEditingChecklist: checklist)
    } else {
        let checklist = Checklist(name: textField.text!)

        /* new */
        checklist.iconName = iconName
        /* end */

        delegate?.listDetailViewController(self, didFinishAddingChecklist: checklist)
    }
}
Finally, you must change IconPickerViewController to actually call the delegate method when a row is tapped.
Add the following method to the bottom of IconPickerViewController.swift:
override func tableView(tableView: UITableView, didSelectRowAtIndexPath indexPath: NSIndexPath) {
    if let delegate = delegate {
        let iconName = icons[indexPath.row]
        delegate.iconPicker(self, didPickIcon: iconName)
    }
}
And that’s it. You can now set icons on the Checklist objects. To recap, you:
- added a new view controller object,
- designed its user interface in the storyboard editor, and
- hooked it up to the Add/Edit Checklist screen using a segue and a delegate.
Those are the basic steps you need to take with any new screen that you add.
Run the app to try it out!
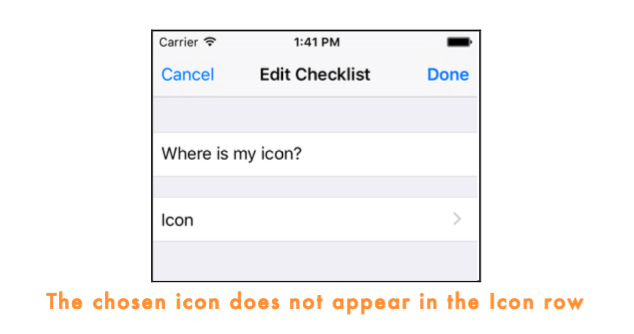
Hmm, there seems to be a small problem. After picking an icon it doesn’t actually appear in the Icon row.
Exercise: Can you figure this one out? Hint: It doesn’t have anything to do with the source code.
Answer: When you designed this screen in Interface Builder, you placed the icon’s Image View right next to the disclosure indicator:

However, the storyboard doesn’t use the same dimensions as the iPhone screen – it’s much wider.
You’ve been designing on a square canvas that is independent of the screen sizes of the actual devices. The dimensions of this square fall somewhere in between the sizes of iPhones and iPads. Bigger than the iPhone, smaller than the iPad.
Designing for the square allows you to have a resizable user interface that works on both the iPhone and iPad – that’s why they’re called “universal” storyboards.
When the app is run on an actual device, the view controller is resized to fit that screen. On the iPhone it becomes narrower.
And that’s where the problem is: the position of the UIImageView object does not get adjusted for the new screen size. The image view is still there, you just can’t see it – it’s about 200 points or so off-screen to the right.
What you want to happen instead is that the image view stays glued to the right edge of the screen, always at the same distance from the disclosure indicator. When the view controller shrinks to fit the iPhone screen, the image view should move along with it.
The solution is to add Auto Layout constraints to the image view that tell the app what the relationship is between the image view and the edges of the screen.
Select the Image View. Bring up the Pin menu using the icon at the bottom of the canvas.
First, uncheck Constrain to margins.
Activate the bars at the top and the right so they turn red. ! Put checkmarks in front of Width and Height.
For Update Frames choose Items of New Constraints.
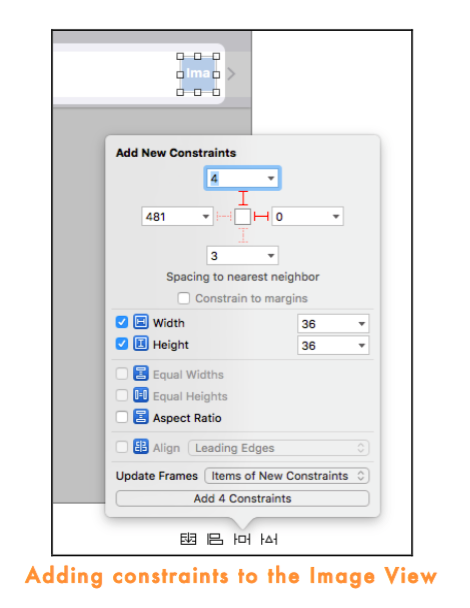
Finally, click Add 4 Constraints to finish.
The image view should now look like this:
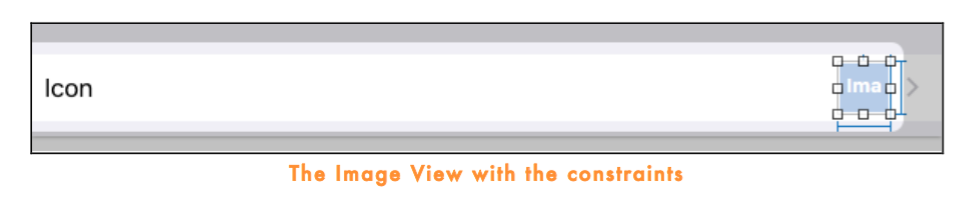
Make sure the bars representing the constraints are blue. If they are orange or red you may have forgotten something in the Pin menu. (Either try again or use the Editor → Resolve Auto Layout Issues → Update Frames menu item.)
The most important constraint is the one on the right. This tells UIKit that the right- hand side of the image view should always stick to the right-hand edge of the table view cell’s content view.
In other words, no matter how wide or narrow the screen is, the image view will always have the same location relative to the disclosure indicator.
The other three constraints – top, width, and height – were necessary only because all views must always have enough constraints to determine their position and size.
If you don’t specify any constraints of your own, Interface Builder will come up with reasonable default constraints. But as soon as you add just one custom constraint, you’ll have to add the others too.
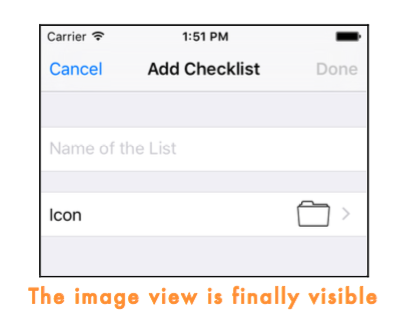
Run the app again. Now the icon does properly appear:
There’s still a small improvement to make. In done(), you currently do this:
let checklist = Checklist(name: textField.text!)
checklist.iconName = iconName
Setting the icon name can be considered part of the initialization of Checklist too, so it would be nice if you could write:
let checklist = Checklist(name: textField.text!, iconName: iconName)Make this change. In ListDetailViewController.swift’s done() method, replace the code that creates the new Checklist object with the above.
To make this work, you have to add a new init method to Checklist.swift that takes two parameters: name and iconName.
Add the new init method to Checklist.swift:
init(name: String, iconName: String) {
    self.name = name
    self.iconName = iconName

    super.init()
}
Checklist now has three init methods:
- init(name) for when you just have a name
- init(name, iconName) for when you also have an icon name
- init?(coder) for loading the objects from the plist file
Note that at this point init(name) and init(name, iconName) do almost the same things. For comparison, here is init(name) again:
init(name: String) {
    self.name = name
    iconName = "No Icon"

    super.init()
}
Both initializers assign values to self.name and iconName, and call super.init().
The only difference is that init(name) does not have to use the notation “self.iconName” because there iconName can only mean one thing.
You can improve on this by making init(name) call init(name, iconName) with “No Icon” as the value for the iconName parameter.
Replace init(name) with:
convenience init(name: String) {
    self.init(name: name, iconName: "No Icon")
}
Instead of super.init() it now calls self.init(name, iconName).
Because it farms out its work to another init method, init(name) is now known as a convenience initializer.
It does the same thing as init(name, iconName) but saves you from having to type iconName: “No Icon” whenever you want to use it.
init(name, iconName) has become the so-called designated initializer for Checklist.
It is the primary way to create new Checklist objects, while init(name) exists only for the convenience of lazy developers… such as you and me. :-)
Build the app to verify it still works.
Exercise: Give ChecklistItem an init(text) method that is used instead of the parameter-less init(). Or how about an init(text, checked) method?
Making the app look good
You’re going to keep it simple in this tutorial as far as fancying up the graphics goes. The standard look of navigation controllers and table views is perfectly adequate, although a little bland. In the next tutorials you’ll see how you can customize the look of these UI elements.
Even though this app uses the stock visuals, there is a simple trick to give the app its own personality: changing the tint color.
The tint color is what UIKit uses to indicate that things can be interacted with, such as buttons. The default tint color is a medium blue.
tint color就是 UIKit 用来表明可以与之交互的东西,比如按钮。默认tint color是蓝色的。
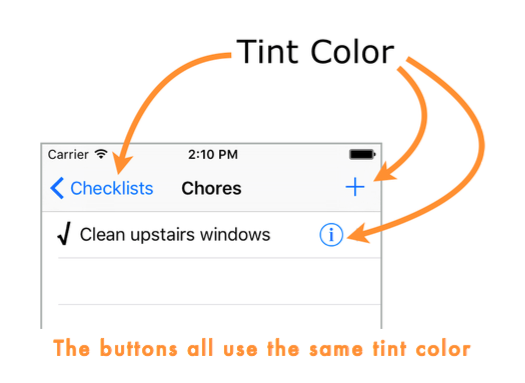
Changing the tint color is pretty easy.
Open the storyboard and go to the File inspector (the first tab).
Click Global Tint to open the color picker and choose Red: 4, Green: 169, Blue: 235. That makes the tint color a lighter shade of blue.
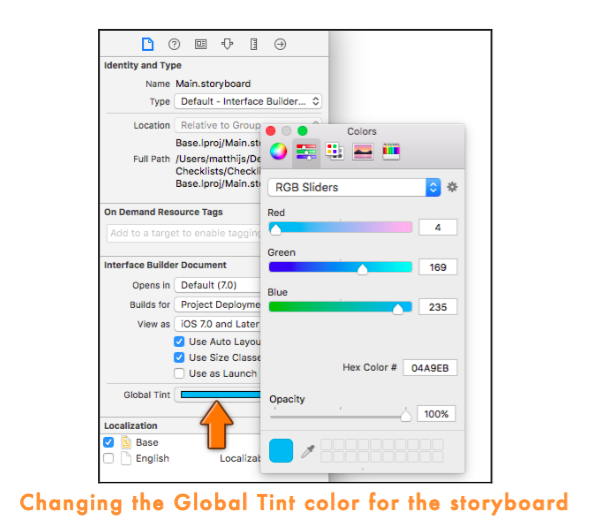
Tip: If the color picker only shows a black & white bar, then click the box that says Gray Scale Slider and change it to RGB Sliders.
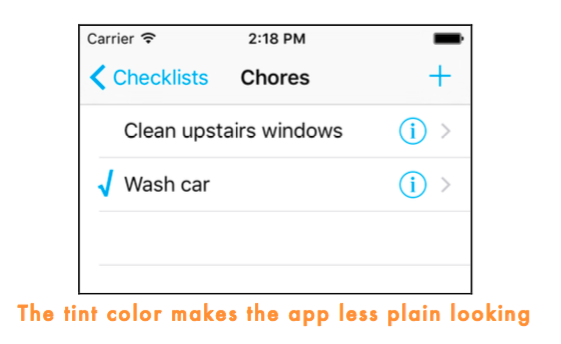
It would also look nice if the checkmark wasn’t black but used the tint color too. ! To make that happen, add the following line to configureCheckmarkForCell() in ChecklistViewController.swift:
label.textColor = view.tintColorRun the app. It already looks a lot more interesting:
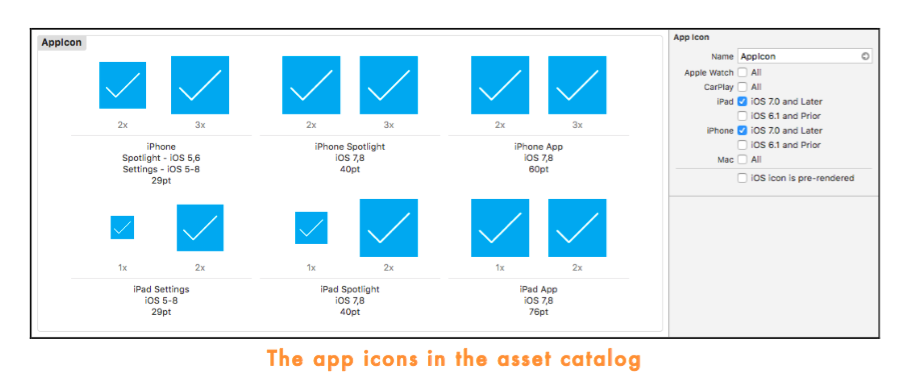
No app is complete without an icon. The Resources folder for this tutorial contains a folder named Icon with the app icon image in various sizes. Notice that it uses the same blue as the tint color.
Add these icons to the asset catalog (Assets.xcassets). Recall that icons go into the AppIcon section. Simply drag them from the Finder into the slots.
Apps should also have a launch image or launch file. Showing a static picture of the app’s UI will give the illusion the app is loading faster than it really is. It’s all smoke and mirrors.
The Xcode template includes the file LaunchScreen.storyboard that is used as the launch file. With some effort you could make this look like the initial screen of the app, but there’s an easier solution.
Open the Project Settings screen. In the General tab, scroll down to the App Icons and Launch Images section.
In the Launch Screen File box, press the arrow and select Main.storyboard.
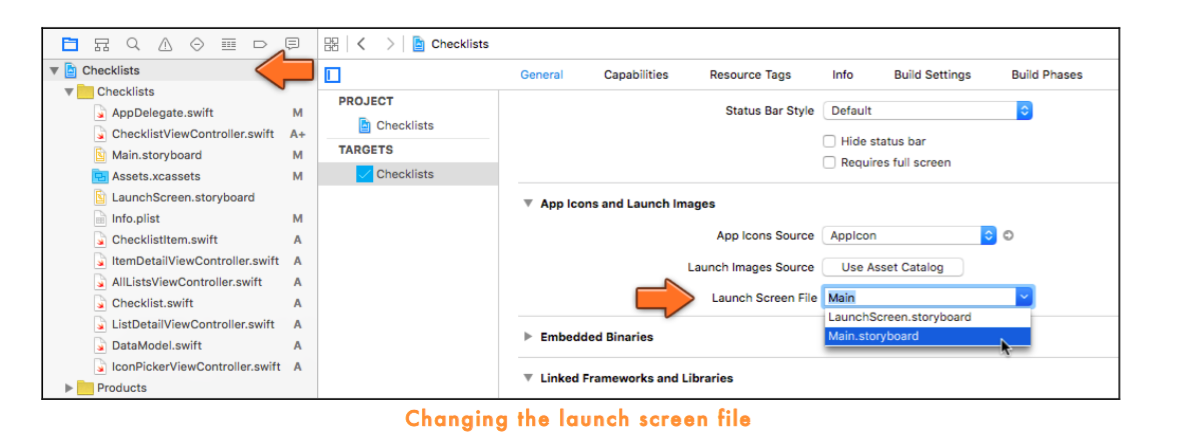
This tells the app you’ll be using the design from the storyboard as the launch file.
Upon startup, the app finds the initial view controller and converts it into a static launch image. For this app that is the All Lists View Controller inside its navigation controller.
Delete LaunchScreen.storyboard from the project.
From the Product menu choose Clean. It’s also a good idea to delete the app from the Simulator just so it no longer has any copies of the old launch file lying around (hold down on the icon until it starts to wiggle, just like on a real iPhone).
Run the app. Just before the real UI appears you should briefly see the following launch screen:
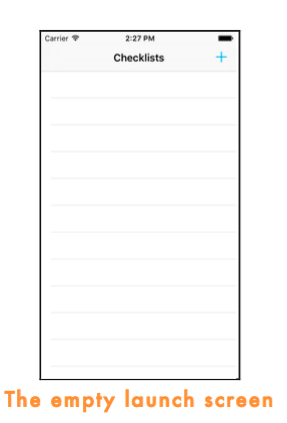
The launch screen simply has a navigation bar and an empty table view. This gives the illusion the app’s UI has already been loaded but that the data hasn’t been filled in yet.
Using a proper launch screen makes the app look more professional – and faster!
For many apps you can simply use the main storyboard as the launch file, making it a no-brainer to add. Besides, you need a launch file to support the larger screens of the new iPhone 6 and 6 Plus models.
Supporting all iPhone models
The app should run without major problems on all current iPhone models, from the smallest (iPhone 4S) to the largest (iPhone 6 Plus). Table view controllers are very flexible and will automatically resize to fit the screen, no matter how large or small. Give it a try in the different Simulators!
Well, I said no major problems. But there are still a few tweaks you can make here and there.
For example, on the 3.5 and 4-inch models, the text may run off the page when you’re entering the name of a new checklist or to-do item:
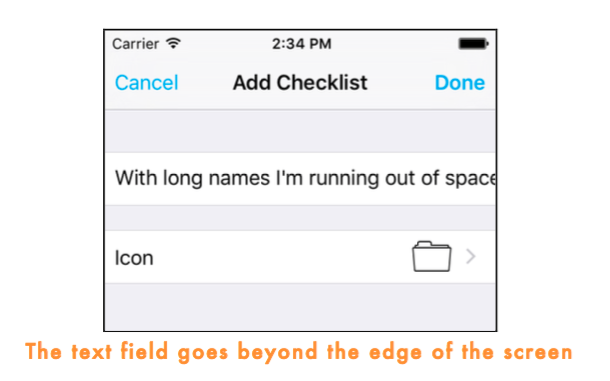
This is due to the UITextField not automatically resizing with the view controller as it shrinks to the available space. The solution, again, is Auto Layout constraints.
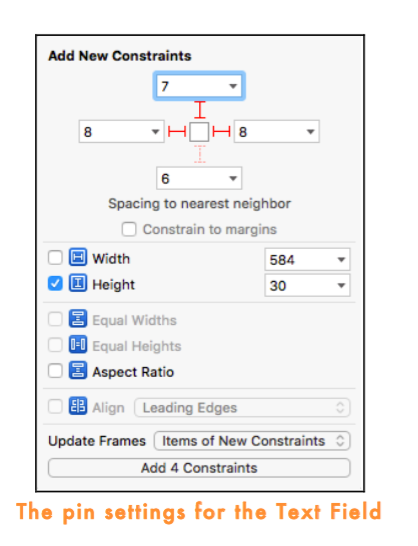
Open the storyboard and go to the Add Checklist screen. Select the Text Field. ! In the Pin menu, activate the top, left, and right bars so they become red.
Uncheck Constrain to margins.
Put a checkmark in front of Height (it should be 30 points high).
For Update Frames choose Items of New Constraints.
These options will make the text field stick to the sides of the table view cell. ! Repeat this procedure for the text field from the Add Item screen.
Run the app and the text should start scrolling when you get to the edge:
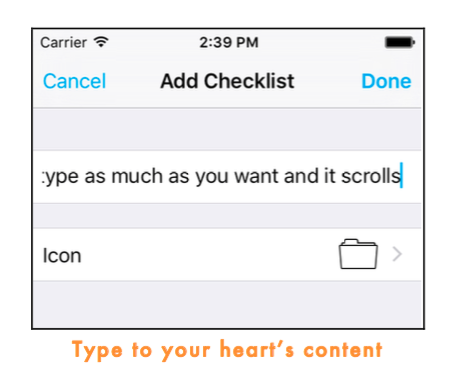
Let’s say you enter a very long text. What happens to that text when it gets shown in the other table view?
There is no problem on the All Lists screen:
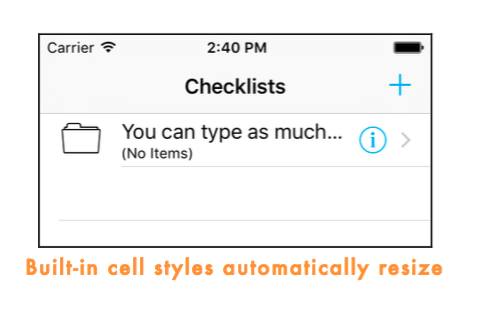
This table view uses the built-in “Subtitle” cell style, which automatically resizes to fit the width of the screen. It also truncates the text with … when it becomes too large.
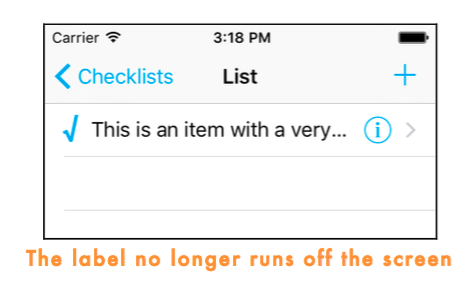
For the to-do items table, however, the picture doesn’t look so rosy:
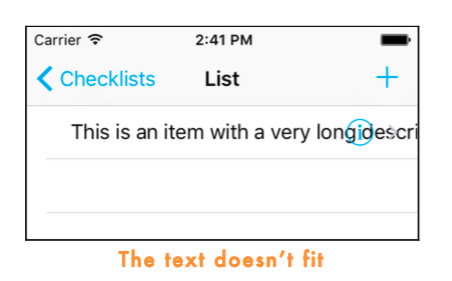
The label overlaps the disclosure button on the right and runs off the screen. That’s unacceptable.
Because this is a custom prototype cell design, you’ll have to add some constraints to prevent this from happening.
In the storyboard, go to the Checklist screen and select the label inside the prototype cell.
First use Editor → Size to Fit Content to give the label its ideal size. That makes it a lot smaller, but that’s OK. Without doing this first you may run into issues on the next steps.
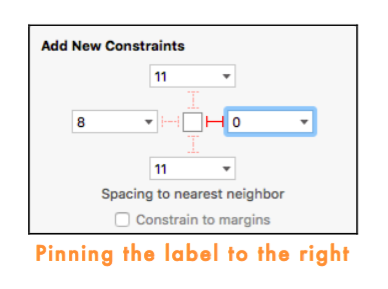
You want to pin the label to the right edge of the content view so it sticks to the disclosure button. Let’s make that constraint first.
Open the Pin menu and uncheck Constrain to margins.
Activate the red bar on the right. Give it the value 0 so there is no spacing between the label and the disclosure button.
As always, set Update Frames to Items of New Constraints. Click Add 1 Constraint to add the new constraint.
Whoops, that messes up the label:
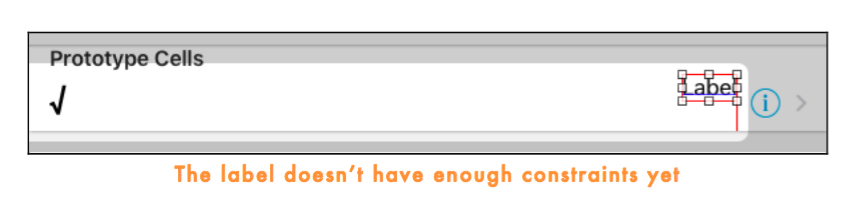
Remember that you always need to specify enough constraints to determine the position and size of a view. Here you only added a constraint for the right edge of the label, which is not enough.
No panic! This sort of thing is common while you’re adding constraints. To fix it you simply have to add the missing ones.
With the label still selected, open the Align menu (next to Pin). Check Vertically in Container. Update Frames should be Items of New Constraints.
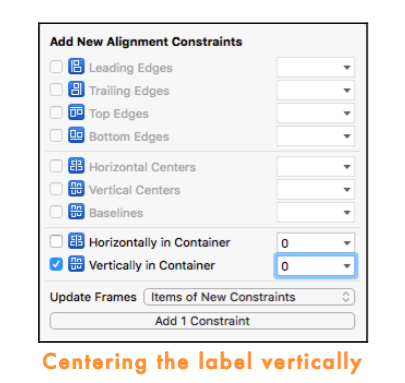
Now everything turns blue again. The label has a valid position, both X and Y.
Note: Even though you didn’t specify any constraints for the label’s size, the bars are all blue. How come they are not still orange?
Without size constraints the label uses its contents – the text and the font – to calculate how big needs to be. This is called the intrinsic content size.
UI components with an intrinsic size, such as UILabel, don’t need to have Width or Height constraints, but this is only valid if you’ve used Size to Fit Content to reset the label to its intrinsic size first.
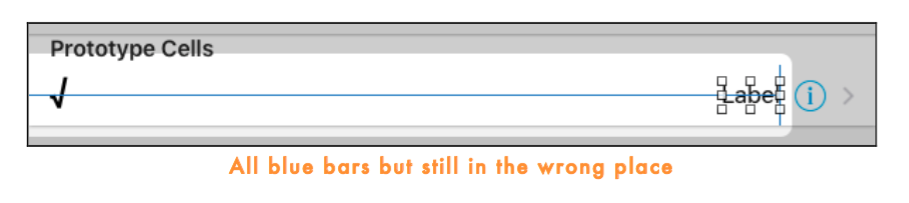
Unfortunately, the label is now right aligned. That’s not what you wanted… the label should be on the left and just as wide as the cell’s content view.
The easiest way to make this happen is to add a new constraint on the left to glue the label to the left edge of the screen as well.
You can’t use the Pin menu to make this constraint because that would connect the label to the checkmark, which is not what you want (the size of the checkmark label changes depending on whether the check is set or not). Instead, you’ll use another technique to make the new constraint.
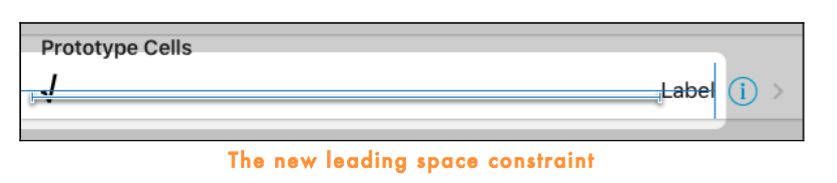
Select the label again. Ctrl-drag from the label to anywhere within the cell. When you let go, a popup appears. The options inside this popup depend on the direction you dragged in, so what you see may be slightly different from the illustration. To make the constraint, select Leading Space to Container Margin from the popup.
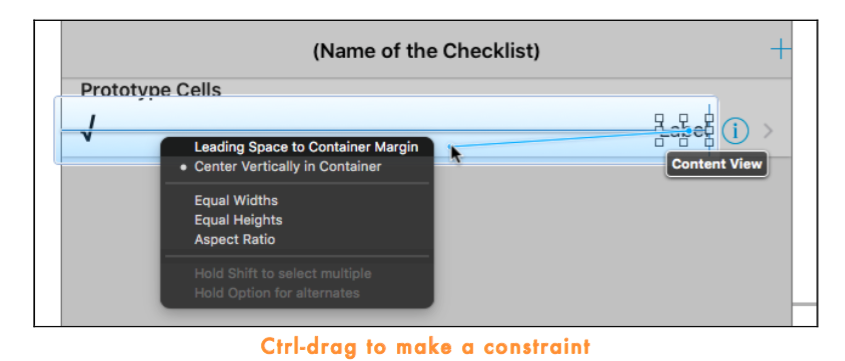
This adds a very big blue bar for the new constraint, but doesn’t actually move the label yet.
Select the blue bar. In the Size inspector, change Constant to 30. That’s better:
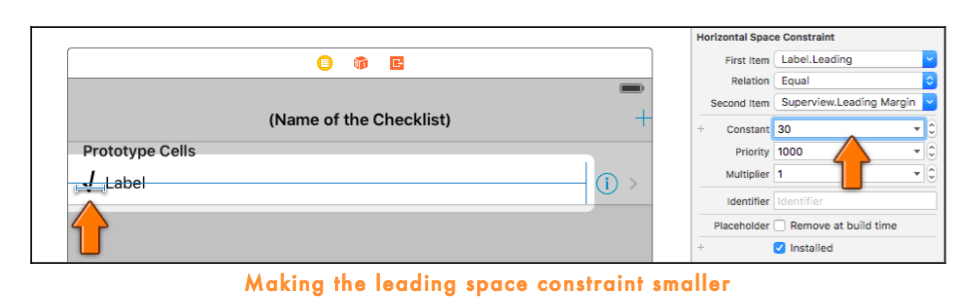
The label is now pinned to both edges of the table view cell’s content view, so it will get stretched to however wide the table view cell is.
Run the app and the label should properly truncate: