源码:https://github.com/PacktPublishing/Asynchronous-Android-Programming
第1章 Asynchronous Programming in Android Android 里的异步编程
Android software stack
Dalvik runtime
ART runtime
Memory sharing and Zygote
zygote这个词的中文意思是“受精卵”。
Zygote本身是一个Native的应用程序,和驱动、内核等均无关系。
- First, the virtual machine and core libraries are already loaded into the memory. Not having to read this significant chunk of data from the filesystem to initialize the virtual machine drastically reduces the startup overhead.
- Second, the memory in which these core libraries and common structures reside is shared by the Zygote with all other applications, resulting in saving a lot of memory when the user is running multiple apps.
Android process model
Process ranks
- Foreground process: This is a process that hosts an activity or service that the user is currently interacting with: a service started in the foreground or service running its life cycle callbacks
- Visible process: This is a process that hosts a paused activity or service bounded to a visible activity
- Service process: This is a process that hosts a service not bound to a visible activity
- Background process: This is a process that hosts a non-visible activity; all background processes are sorted over a Least-Recently-Used (LRU) list, therefore, the most recently used processes are the last killed processes when they have the same rank
- Empty process: This is a process used to cache inactive Android components and to improve any component startup time
Process sandboxing
Linux user ID (UID)
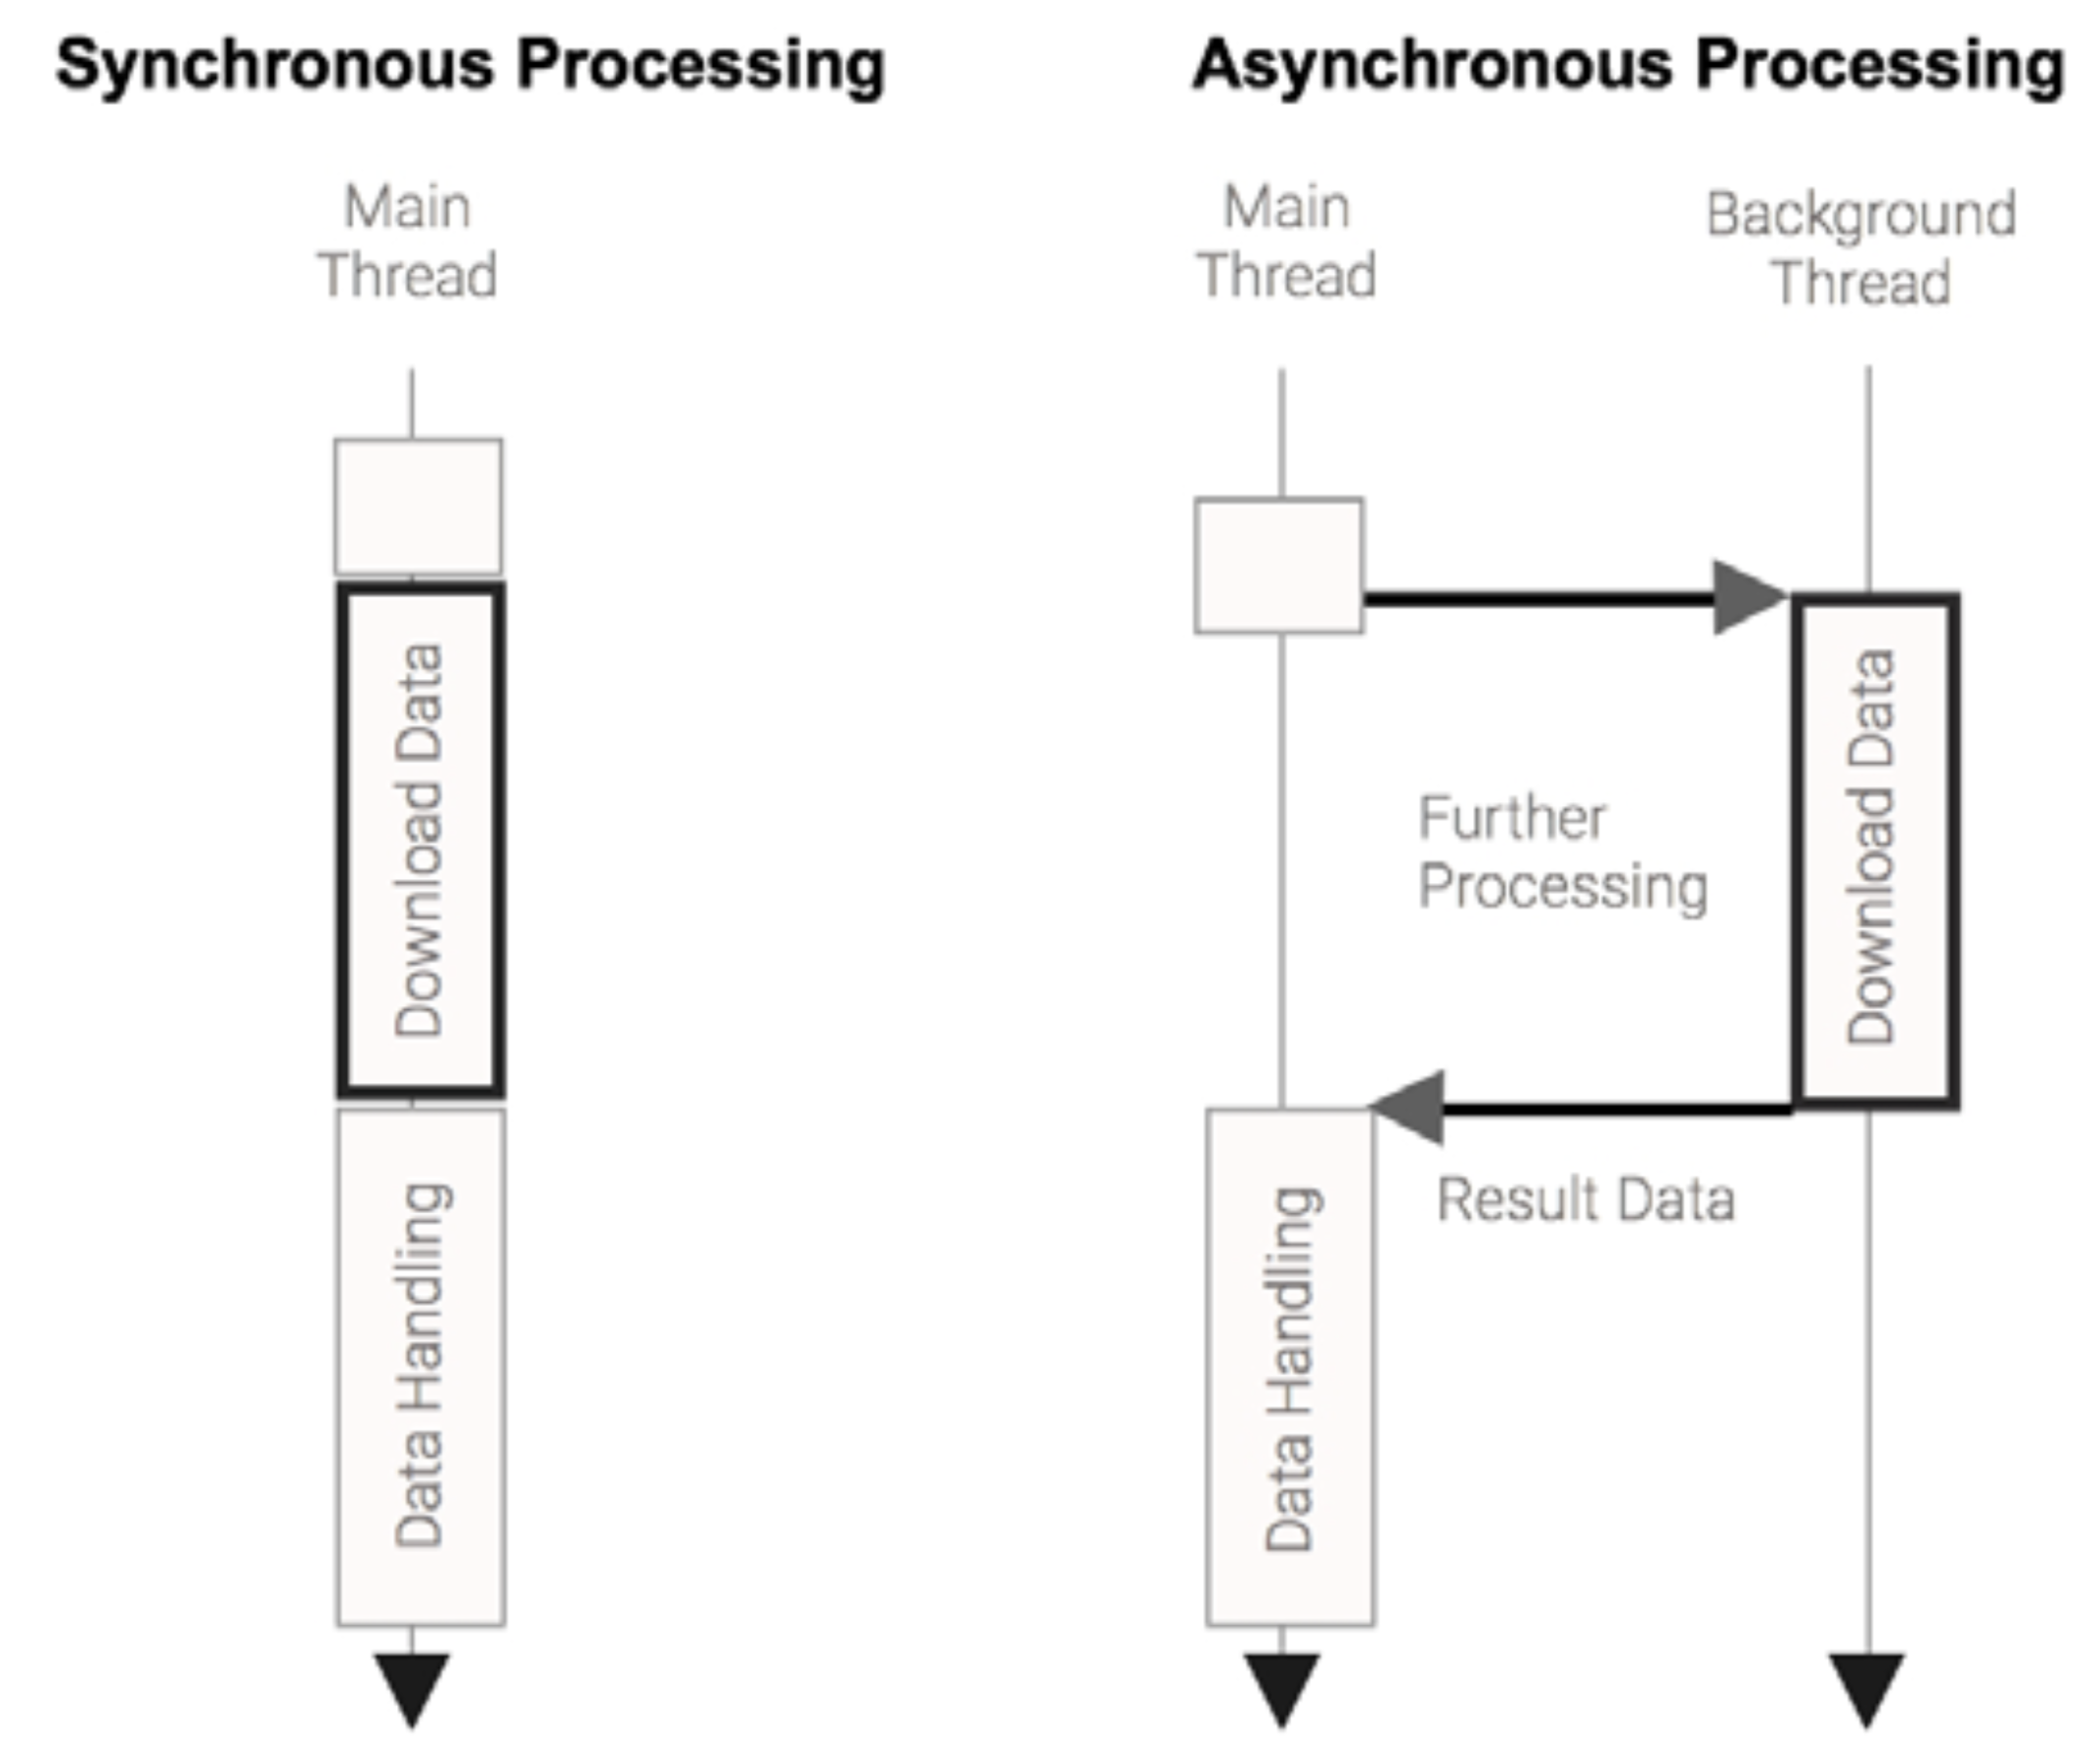
Android thread model
The main thread
The main thread, also known as UI Thread, is also the thread where your UI event handling occurs, so to keep your application as responsible as possible, you should:
- Avoid any kind of long execution task, such as input/output (I/O) that could block the processing for an indefinite amount of time
- Avoid CPU-intensive tasks that could make this thread occupied for a long time

Since the Android 5.0 (Lollipop), a new important thread named RenderThread was introduced to keep the UI animations smooth even when the main thread is occupied doing stuff.
The Application Not Responding (ANR) dialog
Maintaining responsiveness
- Network communications
- Input and output file operations on the local filesystem
- Image and video processing
- Complex math calculations
- Text processing
- Data encoding and decoding
Concurrency in Android
The Android SDK, as it is based on a subset of Java SDK, derived from the Apache Harmony project, provides access to low-level concurrency constructs such as java.lang.Thread, java.lang.Runnable, and the synchronized and volatile keywords.
Thread
public class MyThread extends Thread {
    public void run() {
        Log.d("Generic", "My Android Thread is running ...");
    }
}
 MyThread myThread = new MyThread();
 myTread.start();
Other helpful thread-related methods include the following:
- Thread.currentThread(): This retrieves the current running instance of the thread
Thread.sleep(time): This pauses the current thread from execution for the given period of timeThread.getName() and Thread.getId(): These get the name and TID, respectively so that they can be useful for debugging purposesThread.isAlive(): This checks whether the thread is currently running or it has already finished its jobThread.join(): This blocks the current thread and waits until the accessed thread finishes its execution or dies
Runnable
package java.lang;
public interface Runnable {
    public abstract void run();
}
public class MyRunnable implements Runnable {
    public void run(){
        Log.d("Generic","Running in the Thread " +
        // Do your work here
        ...
    }
}
Thread thread = new Thread(new MyRunnable());
thread.start();
Correctness issues in concurrent programs
int myInt = 2;
...
public class MyThread extends Thread {
    public void run() {
        super.run();
        myInt++;
    }
}
...
Thread t1 = new MyThread();
Thread t2 = new MyThread();
t1.start();
t2.start();
This kind of timing issue is known as a race condition.
这种时序问题就是众所周知的竞争条件/竞态条件。
To achieve this correctness, we can make use of the synchronized construct to solve the correctness issue on the following piece of code:
我们可以使用synchronized构造。
Object lock = new Object();
public class MyThread extends Thread {
    public void run() {
        super.run();
        synchronized(lock) {
            myInt++;
        }
    }
}
Another way to create mutually exclusive scopes is to create a method with a synchronized method:
另一种方法是synchronized方法。
int myInt = 2;
synchronized void increment() {
    myInt++;
}
...
public class IncrementThread extends Thread {
    public void run() {
        super.run();
        increment();
    }
}
Liveness issues in concurrent programs
Thread coordination 线程协调
-
Synchronize access of threads to shared resources or shared memory:
a. Shared database, files, system services, instance/class variables, or queues
-
Coordinate work and execution within a group of threads:
a. Parallel execution, pipeline executions, inter-dependent tasks, and so on
while(!readyToProcess) {
     // do nothing .. busy waiting wastes processor time.
}
In Java, every object has the wait(), notify(), and notifyAll()methods that provide low-level mechanisms to send thread signals between a group of threads and put a thread in a waiting state until a condition is met.
Concurrent package constructs
Other Java concurrent constructs provided by java.util.concurrent, which are also available on Android SDK are as follows:
- Lock objects (java.util.concurrent): They implement locking behaviors with a higher level idiom.
- Executors: These are high-level APIs to launch and manage a group of thread executions (ThreadPool, and so on).
- Concurrent collections: These are the collections where the methods that change the collection are protected from synchronization issues.
- Synchronizers: These are high-level constructs that coordinate and control thread execution (Semaphore, Cyclic Barrier, and so on).
- Atomic variables (java.util.concurrent.atomic): These are classes that provide thread-safe operations on single variables. One example of it is AtomicInteger that could be used in our example to solve the correctness issue.
Executor framework
The Executor framework is another framework available on java.util. concurrent that provides an interface to submit Runnable tasks, decoupling the task submission from the way the task will run:
public interface Executor {
    void execute(Runnable command);
}
- Executors.newCachedThreadPool(): This is a thread poll that could grow and reuse previously created threads
- Executors.newFixedThreadPool (nThreads): This is a thread pool with a fixed number of threads and a message queue for store work
- Executors.newSingleThreadPool(): This is similar to newFixedThreadPool, but with only one working thread
public class MyRunnable implements Runnable {
    public void run() {
        Log.d("Generic", "Running From Thread " + Thread.currentThread().getId());
        logOnConsole("Running From Thread " + Thread.currentThread().getId());
        // Your Long Running Computation Task
        try {
            // Sleeps for 200 ms
            Thread.sleep(200);
        } catch (InterruptedException e) {
            e.printStackTrace();
        }
    }
}

public void startWorking() {
    Executor executor = Executors.newFixedThreadPool(5);
    for ( int i=0; i < 20; i++ ) {
        executor.execute(new MyRunnable());
    }
}
Android primary building blocks
four main building blocks 四大组件
- android.app.Activity
- android.app.Service
- android.content.BroadcastReceiver
- android.content.ContentProvider
The Activity, Service, and BroadcastReceiver are activated explicitly or implicitly over an asynchronous message called Intent.
激活活动、服务、广播接收者要显示或者隐示调用异步意图。
Activity concurrent issues
The most important callbacks on the Activity lifecycle are as follows:
- onCreate(): At this state, Activity is not visible, but it is here where all the private Activity resources (views and data) are created. The long and intensive computations should be done asynchronously in order to decrease the time when the users don’t get a visual feedback during an Activity transition.
- onStart(): This is the callback called when the UI is visible, but not able to interact on the screen. Any lag here could make the user angry as any touch event generated at this stage is going to be missed by the system.
- onResume(): This is the callback called when Activity is going to be in the foreground and at an interactable state.
- onPause(): This is a callback called when Activity is going to the background and is not visible. Computations should end quickly as the next Activity will not resume until this method ends.
- onStop(): This is a callback called when Activity is no longer visible, but can be restarted.
- onDestroy(): This is a callback called when the Activity instance is going to be destroyed in the background. All the resources and references that belong to this instance have to be released.
Manipulating the user interface
You cannot manipulate the user interface from any thread other than the main thread.
If the system detects this, it will instantly notify the application by throwing CalledFromWrongThreadException.
If the developer has access to an Activity instance, the runOnUiThread instance method can be used to update the UI from a background thread.
The method accepts a Runnable object like the one used to create an execution task for a thread:
public final void runOnUiThread (Runnable)
Service concurrent issues 服务并发问题
Service, by default, runs in the main thread of the application process. It does not create its own thread, so if your Service is going to do any blocking operation, such as downloading an image, play a video, or access a network API, the user should design a strategy to of oad the time of the work from the main thread into another thread.
- Started services: This is the service that is started by startService() that can run definitively even if the component that started it was destroyed. A started service does not interact directly with the component that started it.
- Bound services: This service exists while at least one Android component is bounded to it by calling bindService(). It provides a two-way (client-server) communication channel for communication between components.
Started services issues
Bound services issues
Service in a separate proces
To implement a service in a different process, we need to use an inter-process communication (IPC) technique to send messages between your application and the service.
There are two technologies available on the Android SDK to implement this, as follows:
- AIDL (Android Interface Definition Language): This allows you to define an interface over a set of primitive types. It allows you create multithreaded processing services, but it adds other levels of complexity to your implementation. This is only recommended to advanced programmers.
- Messenger: This is a simple interface that creates a queue of work for you in the service side. This executes all the tasks sequentially on single thread managed by a Handler.
Broadcast receiver concurrent issues 广播接收者并发问题
Android concurrency constructs Android 并发构造
Summary
In this chapter, we took a detailed look at the available Android runtimes, Android processes, and thread models.
We then introduced the concurrent issues that we would cope with when we try to implement robust concurrent programs.
Finally, we listed the basic concurrent building blocks available on the SDK to design concurrent programs.
In the next chapter, we’ll take a look at some Android-speci c low-level building blocks on which the other concurrency mechanisms are built: Handler, Looper, and LooperThread.
第2章 Performing Work with Looper, Handler, and HandlerThread
- Understanding Looper
- Understanding Handler
- Sending work to Looper
- Scheduling work with post
- Using Handler to defer work
- Leaking implicit references
- Leaking explicit references
- Updating the UI with Handler
- Canceling pending messages
- Multithreading with Handler and HandlerThread
- Applications of Handler and HandlerThread
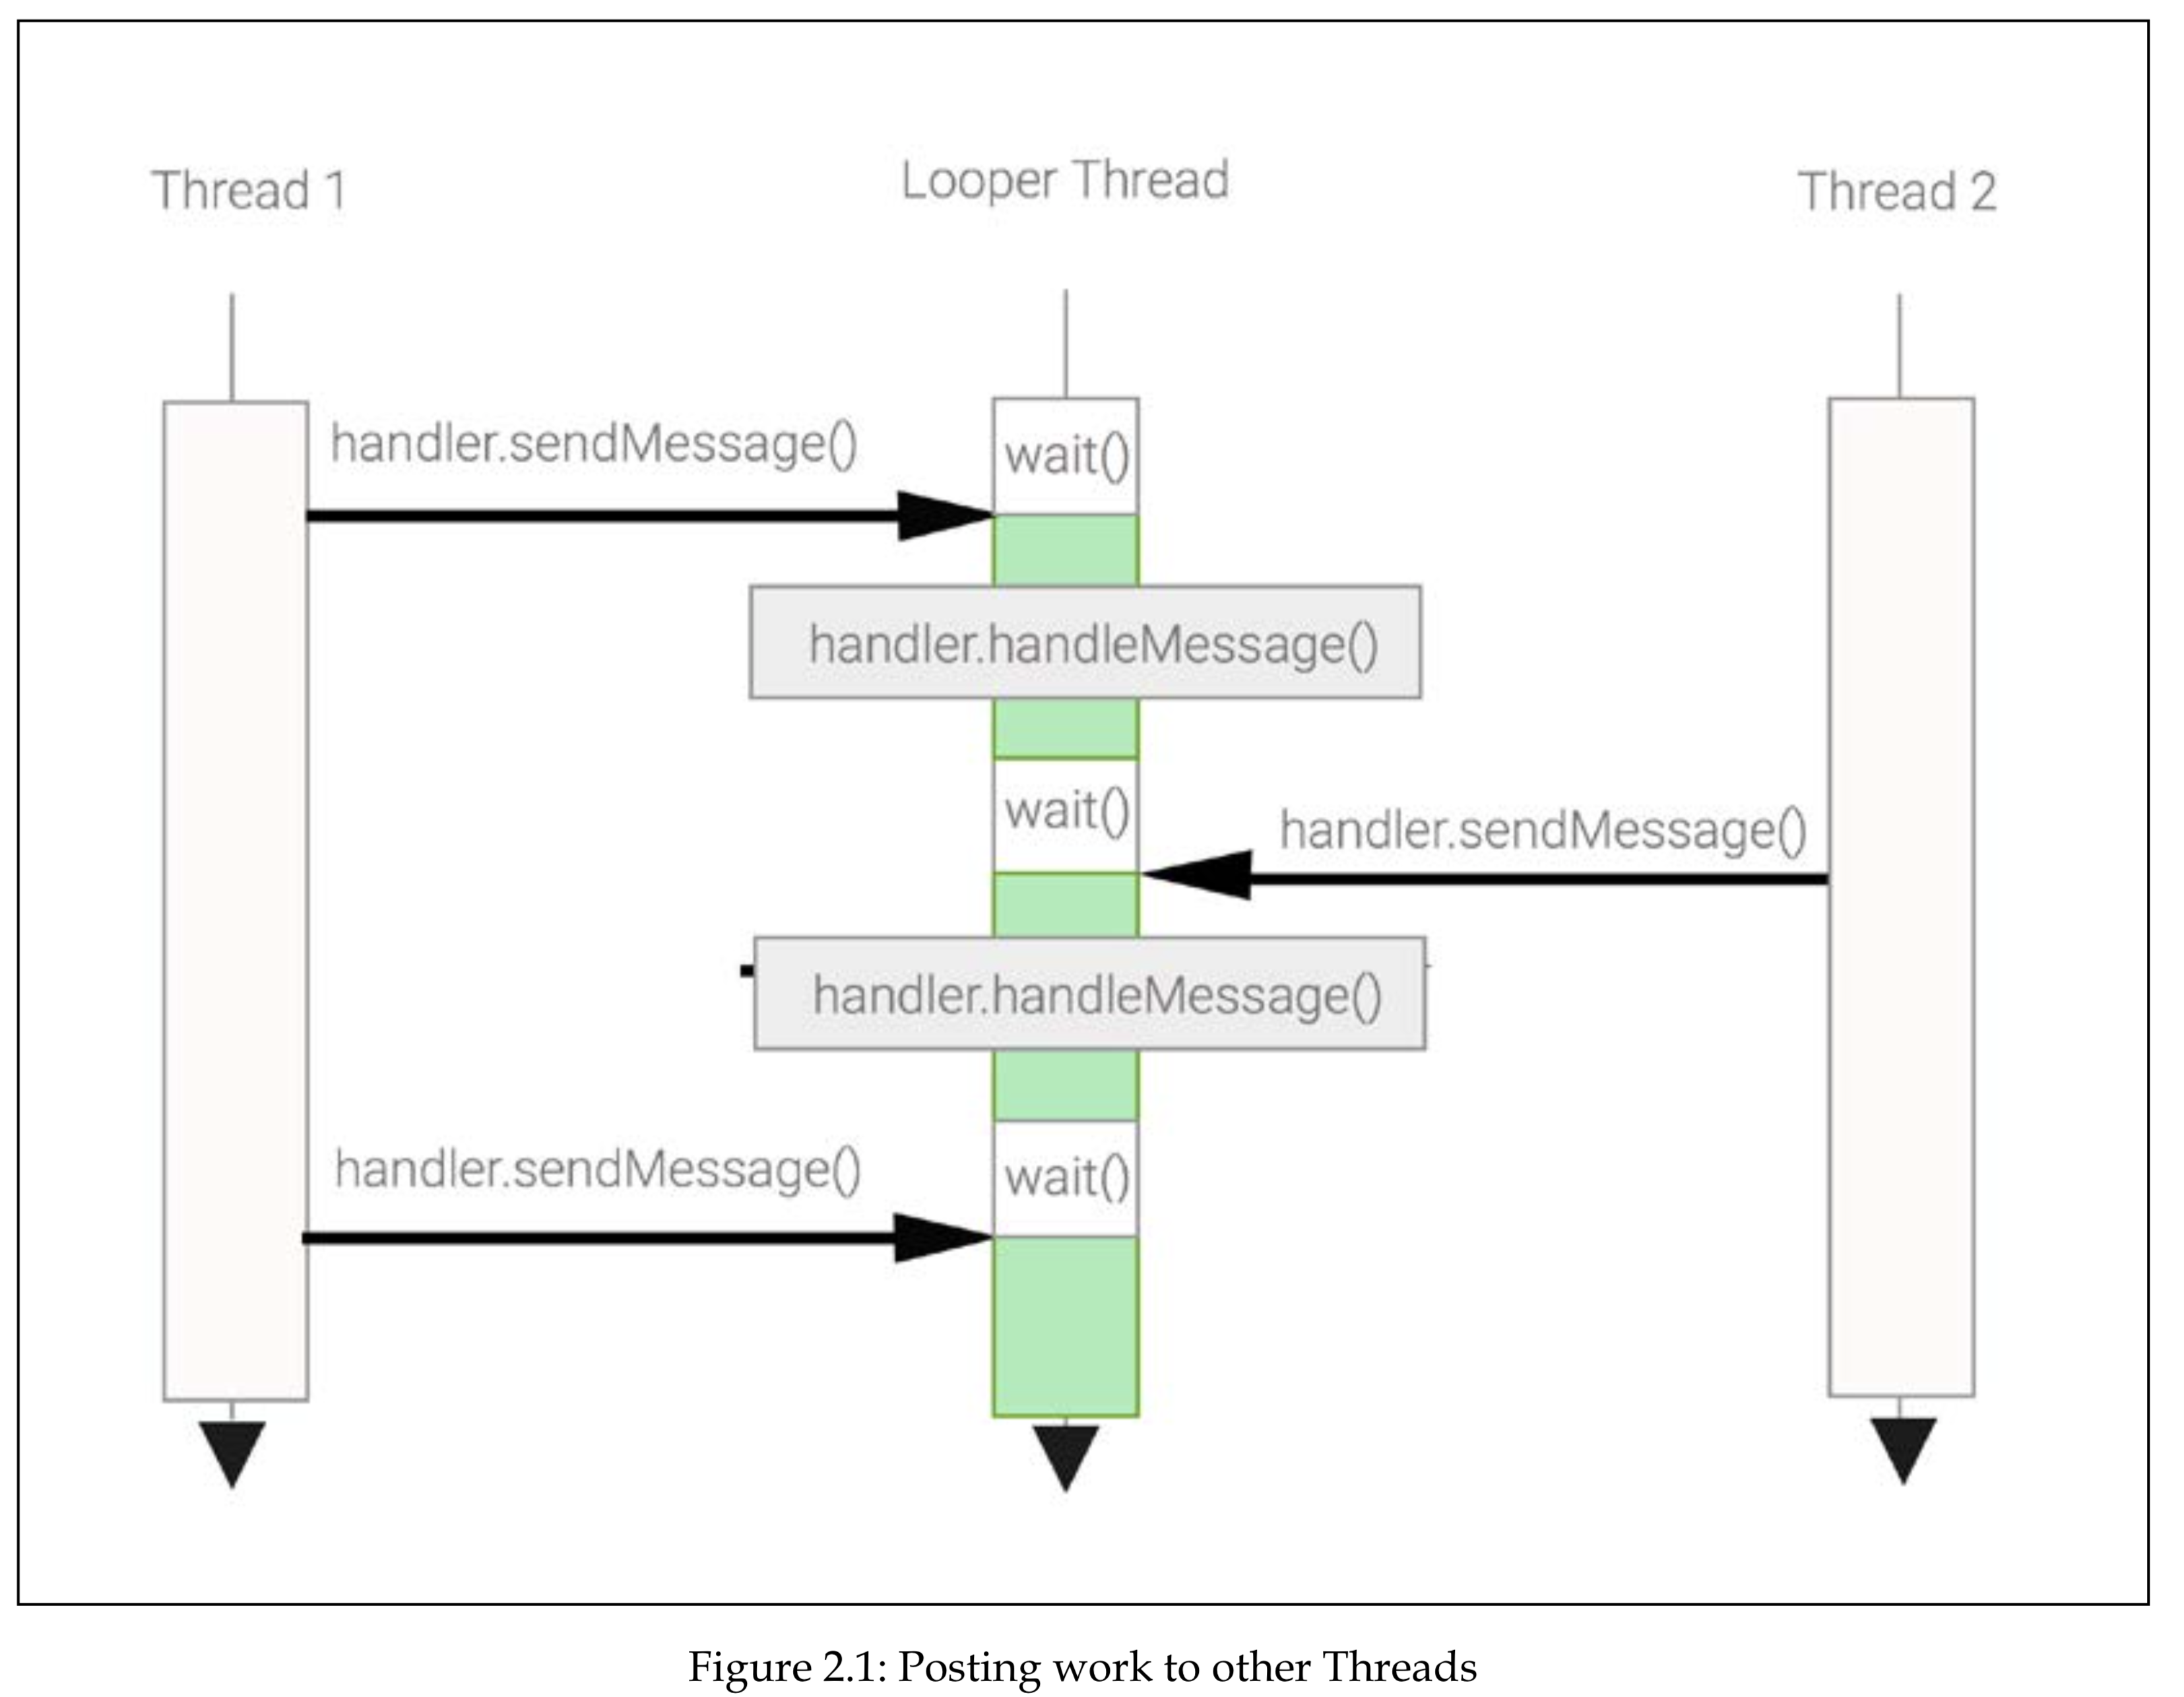
Understanding Looper
A loop is a group of instructions that are repeated continually until a termination condition is met.
Following this de nition, Android’s Looper executes on a thread that has a MessageQueue, executes a continuous loop waiting for work, and blocks when there is no work pending. When work is submitted to its queue, it dispatches it to the target Handler de ned explicitly on the Message object.
The Looper sequence on Android follows these steps:
- Wait until a Message is retrieved from its MessageQueue
- If logging is enabled, print dispatch information
- Dispatch the message to the target Handler
- Recycle the Message
- Go to step 1
获取主线程 Looper。
Looper mainLooper = Looper.getMainLooper();
To set up our own Looper thread, we need to invoke two static methods of Looper— prepare and loop—from within the thread, and they will handle the continuous loop. Here is a simple example:
为了设置我们自己线程的 Looper,我们需要调用 2 个 Looper 的静态方法 prepare 和 loop。 它们会持有连续循环。
class SimpleLooper extends Thread {
    public void run() {
        // Attach a Looper to the current Thread
        Looper.prepare();
        // Start the message processing
        Looper.loop();
    }
}
Looper.prepare()must only be called once from within the same thread; otherwise, a RuntimeException will to be thrown that says only one looper may be created per thread.
Understanding Handler
public class SimpleLooper extends Thread {
    private Handler myHandler;

    @Override
    public void run() {
        Looper.prepare();
        myHandler  =  new MyHandler();
        Looper.loop();
    }

    public Handler getHandler() {
        return myHandler;
    }
}
public class MyHandler extends Handler {
    @Override
    public void handleMessage(Message msg) {
        // Add here your message handling
        // processing
    }
}
public class StackTraceHandler extends Handler {
    @Override
    public void handleMessage(Message msg) {
        // Prints the Stack Trace on the Android Log
        Thread.currentThread().dumpStack();
    }
}
If the current thread does not have a Looper and we try to create a handler over the super constructor, a runtime exception with the message Can’t create handler inside thread that has not called Looper.prepare() is thrown.
public void onCreate(Bundle savedInstanceState) {
    super.onCreate(savedInstanceState);
    ...
    Handler handler = new StackTraceHandler();
    Message msg = handler.obtainMessage();
    handler.sendMessage(msg);
}
Sending work to a Looper
public class StackTraceHandler extends Handler {
    StackTraceHandler(Looper looper){
    super(looper);
}
Scheduling work with post

Using Handler to defer work
Leaking implicit references
Leaking explicit references
Updating the UI with Handler
Canceling a pending Runnable
Scheduling work with send
Cancelling pending messages
Composition versus inheritance
Multithreading with Handler and ThreadHandler
Looper message dispatching debugging
Sending messages versus posting runnables
Applications of Handler and HandlerThread
Summary
In this chapter, we learned how to use Handler to queue work for the main thread and how to use Looper to build up a queueing infrastructure for our own Thread.
We saw the different ways in which we can de ne work with Handler: arbitrary work de ned at the call site with Runnable or prede ned work implemented in the Handler itself and triggered by message-sending.
In the meantime, we learned how to defer work properly without leaking memory on the way.
We learned how to use Handler in a multithreaded application to pass work and results back and forth between cooperating threads, performing blocking operations on an ordinary background thread and communicating the results back to the main thread to update the user interface.
In the next chapter, we’ll start to build responsive applications by applying the AsyncTask instance to execute work in the background using pools of threads and returning progress updates and results to the main thread.
第3章 Exploring the AsyncTask 探索 AsyncTask
- Introducing AsyncTask
- Declaring AsyncTask types
- Executing AsyncTasks
- Providing indeterministic progress feedback
- Providing deterministic progress feedback
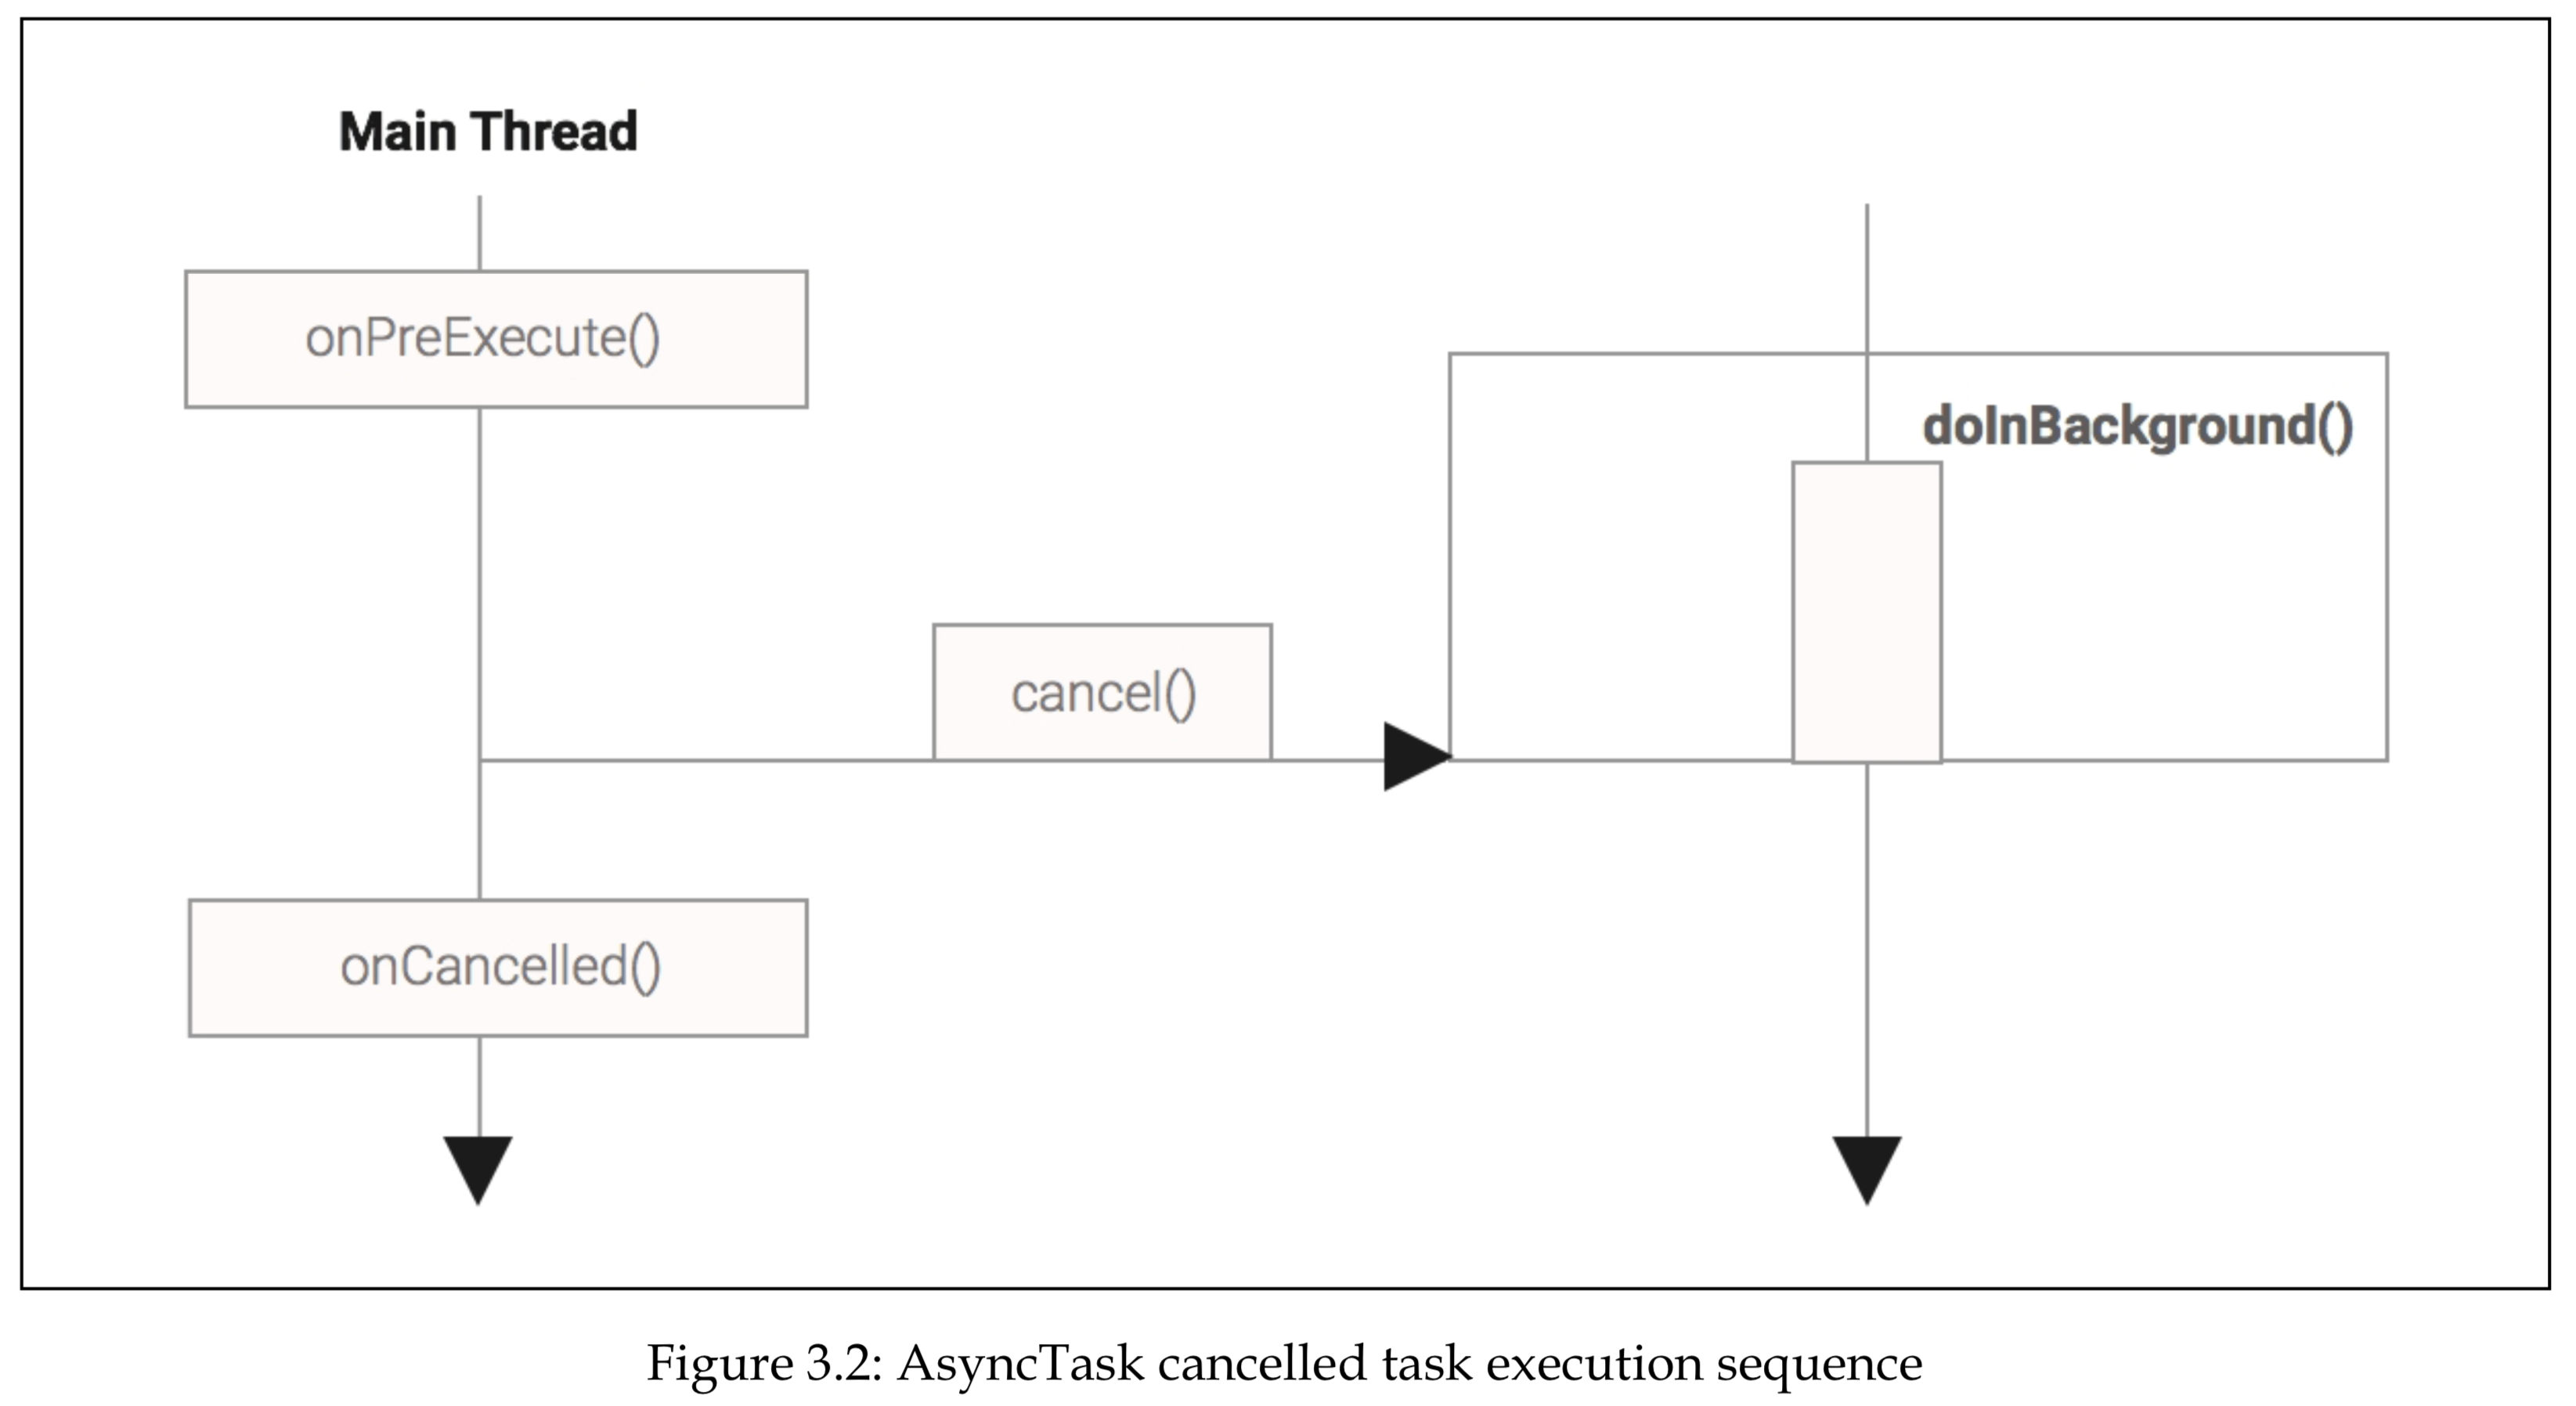
- Canceling an AsyncTask
- Handling exceptions
- Controlling the level of concurrency
- Common AsyncTask issues
- Applications of AsyncTask
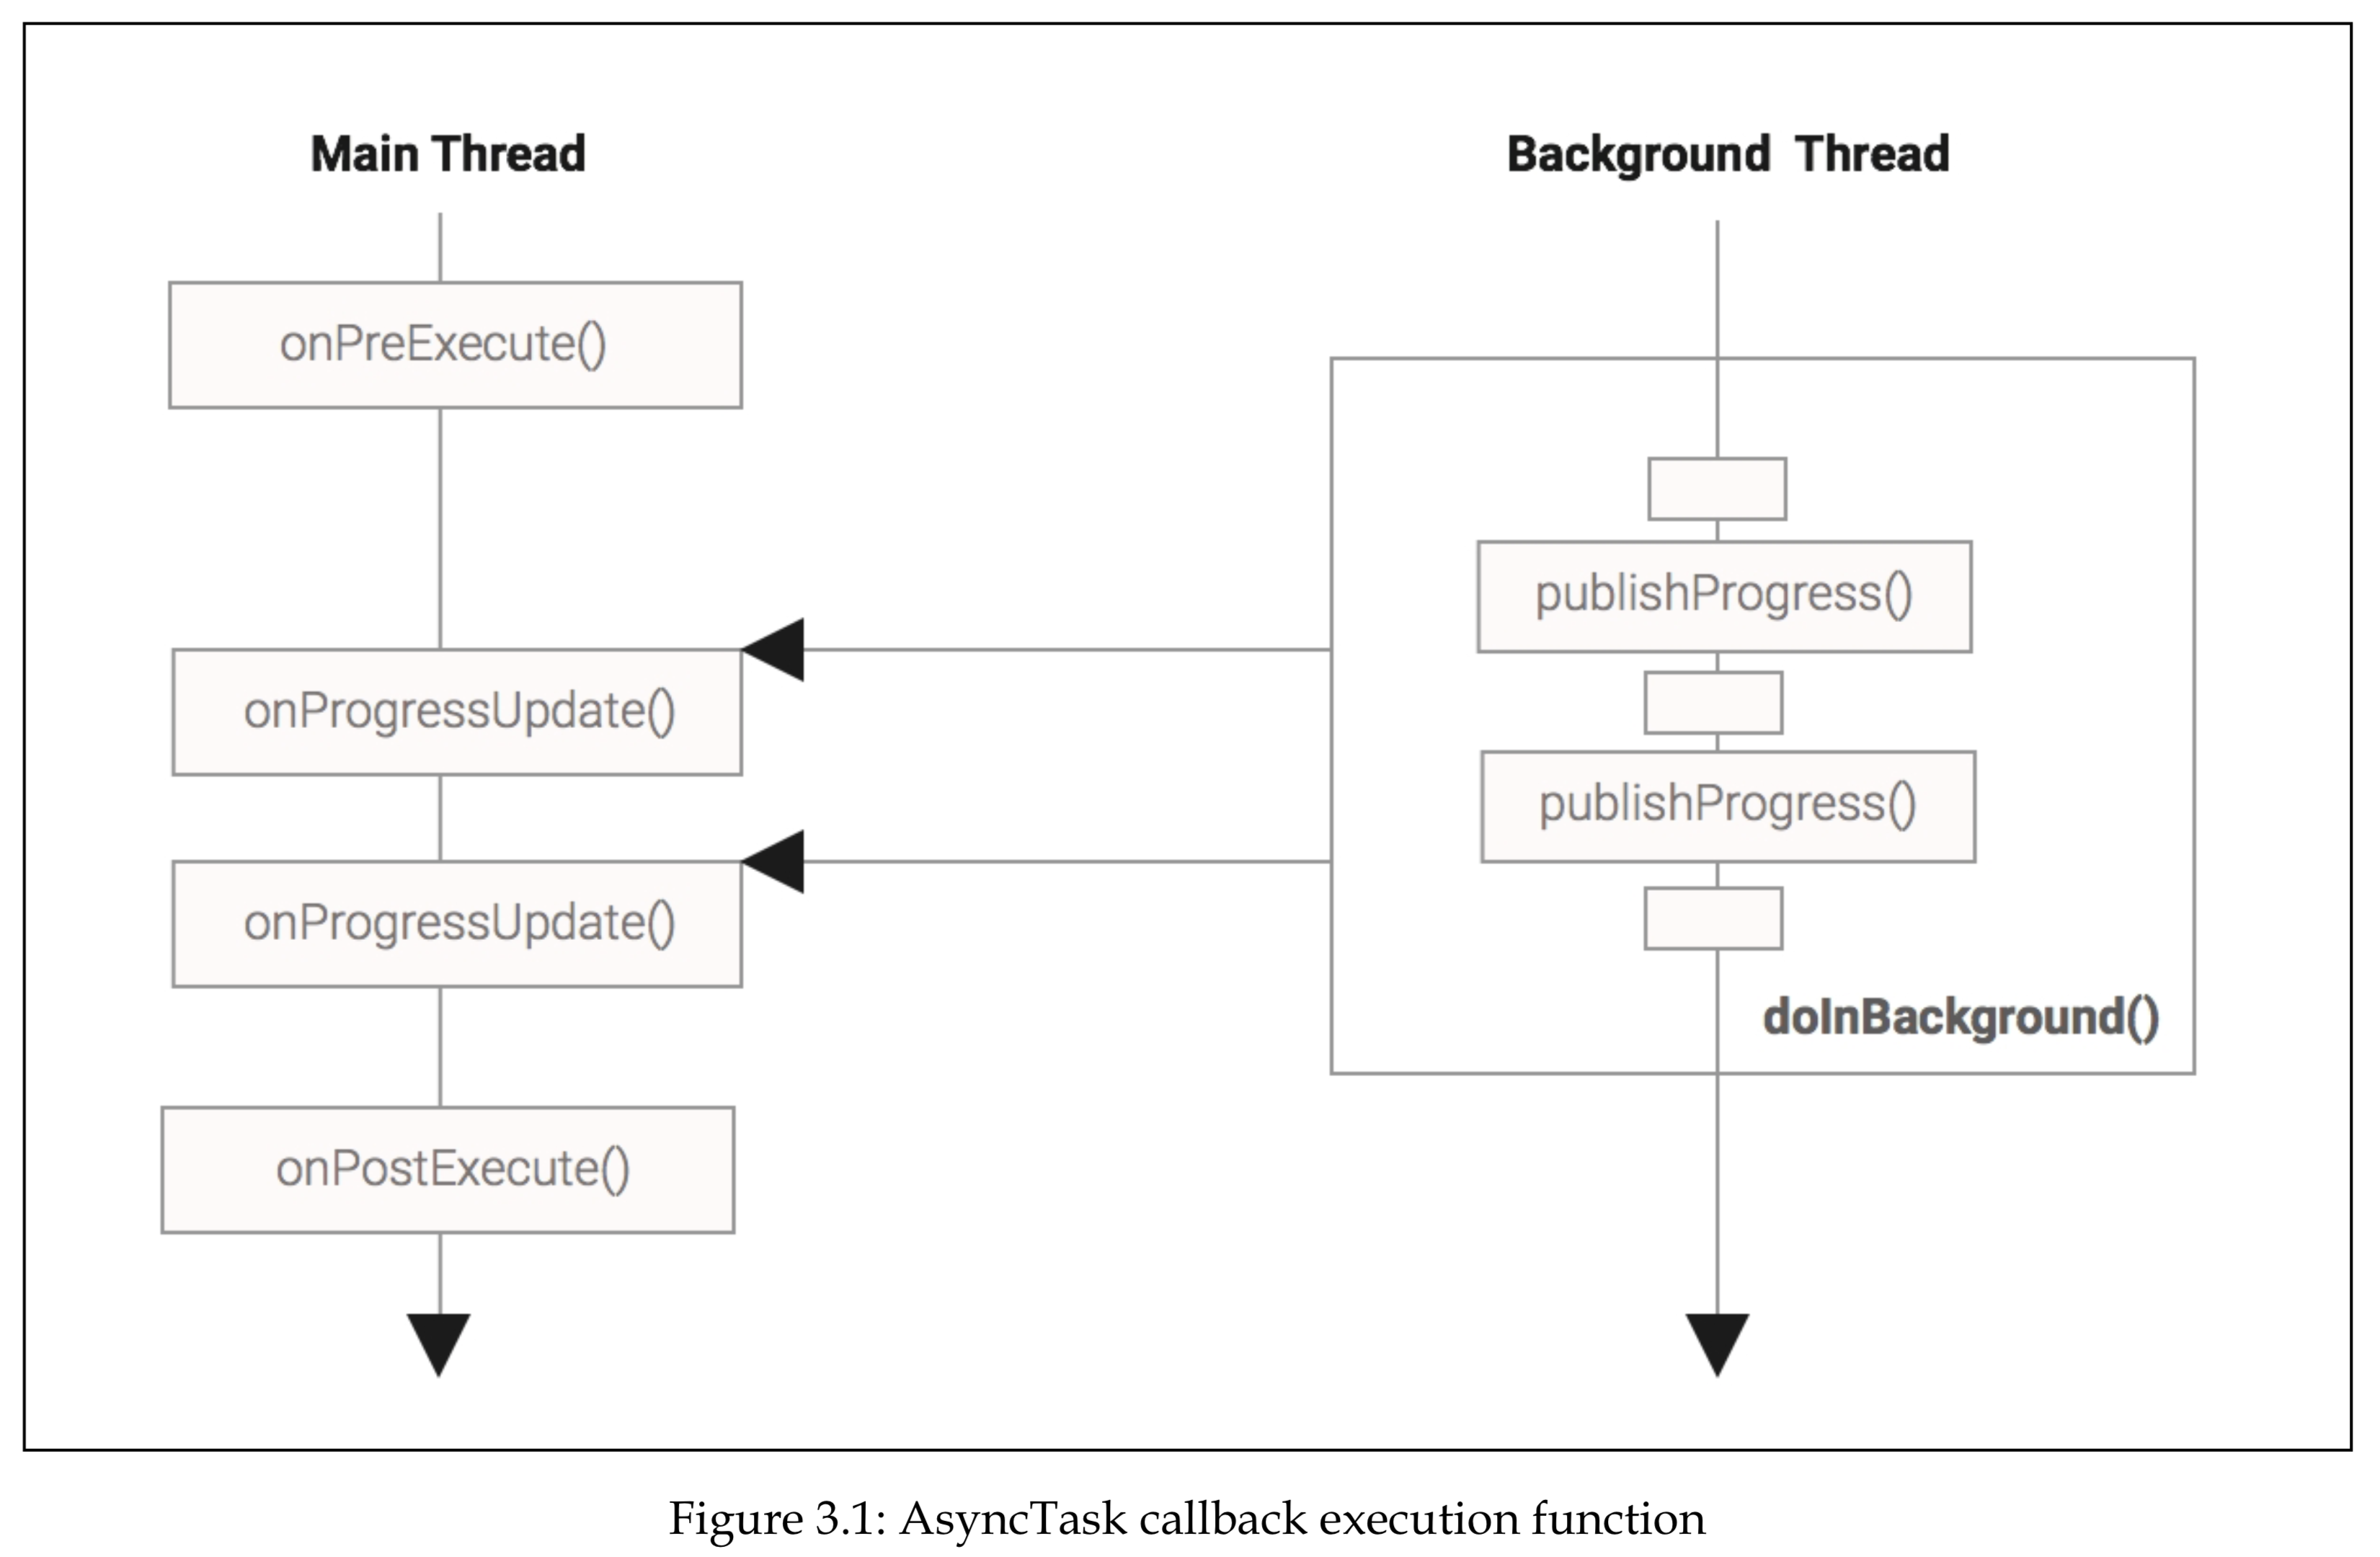
Introducing AsyncTask
protected void onPreExecute()
protected void onProgressUpdate(Progress... values)
protected void onPostExecute(Result result)
protected void onCancelled(Result result)
protected void onCancelled()
Declaring AsyncTask types
abstract class AsyncTask<Params, Progress, Result>
public class DownloadImageTask extends AsyncTask<URL, Integer, Bitmap> {
    // Weak reference to the UI View to update
    private final WeakReference<ImageView> imageViewRef;

    public DownloadImageTask(ImageView imageView) {
        this.imageViewRef = new WeakReference<ImageView>(imageView);
    }

    // Retrieves the image from a URL
    private Bitmap downloadBitmap(URL url) {
        // elided for brevity ...
        ...
    }

    @Override
    protected Bitmap doInBackground(URL... params) {
        URL url = params[0];
        // The IO operation invoked will take a significant ammount
        // to complete
        return downloadBitmap(url);
    }

    ...

    @Override
    protected void onPostExecute(Bitmap bitmap) {
        ImageView imageView = this.imageViewRef.get();
        if (imageView != null) {
            imageView.setImageBitmap(bitmap);
        }
    }
}
Executing AsyncTasks
class MyTask implements AsyncTask<String,Void,String> { ... }
MyTask task = new MyTask().execute("hello");
Providing indeterministic progress feedback
Providing deterministic progress feedback
@Override
protected void onProgressUpdate(Integer... values) {
    progress.setProgress(values[0]);
}
Canceling an AsyncTask
public final boolean cancel(boolean mayInterruptIfRunning)
@Override
protected void onPreExecute() {
    ...
    progress.setCancelable(true);
    progress.setOnCancelListener(
        new DialogInterface.OnCancelListener() {
            public void onCancel(DialogInterface dialog) {
                DownloadImageTask.this.cancel(false);
            }
        }
    );
    ...
}
// If the download is cancelled the Bitmap is null
if ( !isCancelled() ) {
    bitmap = BitmapFactory.decodeStream(bif);
}
AsyncTask Execution State
// Create a download task object
DownloadImageTask task  = new DownloadImageTask(ShowMyPuppyActivity.this, iv);
...
if ( task.getStatus() == AsyncTask.Status.PENDING ) {
    // DownloadImageTask has not started yet so
    // we can can invoke execute()
} else if (task.getStatus() == AsyncTask.Status.RUNNING) {
    // DownloadImageTask is currently running in
    // doInBackground()
} else if (task.getStatus() == AsyncTask.Status.FINISHED
        && task.isCancelled()) {
    // DownloadImageTask is done OnCancelled was called
} else {
    // DownloadImageTask is done onPostExecute was called
}
Handling exceptions
public class Result<T> {
    public T result;
    public Throwable error;
}
Controlling the level of concurrency
API 11
public final AsyncTask<Params, Progress, Result> executeOnExecutor(Executor exec, Params... params)
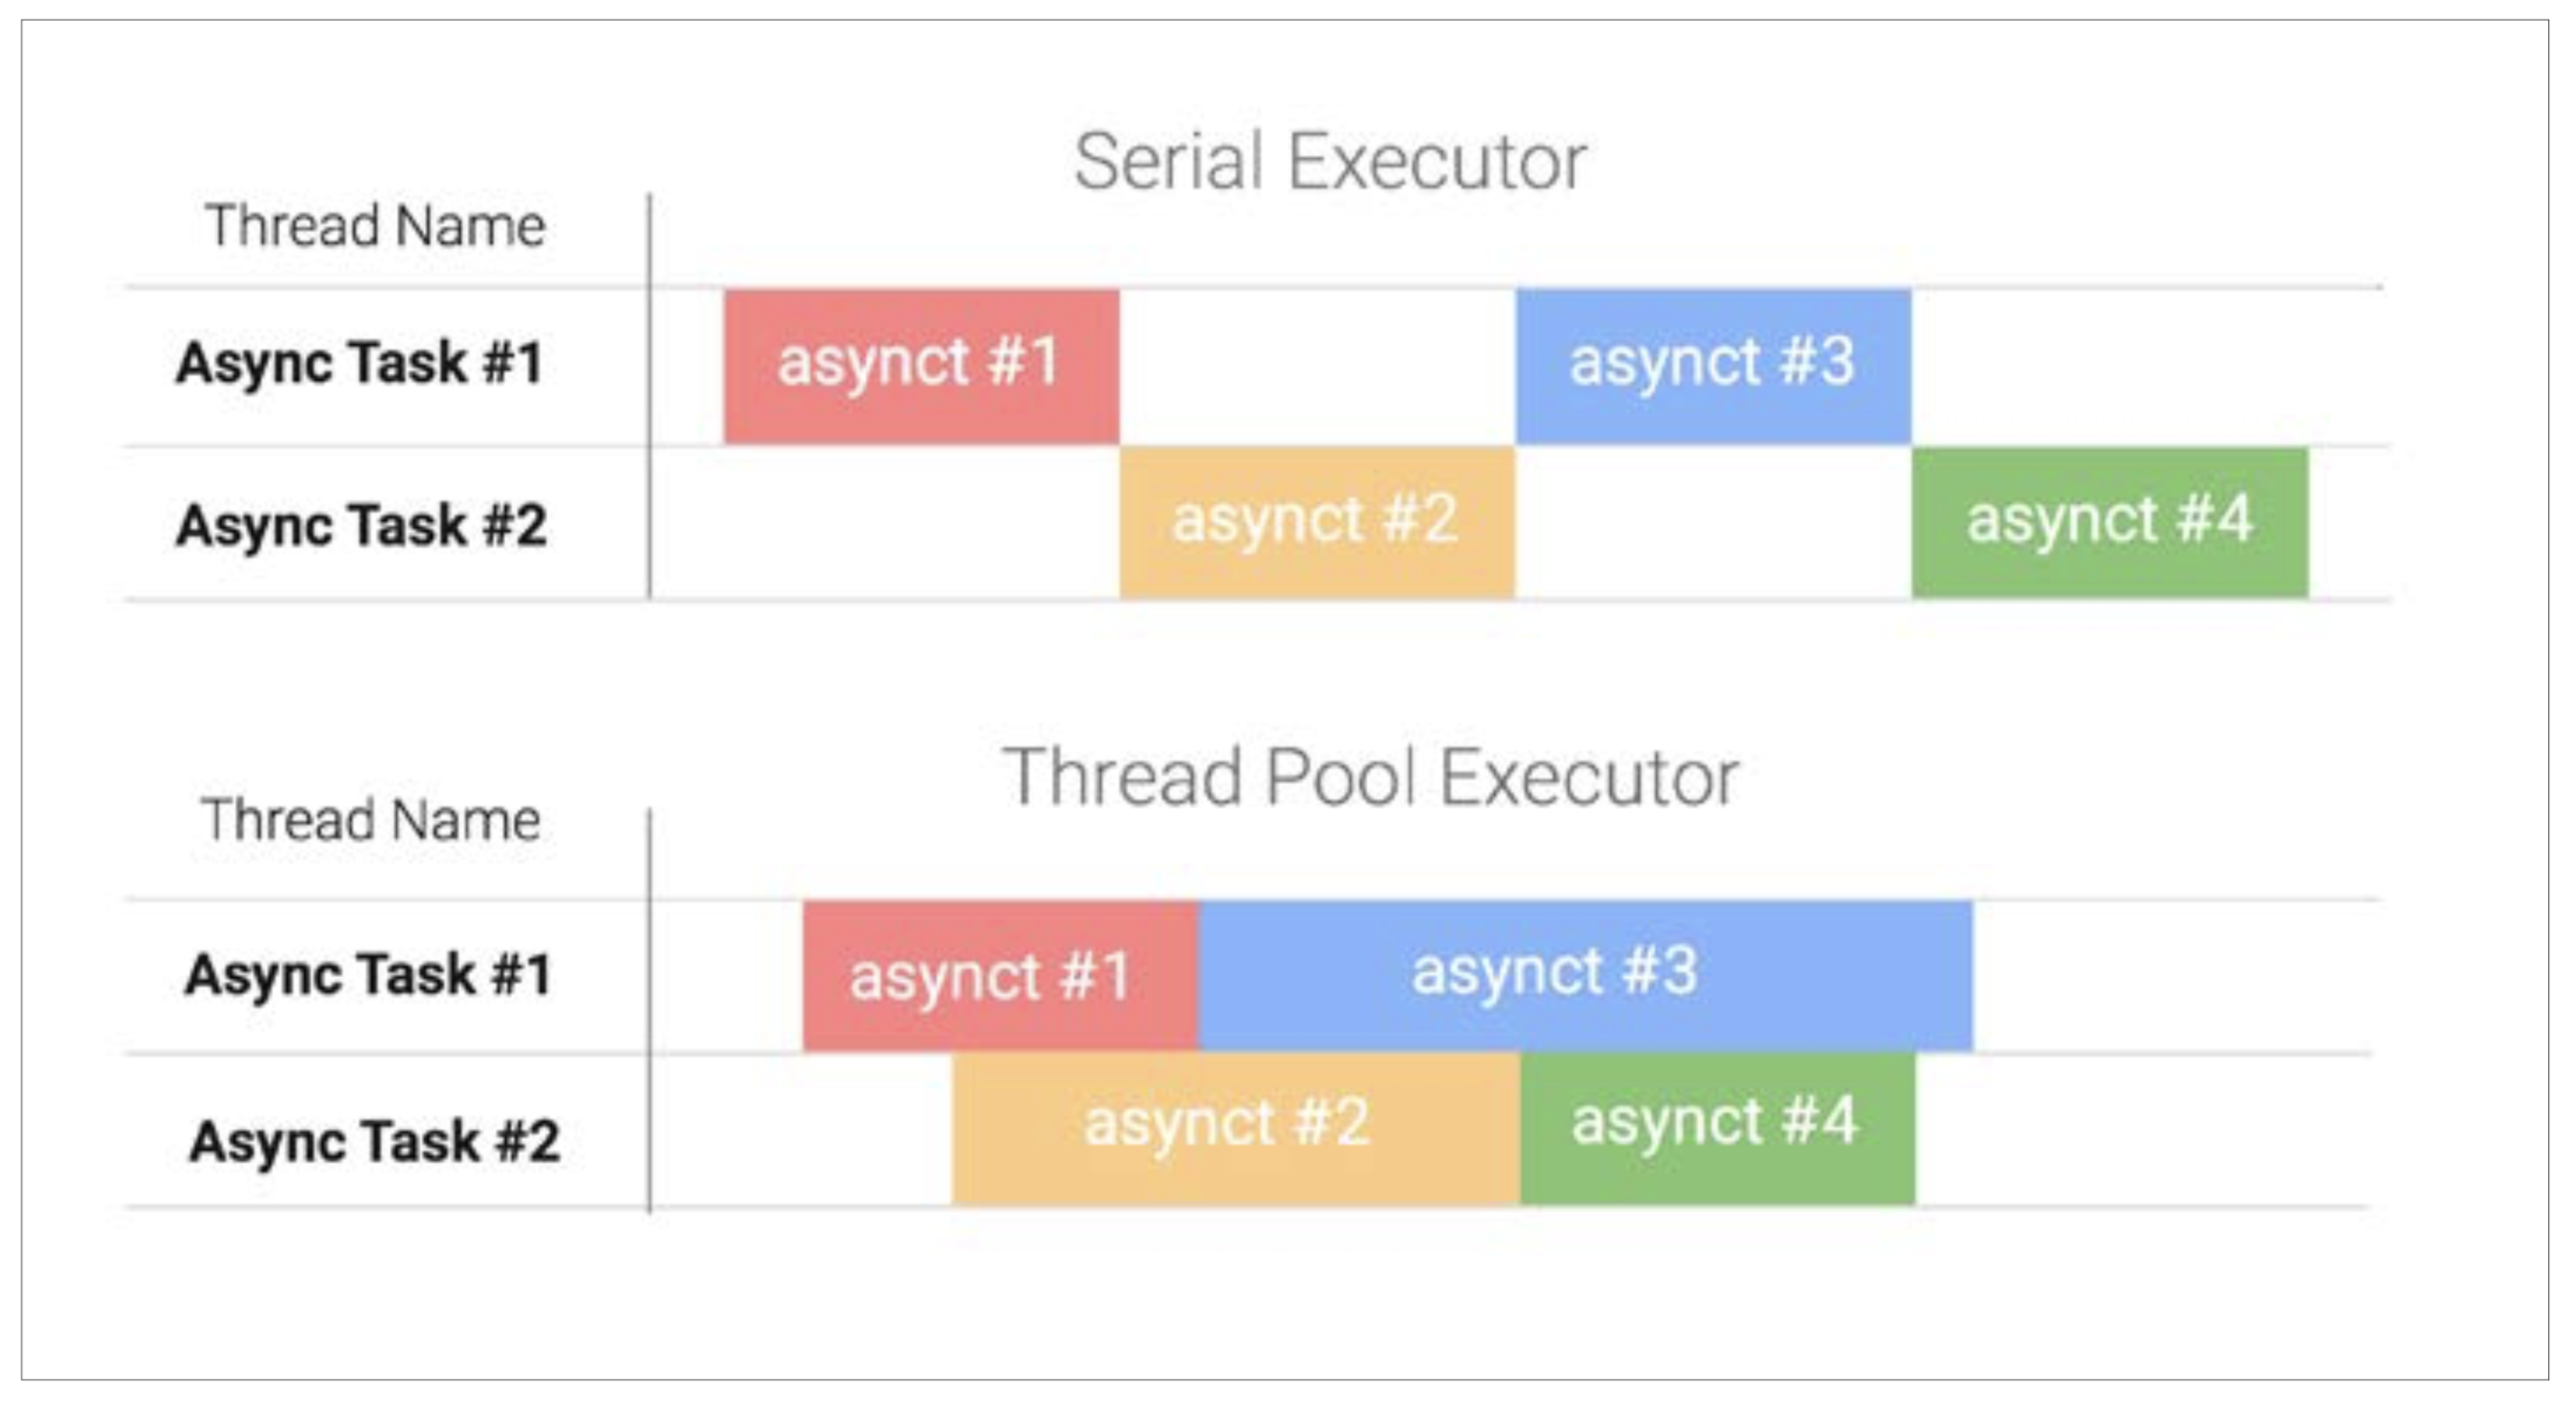
The AsyncTask class provides two Executor instances that allow you to choose between the concurrency levels described earlier in this section:
- SERIAL_EXECUTOR: This Executor queues tasks and makes sure that the tasks are executed by the AsyncTask ThreadPool sequentially, in the order they were submitted.
- THREAD_POOL_EXECUTOR: This Executor runs tasks using a pool of threads for efficiency (starting a new thread comes with some overhead cost that can be avoided through pooling and reuse). THREAD_POOL_EXECUTOR is an instance of the JDK class ThreadPoolExecutor, which uses a pool of threads that grows and shrinks with demand. In the case of AsyncTask, the pool is configured to maintain at least five threads, and expands up to 128 threads. In Android Lollipop 5.0 (API Level 21), the maximum number of threads was reduced to the number of CPU cores * 2 + 1 and the ThreadPool global enqueuing capacity was increased.
task.executeOnExecutor(AsyncTask.THREAD_POOL_EXECUTOR, params);
API 11 the following two statements are equivalent. 下面2行效果一样。
task.execute(params);
task.executeOnExecutor(AsyncTask.SERIAL_EXECUTOR, params);
Common AsyncTask issues
As with any powerful programming abstraction, AsyncTask is not entirely free from issues and compromises. In the next sections we are going to list some of the pitfalls that we could face when we want to make use of this construct in our applications.
Fragmentation issues
Memory leaks
The developer needs to make sure that it cancels the task and removes the reference to the destroyed activity or view.
Activity lifecycle issues
Handling lifecycle issues with early cancellation
protected void onPause() {
    super.onPause();
    if ((task != null) && (isFinishing()))
        task.cancel(false);
}
Handling lifecycle issues with retained headless fragments
public interface AsyncListener {
    void onPreExecute();
    void onProgressUpdate(Integer... progress);
    void onPostExecute(Bitmap result);
    void onCancelled(Bitmap result);
}
Applications of AsyncTask
Summary
In this chapter, we’ve taken a detailed look at AsyncTask and how to use it to write responsive applications that perform operations without blocking the main thread.
We saw how to keep users informed of the progress, and even allow them to cancel operations early. We also learned how to deal with issues that can arise when the Activity lifecycle conspires against our background tasks.
Finally, we considered when to use AsyncTask, and when it might not be appropriate. In the next chapter we’ll learn about Loader—a construct designed to streamline the asynchronous loading of data on the Android platform.
第4章 Exploring the Loader 探索 Loader
- Introducing loaders
- Loader API
- Loader lifecycle
- Loading data with Loader
- Building responsive apps with AsyncTaskLoader
- Building responsive apps with CursorLoader
- Combining loaders
- Applications of loaders
Introducing Loaders
- Background processing: The heavy lifting is automatically performed on a background thread, and the results are safely introduced to the main thread on completion.
- Result caching: Loaded data can be cached and redelivered on repeat calls for speed and efficiency.
- Lifecycle awareness: The framework gives us control over when a Loader instance is destroyed, and allows Loaders to live outside the Activity lifecycle, making their data available across the application and across Activity restarts.
- Data change management: Loaders monitor their underlying data source, and reload their data in the background when necessary. The framework includes lifecycle callbacks that allow us to properly dispose of any expensive resources held by our Loaders.
Loader API
- **android.content.Loader
**: Nonfunctional (abstract) base class that defines the base methods - android.app.LoaderManager: Manages loaders in Activities and Fragments
- android.app.LoaderManager.LoaderCallbacks: Callbacks used to listen for Loader events
- **android.content.AsyncTaskLoader
**: Loader subclass that executes the loading over an AsyncTask - android.content.CursorLoader: Loader implementation used to deal with **android internal databases and content providers’ data sources
Loader
public class Loader<DataType>
protected void onStartLoading()
protected void onStopLoading()
protected void onForceLoad()
protected void onReset()
protected void onCancelLoad()
Loader Manager
LoaderManager getLoaderManager()
// android.support.v4
LoaderManager getSupportLoaderManager();
Loader<D> initLoader(int id, Bundle args, LoaderManager.LoaderCallbacks<D> callback)
Loader<D> restartLoader(int id,Bundle args, LoaderManager.LoaderCallbacks<D> callback)
Loader<D> getLoader(int id);
void destroyLoader(int id);
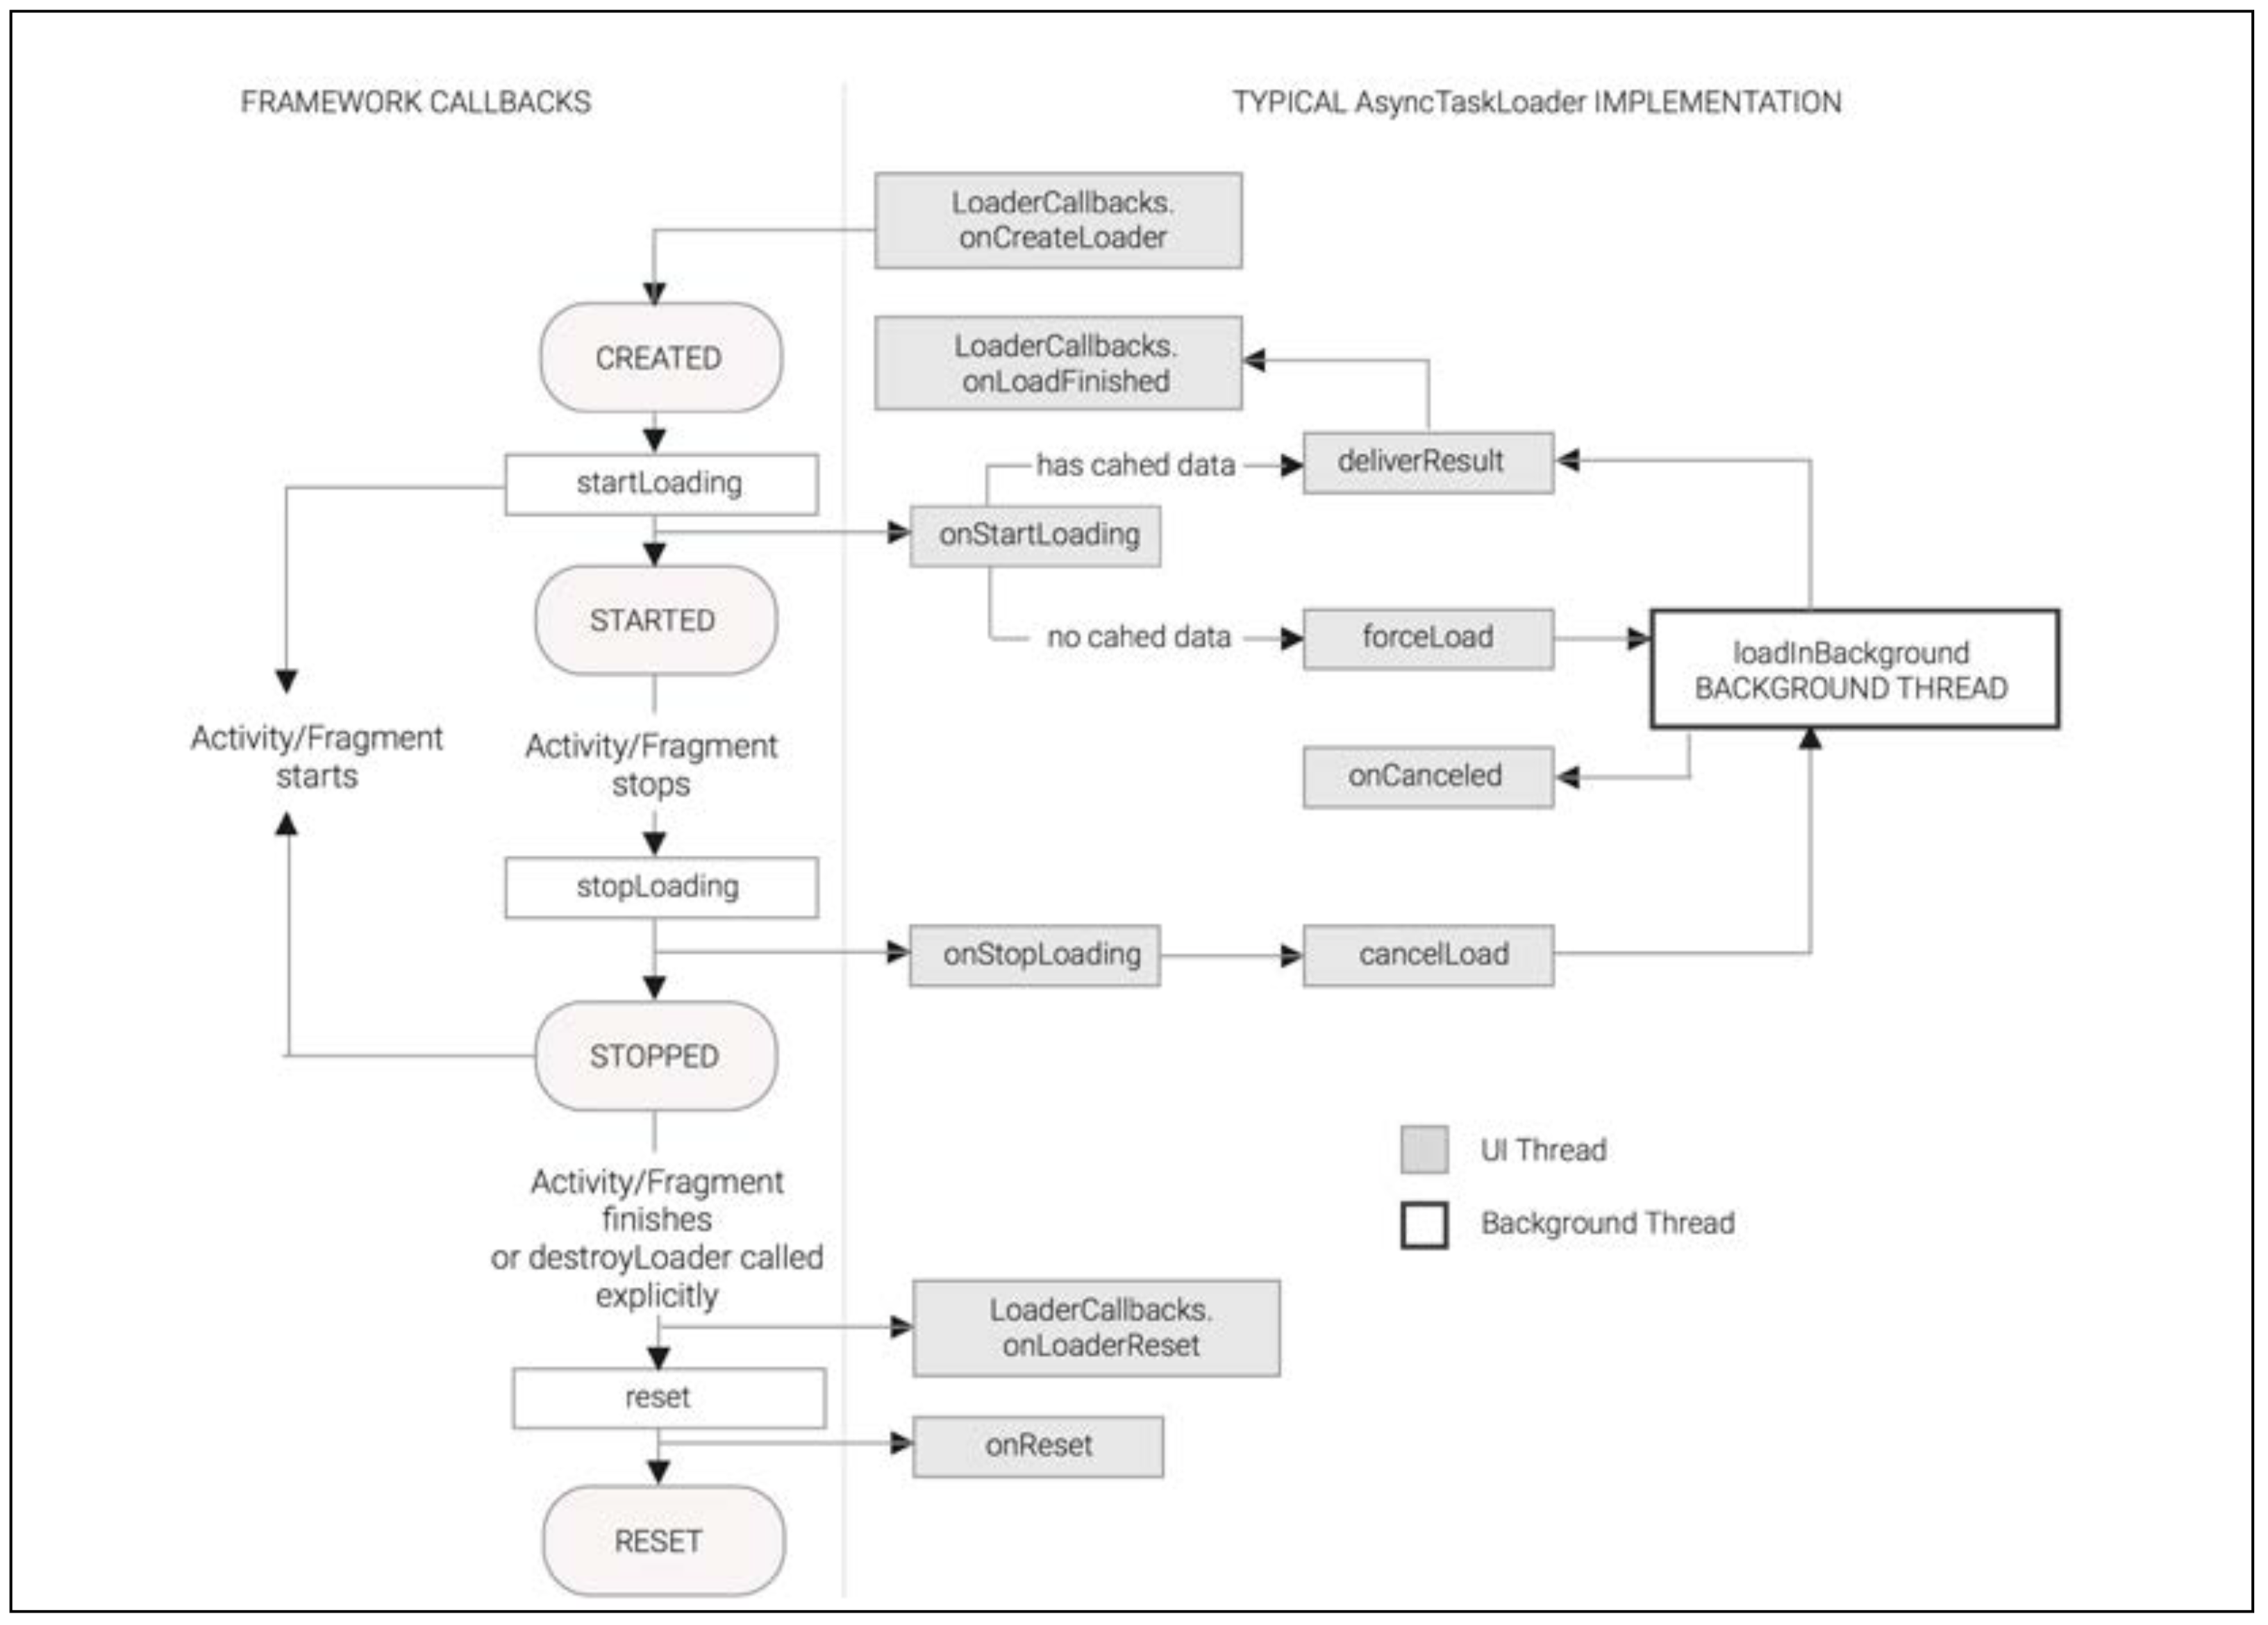
LoaderManager.LoaderCallbacks
Loader<D> onCreateLoader(int id, Bundle args)
void onLoadFinished(Loader<D> loader, D data)
void onLoaderReset(Loader<D> loader)
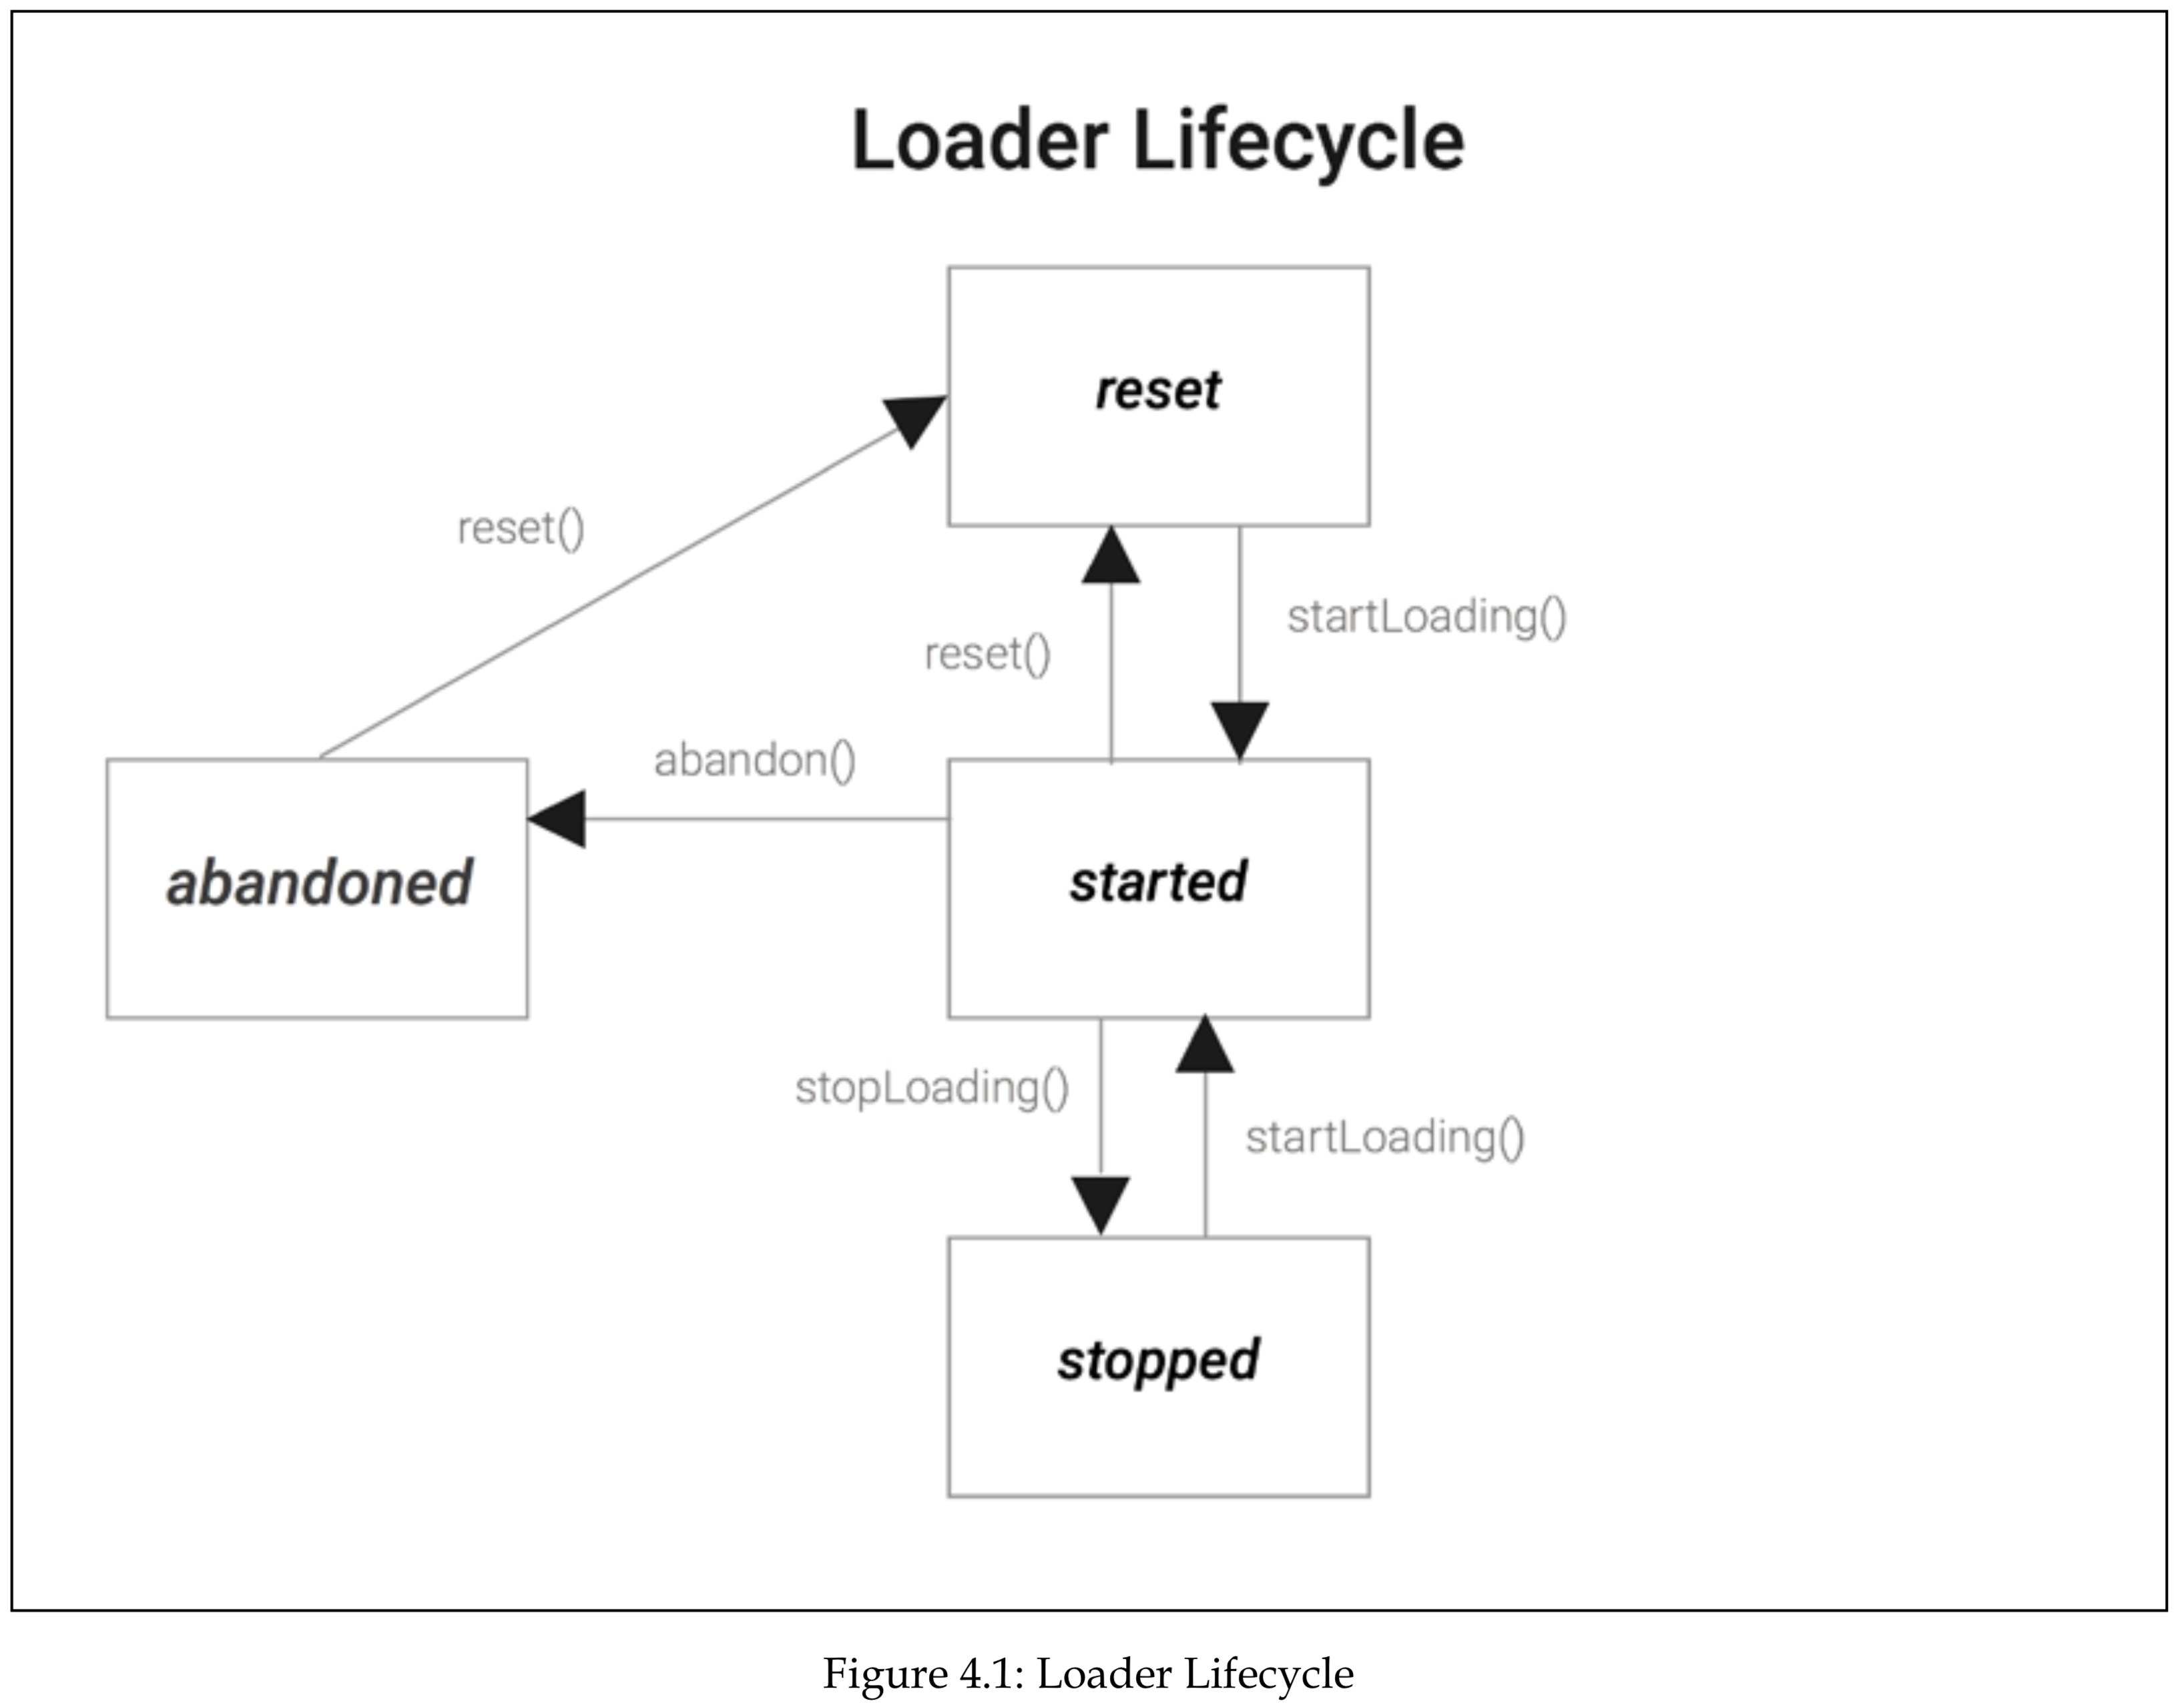
Loader lifecycle
- Reset: This is the flag that sets your loader when you create a Loaders instance. The flag would end up here if the reset() method is invoked. The onReset() is called when the reset is moving to this state, and the developer must use this method to release the resources allocated on the Loader and to reset any cache result.
- Started: This is the flag set when your loader startLoading() is invoked. After your loader enters into this state, the onStartLoading method gets invoked to setup your loading resources. If the Loader has already delivered results you can call the forceLoad() to restart a new loading. Your loader should only deliver results when this flag is on.
- Stopped: This is the flag set when the loader is stopped and is not able to deliver new results or delivery of content changes. In this state, the loader could store results to deliver when the loader is restarted. To implement behavior when the loader has this on, the developer must implement the onStopLoading and release any resources allocated to load the results.
- Abandoned: This is an optional intermediate flag used to pinpoint whether the Loader was abandoned. Like the other methods, subclasses must implement the onAbandon() to implement behavior when the client is no longer interested in new data updates from the loader. At this state, prior to Reset, the Loader must not report any fresh updates but it can keep results to deliver when the loader is restarted.
- ContentChanged: This is a flag used to notify that the Loader content has changed. The onContentChanged is callback invoked when a content change is detected on the Load.
- ProcessingChange: This is a flag used to notify that the Loader content is processing a change on its content. The following functions takeContentChanged(), commitContentChanged(), and rollbackContentChanged() are used to manage the data content changes and its processing state.
Loading data with Loader
Building responsive apps with AsyncTaskLoader
Building responsive apps with CursorLoader
CursorLoader is a specialized subclass of AsyncTaskLoader that uses its lifecycle methods to correctly manage the resources associated with a database Cursor.
Combining Loaders
Applications of Loader
Summary
The Loader framework in Android does a wonderful job of making it easy to load data in the background and deliver it to the main thread when it is ready.
In this chapter we learned about the essential characteristics of all Loaders— background loading, caching of loaded data, and a managed lifecycle.
We took a detailed look at AsyncTaskLoader as a means to perform arbitrary background loading, and CursorLoader for asynchronous loading from local database Cursors.
We saw that Loader can free us from some of the constraints imposed by the Activity lifecycle, and took advantage of that to continue to work in the background even across Activity restarts.
In the next chapter we’ll free ourselves completely from the constraints of the Activity lifecycle and perform background operations with Service, even when our app is no longer in the foreground.
第5章 Interacting with Services 与服务交互
- Introducing Service
- Started Service
- Building responsive apps with IntentService
- Posting results with pending intents
- Reporting progress on the notification drawer
- Introducing Service
- Started Service
- Building responsive apps with IntentService
- Posting results with pending intents
- Reporting progress on the notification drawer
Introducing Service
<service android:name=".MyService"/>
void onCreate();
void onDestroy()
void onStartCommand(Intent intent, int flags, int startId)
IBinder onBind(Intent intent)
boolean onUnbind(Intent intent)
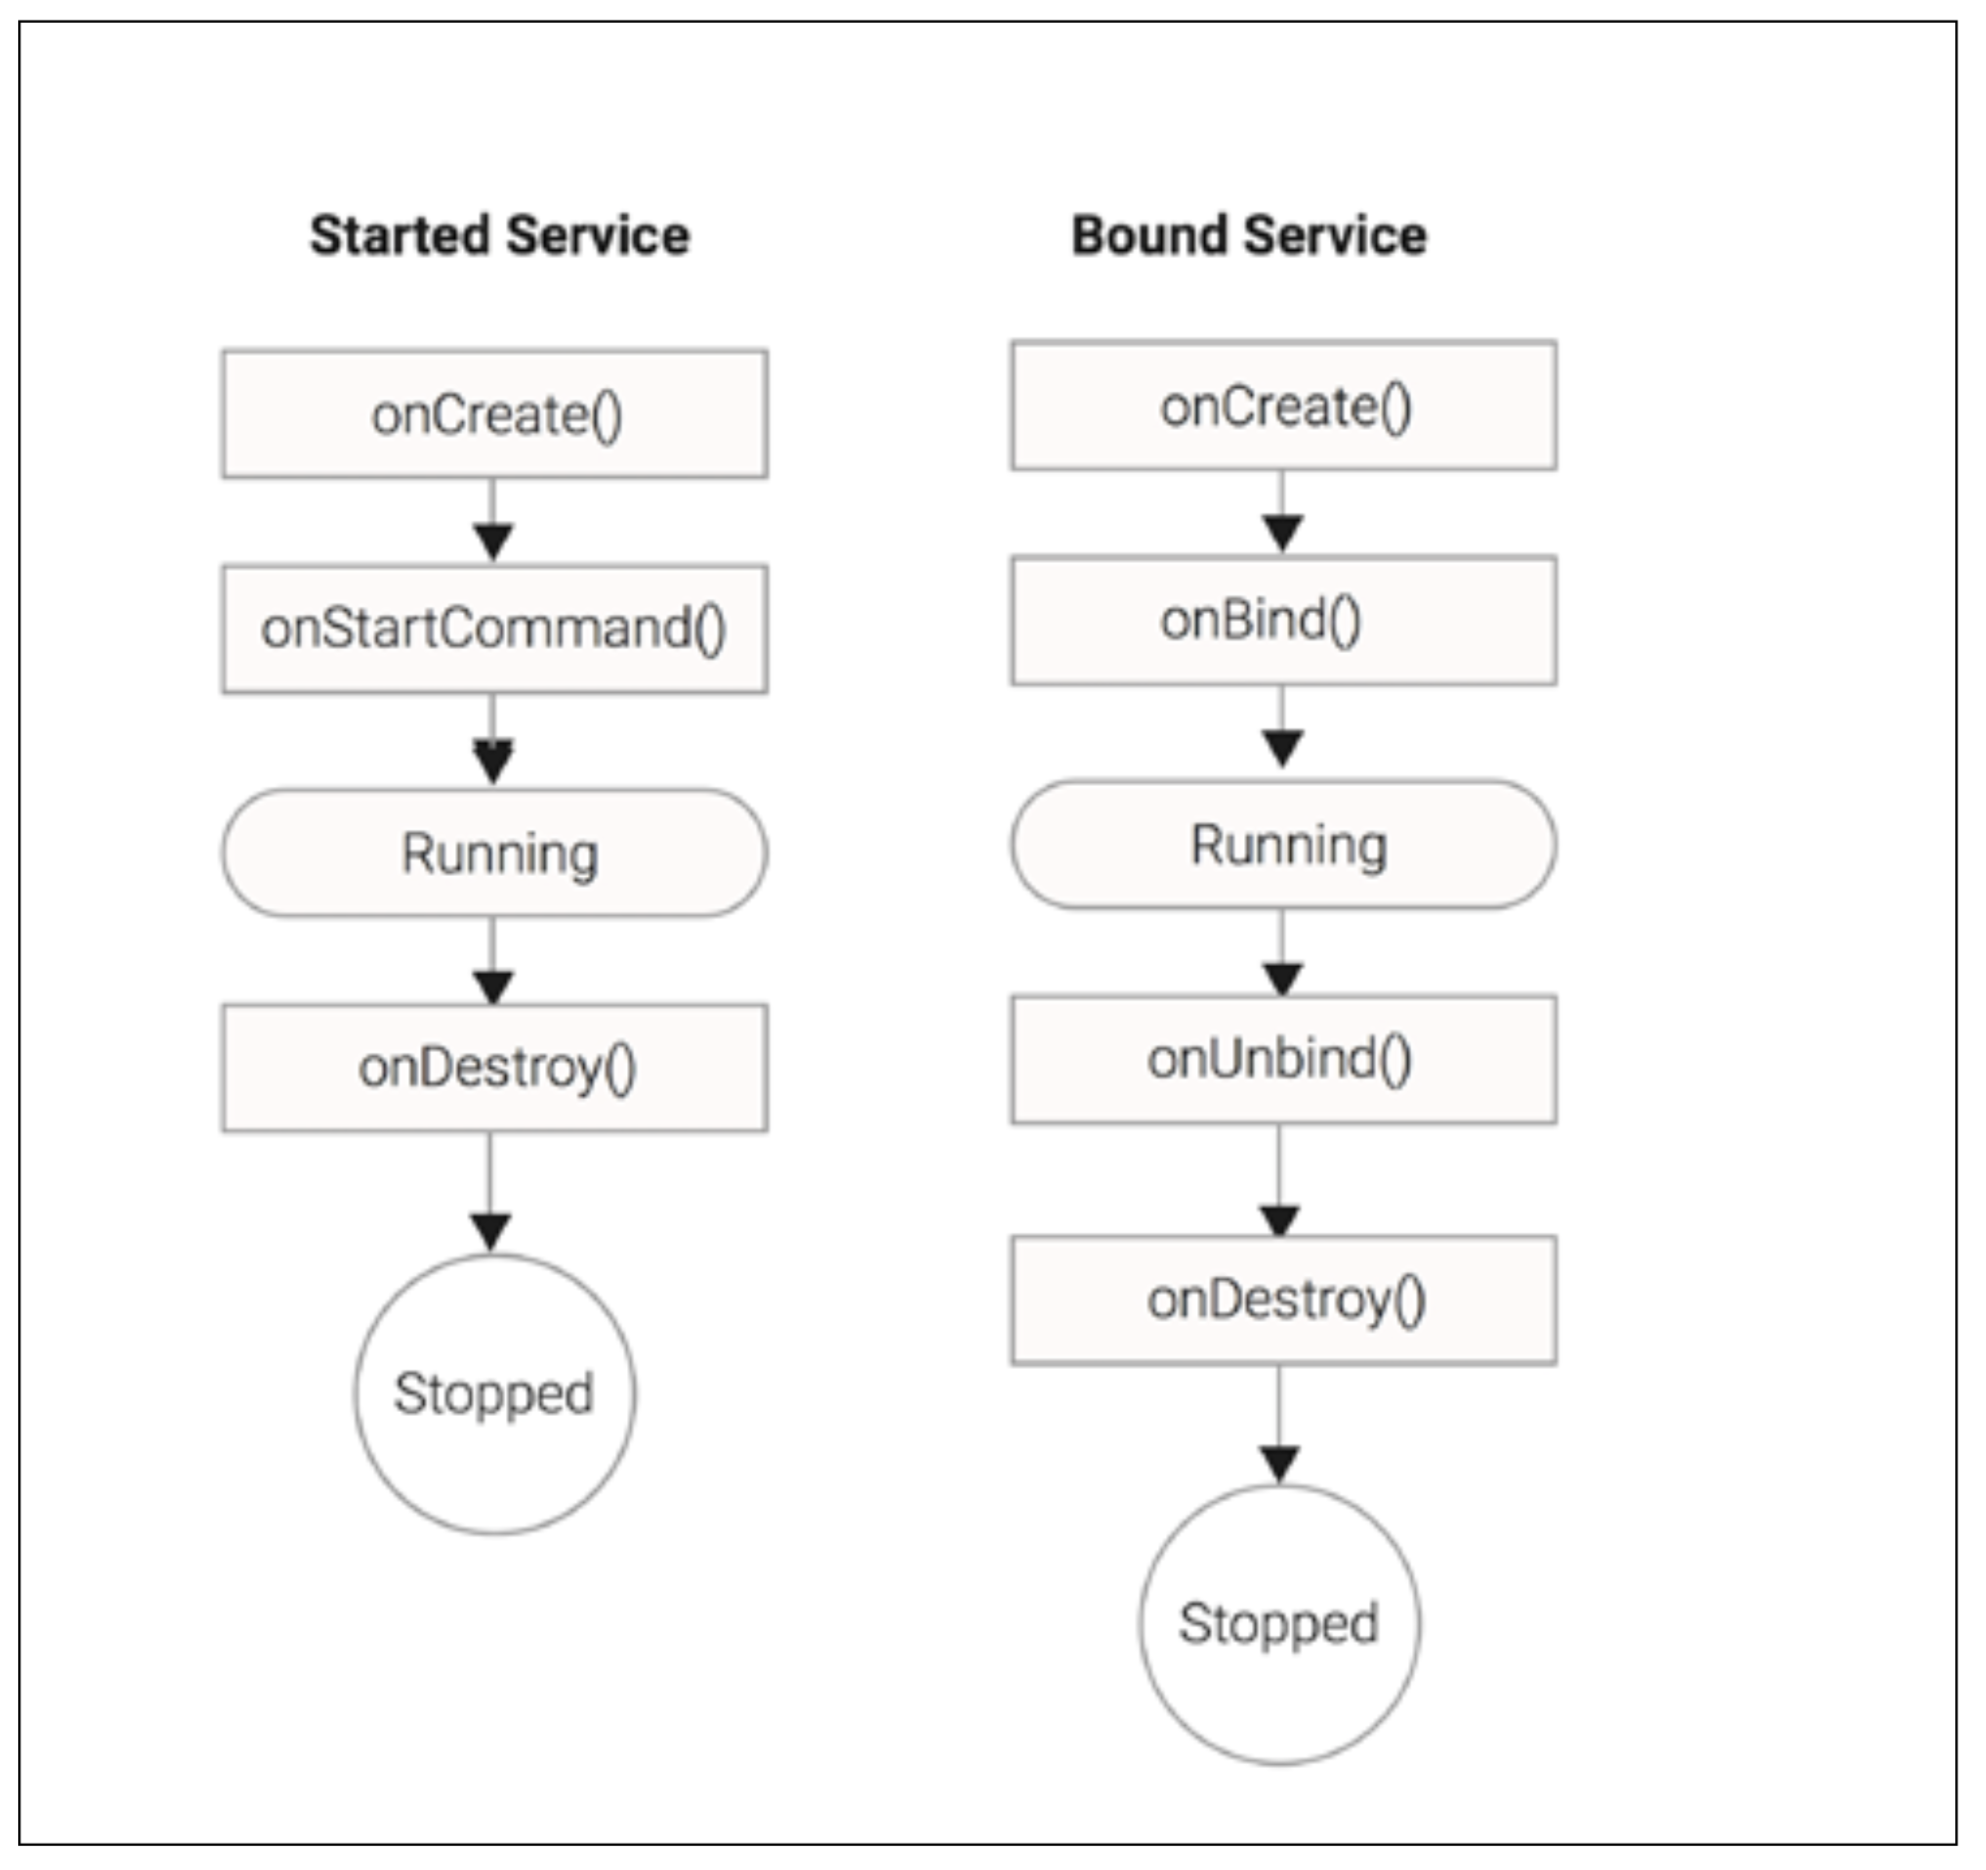
The onCreate() is the lifecycle callback that is called once when the service is created that might be used to allocate Service resources. The onDestroy() is the lifecycle callback called when the service is going to be destroyed and might be used to free Service resources. The onStartCommand() is the lifecycle callback invoked when a started Service is explicitly started with the startService() command. onBind() is the lifecycle callback called when the service is bound to a Service client – bindService(). The onUnbind() is the callback called when the service is unbound from a client - unbindService():
- A Service does not provide a user interface.
- There can be many services active at the same time within an application.
- A Service can remain active even if the application hosting it is not the current foreground application, which means that there can be many services of many apps are active at the same time.
- Because the system is aware of services running within a process, it can avoid killing those processes unless absolutely necessary, allowing the background work to continue. Services have a higher priority than inactive or invisible activities.
Service Kind
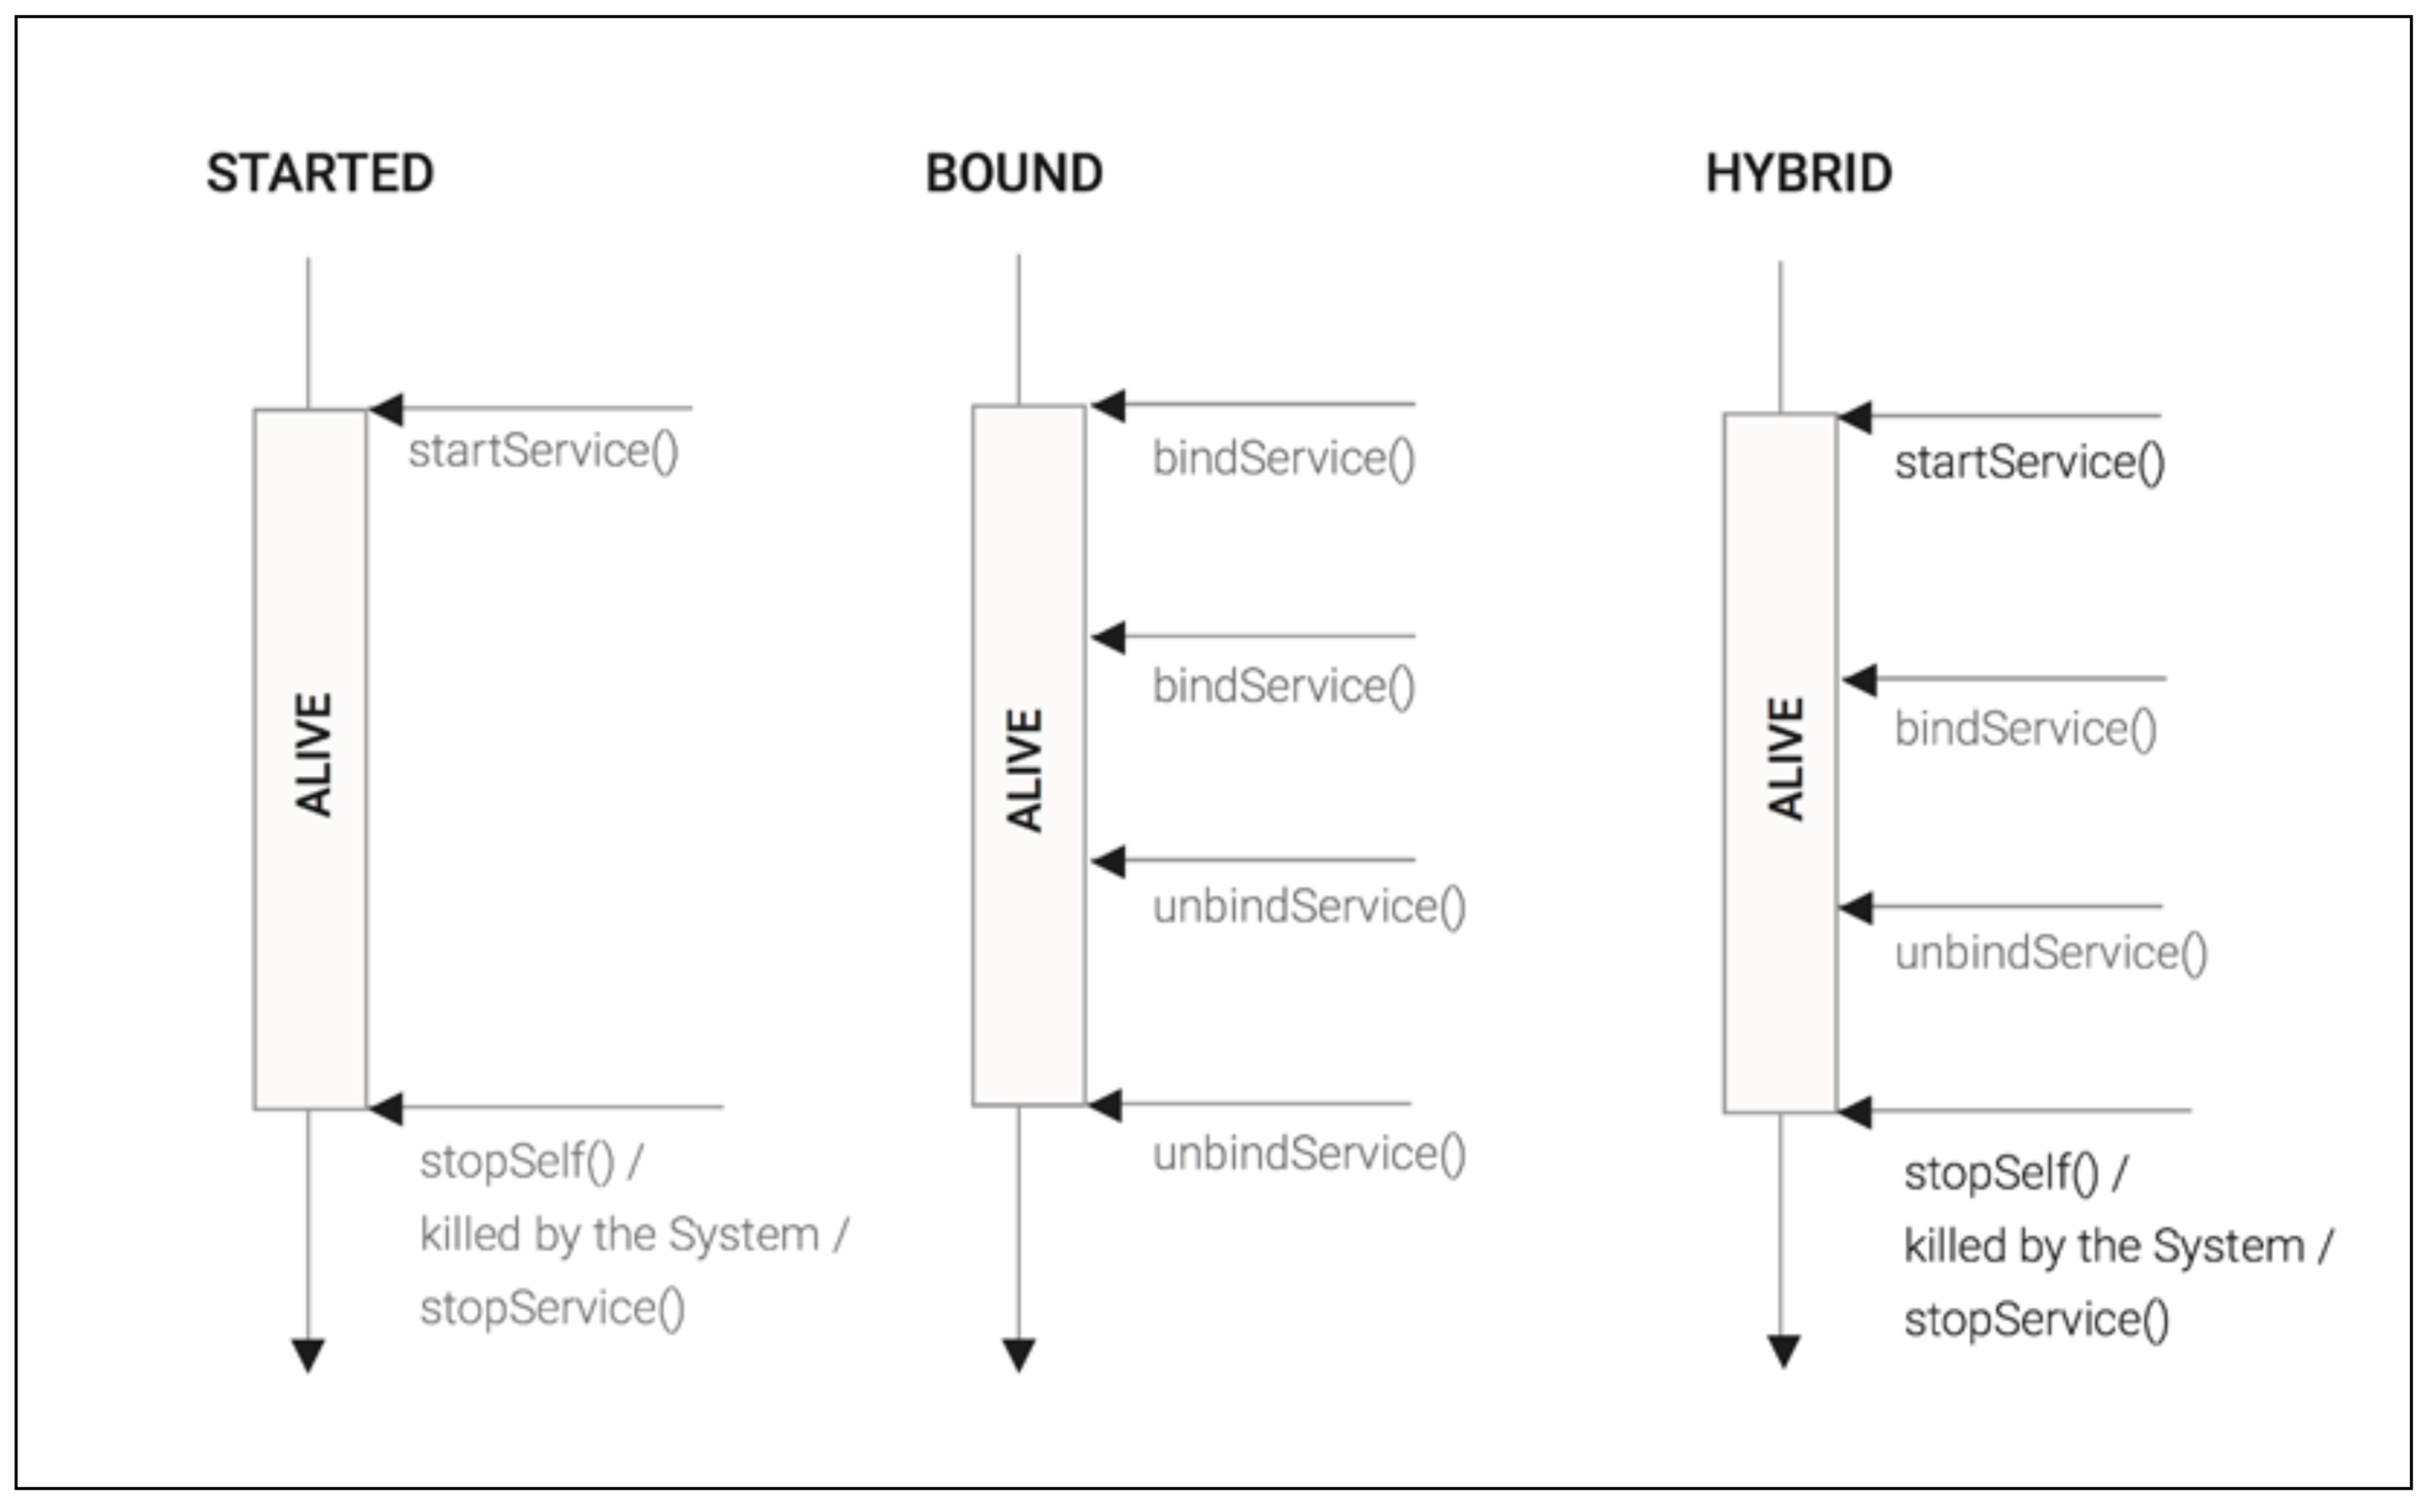
- Started Service: This is a kind of service that is explicitly started when any object on the system invokes startService() and it will continue to run until it stops itself by calling stopSelf() or it is explicitly destroyed with stopService().
- Bound Service: This is a kind of service that is started when the first client binds to it and runs until it has clients are connected. Service clients attach to a Service by calling bindService(), and the service will be destroyed when all the clients unbind, calling unbindService().
- Hybrid Service: This Service is started when an object on the system calls startService() and might have clients connected to it during its lifecycle, by calling bindService(). Like the started Service, it runs indefinitely until the service is stopped, stops itself, or is killed by the system.
- Local Service (LS): The Service runs on the same process as the other Android components and therefore the shared memory could be used to send Java Objects between client and Server.
- Internal Remote Service (IRS): The Service runs on a separate process but it can only be used by the components that belong to the application that defines it. To access it, an IPC technique (Messenger or AIDL) is required to interact with the remote process.
- Global Service (GS): The Service runs on a separate process and could be accessed by other applications. For instance, with IRS, an IPC communication technique must be used by the client to access it.
Started service
ComponentName startService(Intent service)
int onStartCommand(Intent intent, int flags, int startId)
return int.
- START_STICKY: If the Service process is terminated by the system, the Service is going to be restarted and no processed Intents will be delivered to the onStartCommand function. When no start Intents are pending for delivery, a null Intent is passed to the onStartCommand function. If a start request didn’t return before the system kills the Service, the start request is submitted again on the restarted Service passing START_FLAG_RETRY on the onStartCommand second argument.
- START_NOT_STICKY: If the Service is terminated by the system, the Service is only restarted when there is at least one pending start request to be delivered.
- START_REDELIVER_INTENT: If the Service is terminated by the system, the Service will be restarted redelivering the last delivered start Intent and any pending requests. This kind of service is similar to START_STICKY, but instead of delivering a null Intent in the start command, the last successfully delivered Intent is dispatched. When the start request is redelivered, the flag START_ FLAG_REDELIVERY is passed in on the onStartCommand second argument.
Building responsive apps with IntentService
The IntentService class is a specialized subclass of Service that implements a background work queue using a single HandlerThread. When work is submitted to an IntentService, it is queued for processing by a single HandlerThread, and processed in order of submission on the onHandleIntent function:
IntentService类是Service的一个特殊的子类,它使用一个HandlerThread实现后台工作队列。 将工作提交给IntentService时,它将被排队等待由一个HandlerThread进行处理,并按onHandleIntent函数的提交顺序进行处理:
abstract void onHandleIntent(Intent intent);
Handling results
- Send a PendingIntent to the Service from the originating Activity, allowing the Service to callback to the Activity via its onActivityResult method
- Post a system notification allowing the user to be informed that the background work was completed, even if the application is no longer in the foreground
- Send a message to a Handler in the originating Activity using Messenger
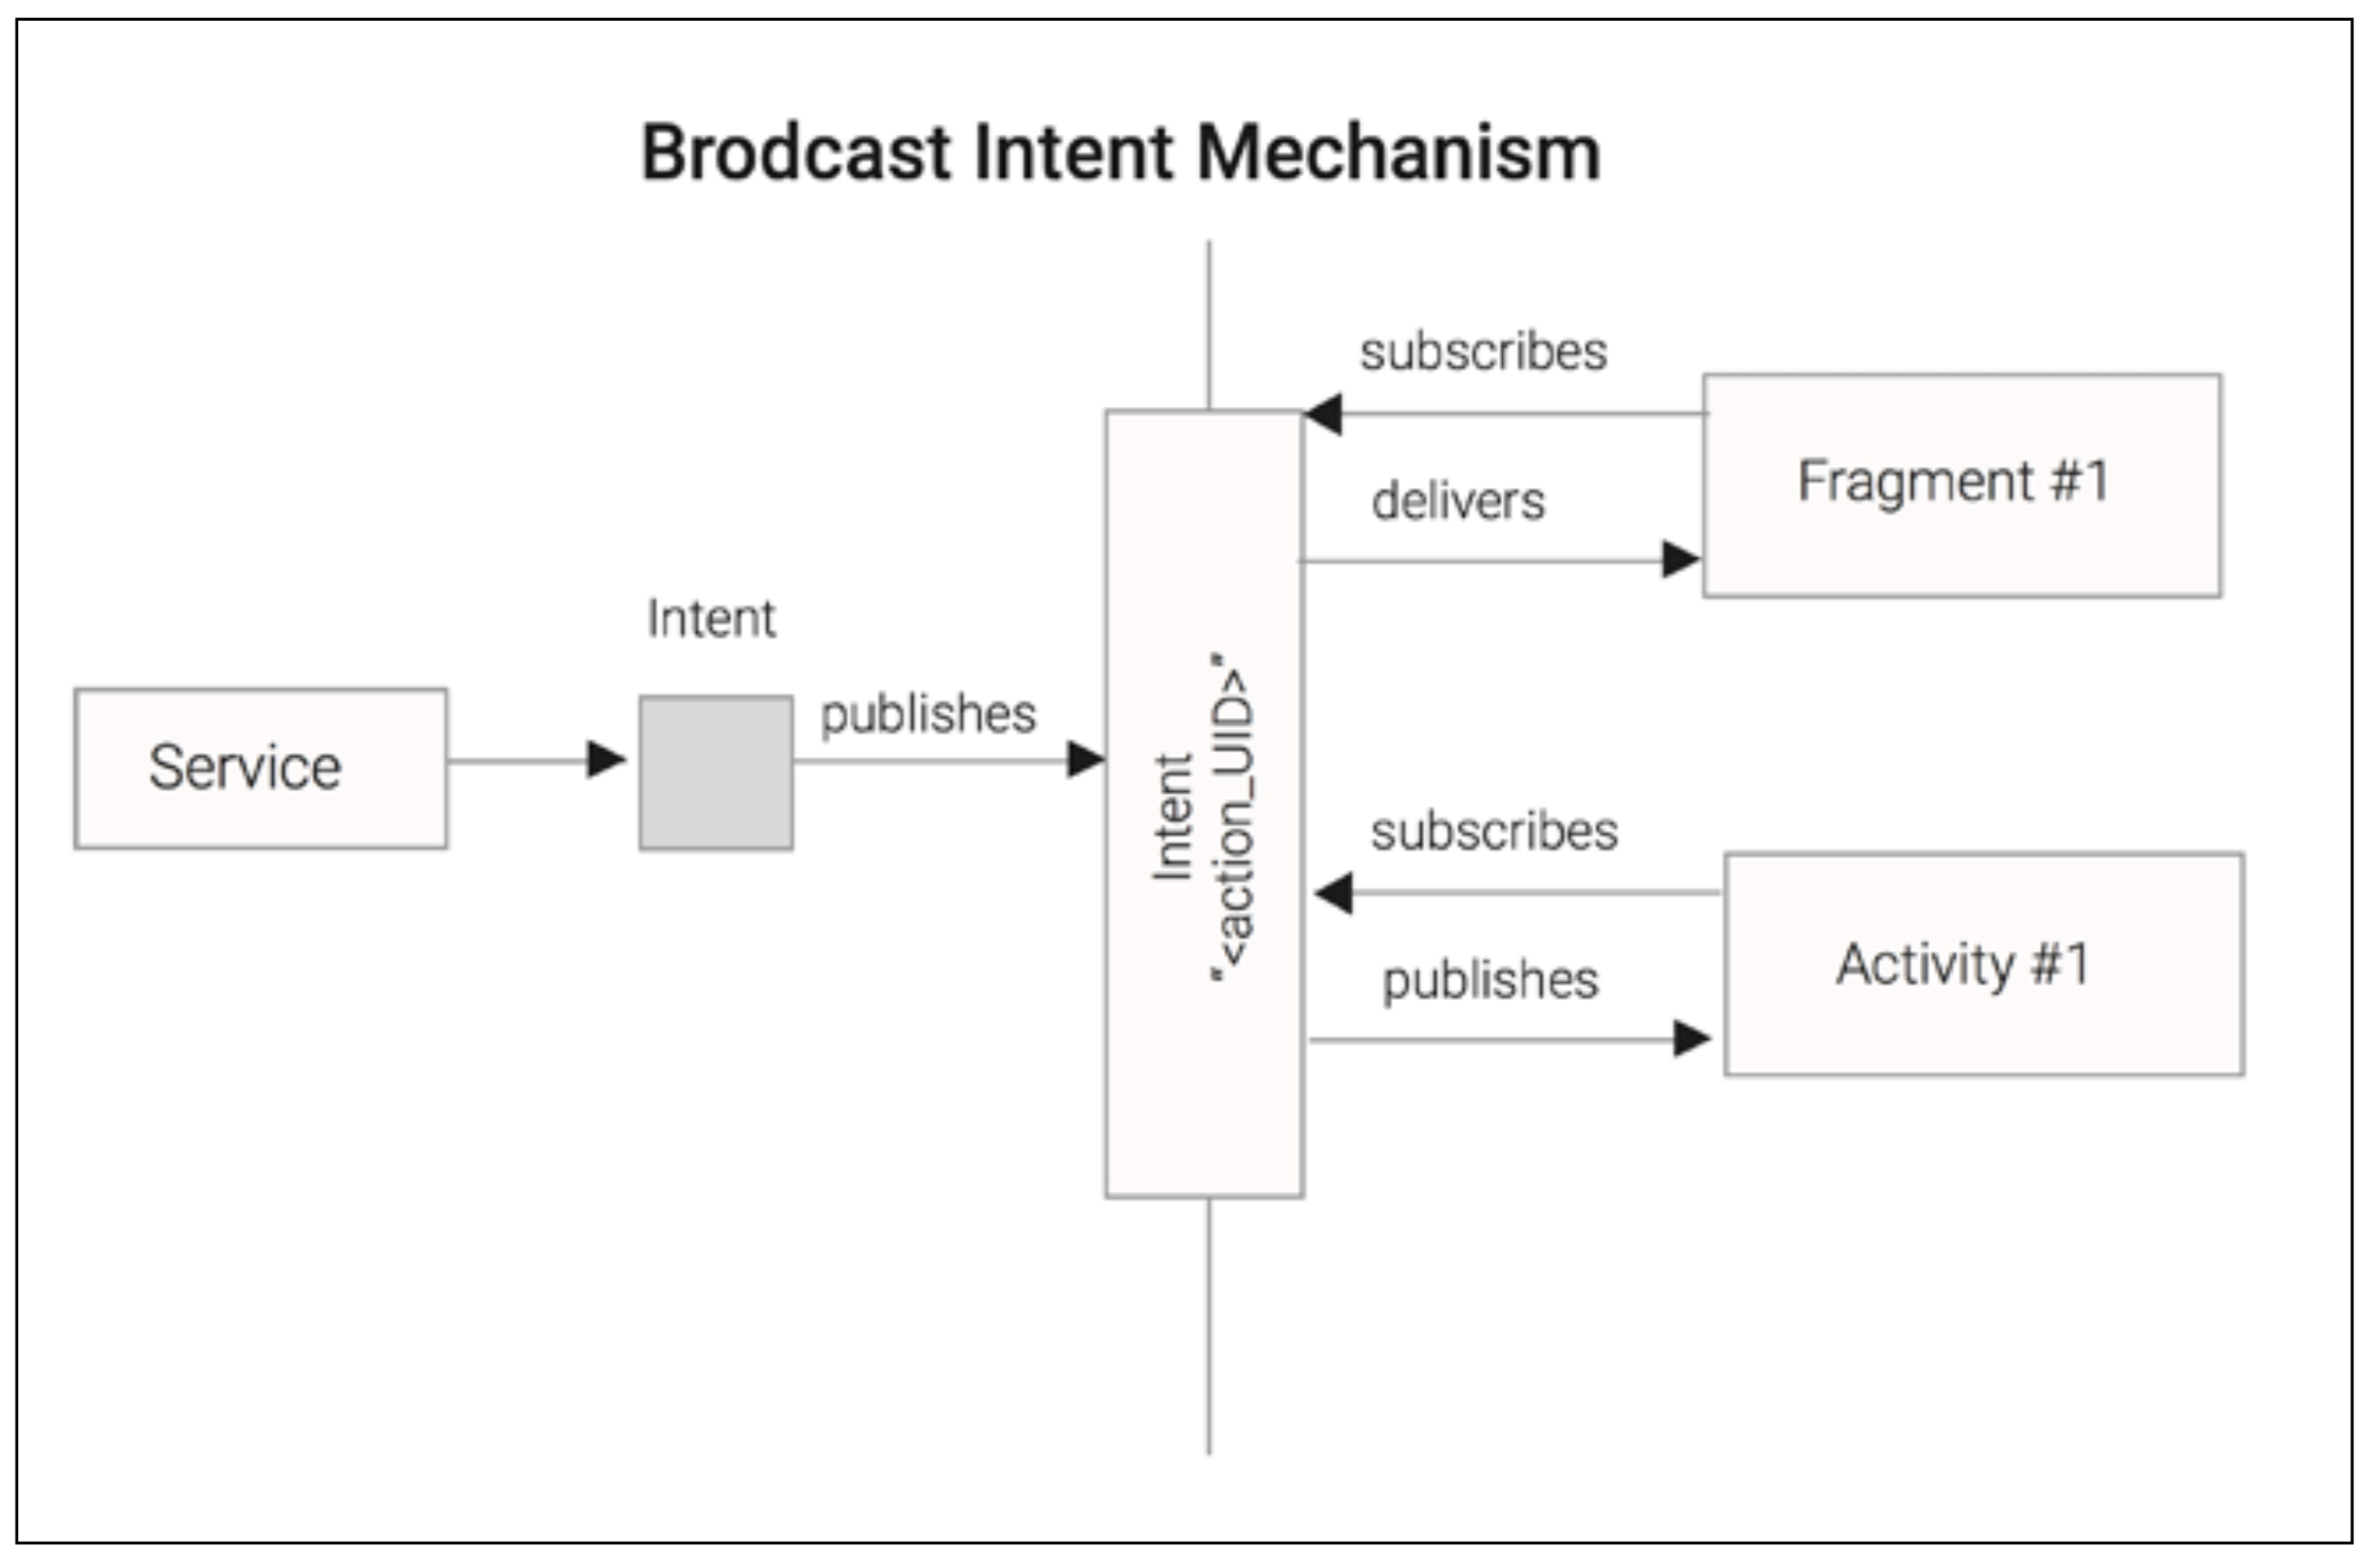
- Broadcast the result as an Intent, allowing any Fragment or Activity— including the originator—to receive the result of background processing
Posting results with PendingIntent
Posting results as system notifications
Applications of IntentService
- Uploading data to remote servers
- Database or data backups
- Time consuming file data processing
- Communication with web service resources (WSDL or REST)
-
Periodic time operations such as alarm processing, calendar event processing, and so on
- The upload usually must complete, even if the user leaves the application
- A single upload at a time usually makes best use of the available connection, since bandwidth is often asymmetric (there is much smaller bandwidth for upload than download)
- A single upload at a time gives us a better chance of completing each individual upload before losing our data connection
HTTP uploads with IntentService
Reporting progress
Bound Service
A Bound Service is an Android Service that de nes a client interface and allows several entities to bind it by invoking bindService() and creating a relation between each order that facilitates the interaction with a request-response model.
IBinder onBind(Intent intent)
boolean onUnbind (Intent intent)
Communicating with a Local Service
inter-process communication (IPC)
Broadcasting results with intents
Detecting unhandled broadcasts
Applications of Services
- Long-running (a few hundred milliseconds and upward):
- Not specific to a single Activity or Fragment class
- Must complete, even if the user leaves the application
- Does not require user intervention to complete
- Operations that require state between different calls
- Requires more concurrency than IntentService provides, or needs control over the level of concurrency
Summary
We explored the very powerful Service component, putting it to use to execute long-running background tasks with or without a con gurable level of concurrency.
We explored the incredibly useful IntentService—an ideal construct for performing long-running background tasks off the main thread, surviving well beyond the lifecycle of the initiating Activity, and even continuing to do useful work when the application is no longer in the foreground.
We learned how to send work to an IntentService with parameterized Intents, how to process that work in the background by implementing onHandleIntent, and how to send results back to the originating Activity using a PendingIntent.
For cases where the application is no longer in the foreground or an operation is particularly long-running, we saw how to post noti cations to the noti cation drawer, complete with progress updates.
We also saw the wide range of communication mechanisms available for delivering results back to the user: direct invocation of local Service methods; broadcasting results to registered parties with BroadcastReceiver; and, if the user has already left the application, raising system noti cations.
第6章 Scheduling Work with AlarmManager
- Scheduling alarms with AlarmManager
- Canceling alarms
- Scheduling repeating alarms
- Scheduling alarms in Doze Mode
- Setting up an alarm clock
- Debugging AlarmManager alarms
- Handling alarms with Activities
- Handling alarms with BroadcastReceivers
- Staying awake with WakeLocks
- Restoring alarms on system boot
- Applications of AlarmManager
Introducing AlarmManager
The leading features of android.app.AlarmManager are as follows:
- Ability to wake up the device from idle states: The user is able to control how the system should handle your alarm when it is in energy saving mode
- Cancel Alarms: a mechanism to cancel a previously created alarm based on Intent comparison
- Update Alarms: a mechanism to update an existing scheduled alarm
- Exact and Inexact Alarms: an API that is able to control the exactness of our scheduling
- Scheduling managed by the Android system: The alarms will fire even when your application is not running, and without consuming any application resources to manage the timers
Scheduling alarms with AlarmManager
AlarmManager am = (AlarmManager)getSystemService(ALARM_SERVICE);
- android.app.AlarmManager.ELAPSED_REALTIME: This schedules the alarm relative to the system clock. If the device is asleep at the scheduled time it will not be delivered immediately; instead, the alarm will be delivered the next time the device wakes.
- android.app.AlarmManager.ELAPSED_REALTIME_WAKEUP: This schedules the alarm relative to the system clock. If the device is asleep, it will be woken to deliver the alarm at the scheduled time.
- android.app.AlarmManager.RTC: This schedules the alarm in UTC relative to the Unix epoch. If the device is asleep at the scheduled time, the alarm will be delivered when the device is next woken.
- android.app.AlarmManager.RTC_WAKEUP: This schedules the alarm relative to the Unix epoch. If the device is asleep it will be awoken, and the alarm is delivered at the scheduled time.
Setting alarms in recent Android versions
if (Build.VERSION.SDK_INT >= 23) {
    // Wakes up the device in Doze Mode
    am.setExactAndAllowWhileIdle(AlarmManager.RTC_WAKEUP, time, pending);
} else if (Build.VERSION.SDK_INT >= 19) {
    // Wakes up the device in Idle Mode
    am.setExact(AlarmManager.RTC_WAKEUP, time, pending);
} else {
    // Old APIs
    am.set(AlarmManager.RTC_WAKEUP, time, pending);
}
Testing your alarms in Doze Mode
# adb shell dumpsys deviceidle disable
Setting a Window alarm
if (Build.VERSION.SDK_INT >= 19) {
    long delay = TimeUnit.MINUTES.toMillis(5L);
    long window = TimeUnit.MINUTES.toMillis(3L);
    long time = System.currentTimeMillis() + delay;
    am.setWindow(AlarmManager.RTC_WAKEUP, time, window, pending);
}
Debugging AlarmManager alarms
# adb shell dumpsys alarm
Canceling alarms
// Function to set the Alarm
void set1HourAlarm(long time) {
    AlarmManager am= (AlarmManager) getSystemService(ALARM_SERVICE);
    long time = in1HourTime();
    am.set(AlarmManager.RTC, time, createPendingIntent(time));
}

// Cancel the alarm
void cancel1HourAlarm(long time) {
    AlarmManager am= (AlarmManager) getSystemService(ALARM_SERVICE);
    // Remove the alarms matching the Intent
    am.cancel(createPendingIntent(time));
}

// Creates the Pending Intent to set and cancel the alarm
PendingIntent createPendingIntent(long time) {
    Intent intent = new Intent("my_alarm");
    PendingIntent pending = PendingIntent.
        getBroadcast(this, ALARM_CODE, intent,
                PendingIntent.FLAG_UPDATE_CURRENT);
    // extras don't affect matching
    intent.putExtra("exactTime", time);
    return pending;
}

// Calculate the Time
long in1HourTime() {
    long delay = TimeUnit.MINUTES.toMillis(5L);
    long time = System.currentTimeMillis() + delay;
    return time;
}
Scheduling repeating alarms
void setRepeating(
        int type, long triggerAtMillis,
        long intervalMillis, PendingIntent operation);
void setInexactRepeating(
        int type, long triggerAtMillis,
        long intervalMillis, PendingIntent operation)
Scheduling an alarm clock
void setAlarmClock(AlarmClockInfo info, PendingIntent operation)
Handling alarms
PendingIntent.getActivities(Context, int,Intent[],int)
PendingIntent.getActivity(Context,int, Intent, int)
PendingIntent.getService(Context,int, Intent, int)
PendingIntent.getBroadcast(Context,int, Intent, int)
Handling alarms with Activities
Intent first = new Intent(context, ListActivity.class);
Intent second = new Intent(context, DetailActivity.class);
first.setFlags(Intent.FLAG_ACTIVITY_CLEAR_TOP);
PendingIntent pending = PendingIntent.getActivities(
        context, 0,
        new Intent[]{first, second},
        PendingIntent.FLAG_UPDATE_CURRENT);
Handling alarms with BroadcastReceiver
Working with BroadcastReceiver
Asynchronous work with goAsync
public final PendingResult goAsync()
Handling alarms with Services
Intent intent = new Intent(this,SMSDispatcherIntentService.class);
intent.putExtra(SMSDispatcherIntentService.TO_KEY, phoneNumber);
intent.putExtra(SMSDispatcherIntentService.TEXT_KEY, text);
PendingIntent service = PendingIntent.getService(
        context, 0, intent, PendingIntent.FLAG_UPDATE_CURRENT);
am.set(AlarmManager.RTC_WAKEUP, time, service);
<service android:name=".chapter6.SMSDispatcherIntentService" >
</service>
Staying awake with WakeLocks
Resetting alarms after a system reboot
Applications of AlarmManager
Summary
In this chapter, we learned to schedule work for our applications to perform at some time in the distant future, either as a one-shot operation or at regular intervals.
We learned to set alarms relative to the system clock or real time, how to wake the device up from a deep sleep and doze mode, how to cancel alarms when we no longer need them, and how to set exact alarms on the most recent Android versions.
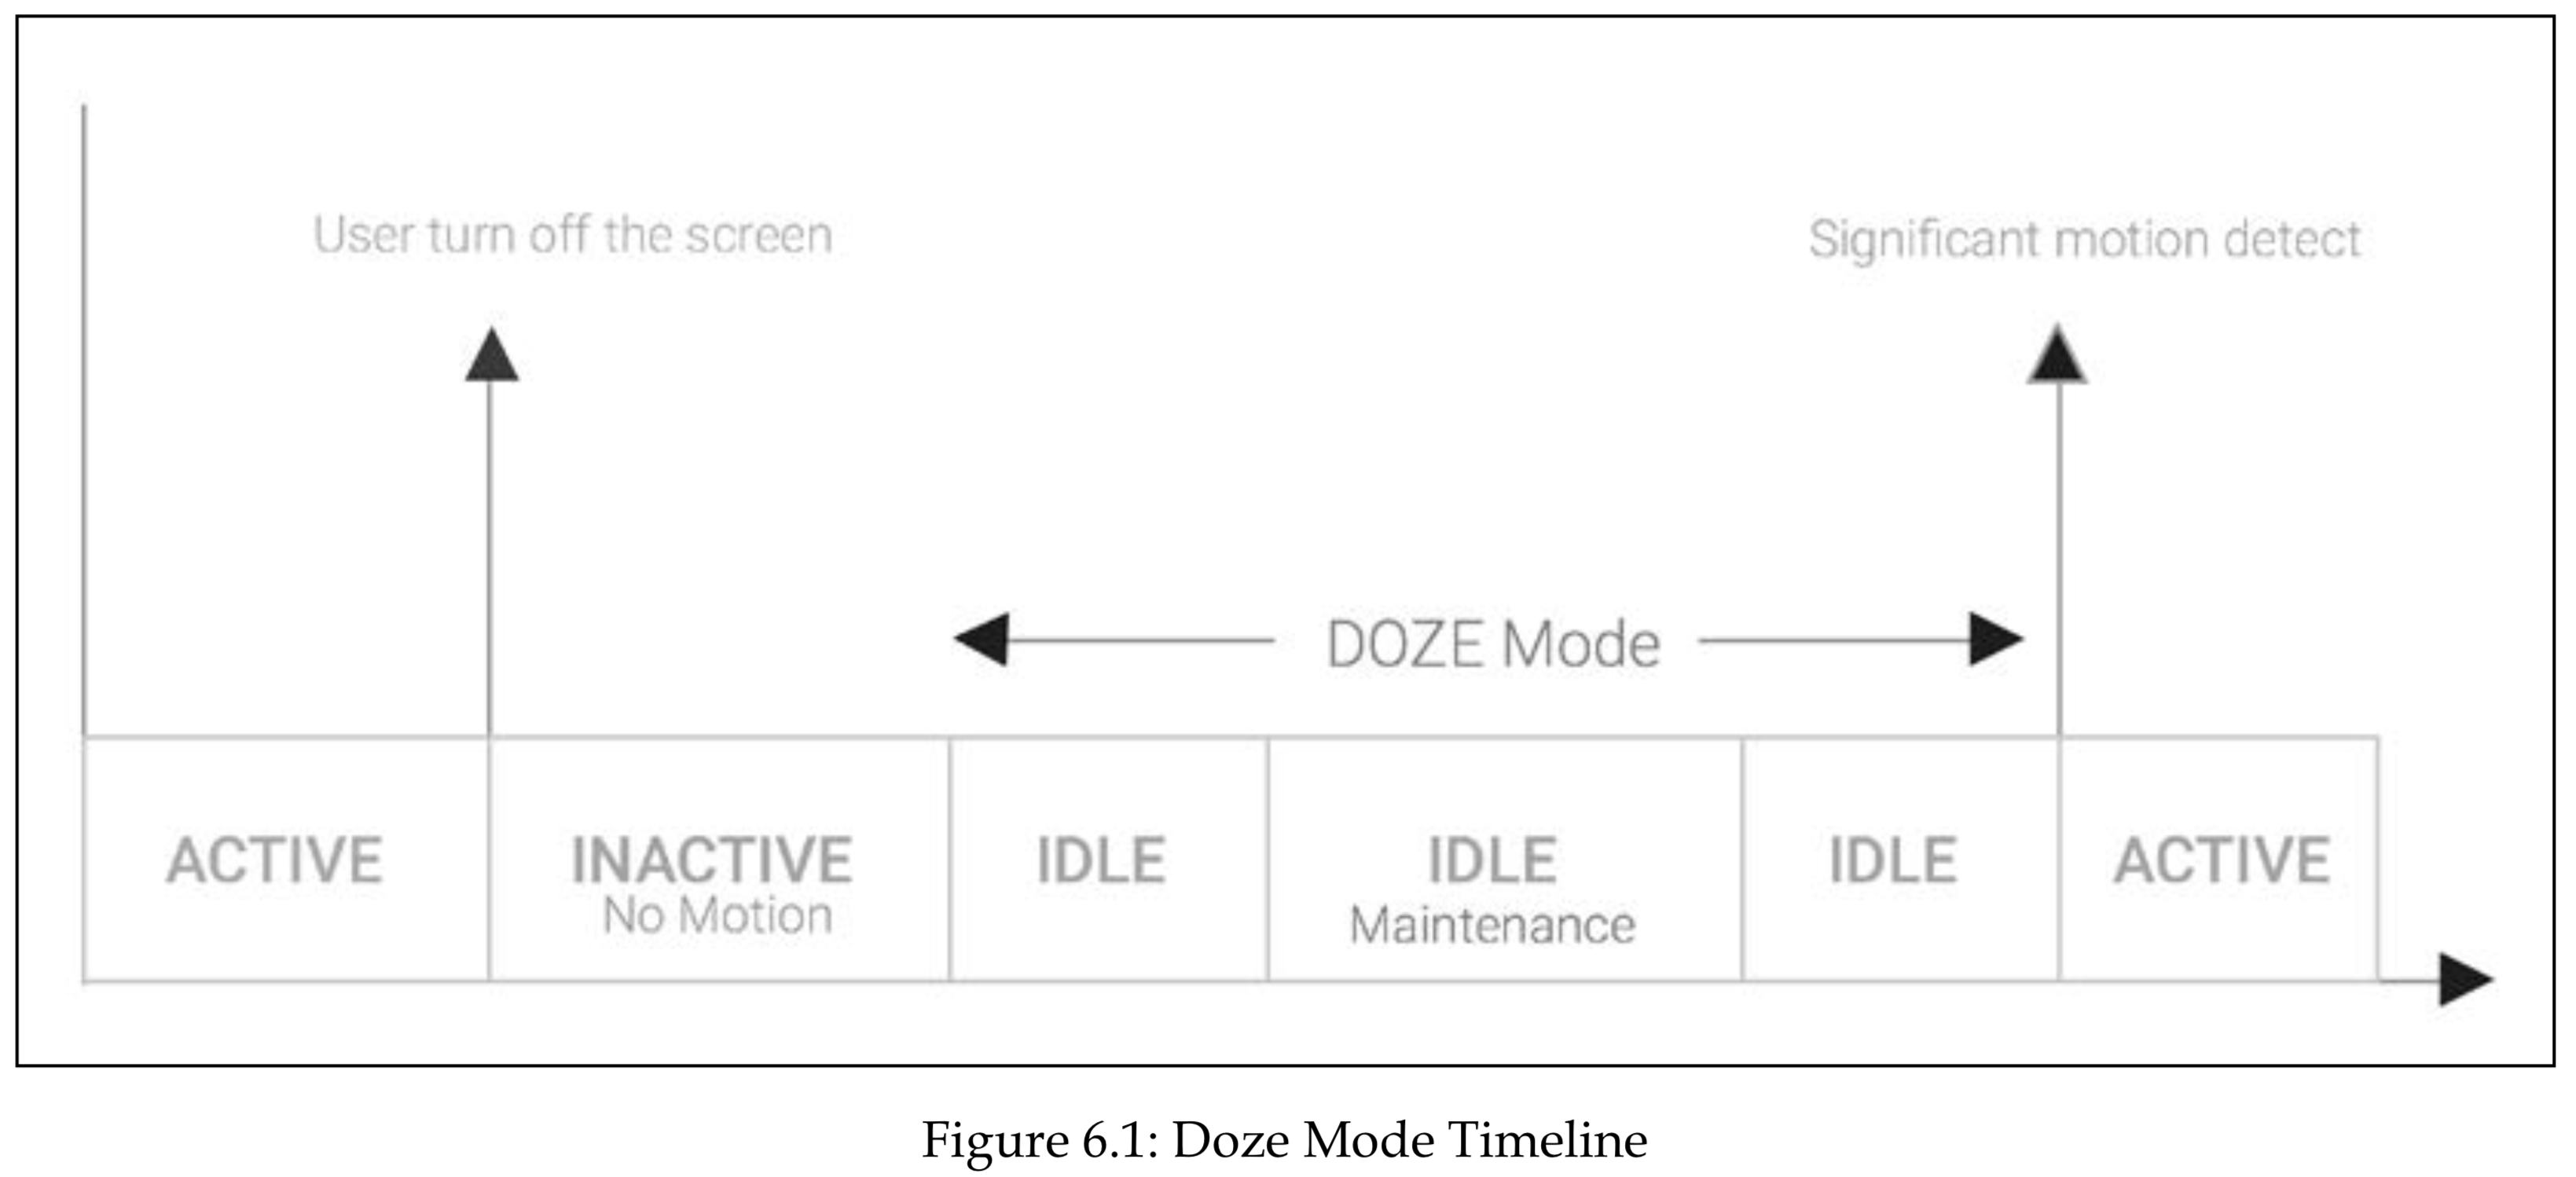
In the meantime, we introduced the reader to Doze Mode, a new power management feature that saves battery cycles by deferring jobs and tasks to a maintenance window. We learned how to test our alarms taking into account the new power management states introduced by the doze mode.
We learned how to debug alarms created with AlarmManager and how to analyze the information printed from the dumpsys commands.
Our exploration covered various options for responding to alarms, including bringing an Activity to the foreground or doing work directly in a BroadcastReceiver, synchronously or asynchronously.
Finally, we arranged for an IntentService to be launched with a WakeLock to keep the CPU from powering down while our long-running background work is completed, and to nish we learned how to re-create the alarms after a system boot using a boot BroadcastReceiver.
The AlarmManager is a very useful class to schedule work in the background but it has some major disadvantages. First, it does not take into account the device current context, like if the device is connected to the charger, or whether the device is connected to a Wi-Fi network. Second, we can only schedule our background work based on the time condition.
To solve these issues, the Android team introduced in Android Lollipop API Level 5.0 the JobScheduler API; an API that allows the execution of background work based on a number of time and context criteria.
In the next chapter we are going to explain how to exercise the JobScheduler API to schedule tasks that will only run when the appropriate energy and environment device conditions are met.
第7章 Exploring the JobScheduler API
- Introduction to JobScheduler
- Setting the JobScheduler running criteria
- Controlling the execution of your job with criteria
- How to schedule work with JobService
- Executing repeating tasks with JobScheduler
- Retrieving the list of pending JobScheduler schedules
- How to cancel a task in JobScheduler
Introduction to JobScheduler
The main features introduced with Scheduler API are as follows:
- Less power consumption: The job task could be delayed until the device is powered to the charger or they are grouped to run in batches on a regular basis
- Persistent jobs across reboots: We are able to install job schedules that persistent task across device reboots
- Better network bandwidth management: The job could be delayed until a higher bandwidth network is available, such as when a Wi-Fi network connection is available
- Less intrusive execution: The job could be delayed until the user is not interacting with the device
JobScheduler js = (JobScheduler)getSystemService(Context.JOB_SCHEDULER_SERVICE);
Setting running criteria
Scheduling a job
- Our job should only run when the device is charging to save the battery
- Our job should only run when an unmetered network is available to save mobile network bandwidth
- Our job should only run when the device is idle because we don’t want to slow down the UI responsiveness
- Our job must run at least once within eight hours of being scheduled
- Our job should run even after device reboot
Implementing the JobService
public class AccountBackupJobService extends JobService {
    @Override
    public boolean onStartJob(JobParameters params) {
        // Start your job here
        return false;
    }
    @Override
    public boolean onStopJob(JobParameters params) {
        // Stop your job here
        return false;
    }
}
Listing pending jobs
public List<JobInfo> getAllPendingJobs();
Canceling a job
void cancel(int jobId);
void cancelAll();
Scheduling a periodic job
Applications of the JobScheduler
Summary
In this chapter, we explored the JobSheduler API, putting it to use to schedule background work that starts when a group of conditions de ned by us are met.
We learned in detail how to set the different criteria supported by the API and how to schedule based on the JobInfo object that starts a job when the device is charging and not in use.
In the meantime, we learned how to implement an asynchronous JobService that is able to run in a background execution line and nish the job execution properly by releasing all the acquired resources (WakeLock, …).
Later, we used the getAllPendingJobs to create a sample code to list all the pending Scheduler API jobs within our application. From the example, we learned how to cancel a speci c job or all the pending jobs in our applications.
To nish, we built a persistent and recurrent schedule using the JobSheduler API, which wakes up the device and executes our job every 12 hours.
In the next chapter, we will learn how to transfer data from and to the network using effective asynchronous libraries and protocols, without even draining the battery.
第8章 Interacting with the Network
- Introducing Android HTTP clients
- Performing HTTP requests asynchronously
- Interacting with JSON web APIs
- Interacting with XML web APIs
- Optimizing HTTP timeouts
- Communicating securely over SSL sessions
- HTTP open source libraries
Introducing Android HTTP clients
Internet Engineering Task Force (IETF)
the World Wide Web Consortium (W3C)
HttpURLConnection
Performing HTTP requests asynchronously
public interface AsyncHTTPClient {
    void execute(HTTPRequest request, ResponseHandler handler);
}

public class HTTPRequest {
    final Verb mVerb;
    final String mUrl;
    final List<Header> mHeaders;
    final Map<String, String> mParameters;
    final Body mBody;
    private HTTPRequest(Builder builder) {...}
}

public abstract class ResponseHandler {
    // Method invoked when a success response is returned
    // 200 Response Code
    abstract public void onSuccess(HTTPResponse response) ;
    // Method invoked when a failure response is returned
    // 4XX, 50X
    abstract public void onFailure(HTTPResponse response) ;
    // Method Invoked when an error happens
    abstract public void onError(Throwable error);
}
public class HTTPResponse {
    final int mResponseCode;
    final List<Header> mHeaders;
    final Body mBody;
}
public class HTTPAsyncTask extends AsyncTask<HTTPRequest, Void, Result<HTTPResponse>> {
    // Response Handler to be invoked In onPostExecute
    // on the UI Thread
    final ResponseHandler mHandler;
    // Handler is passed on the constructor
    public  HTTPAsyncTask(ResponseHandler handler) {
        this.mHandler = handler;
    }
    ...
}
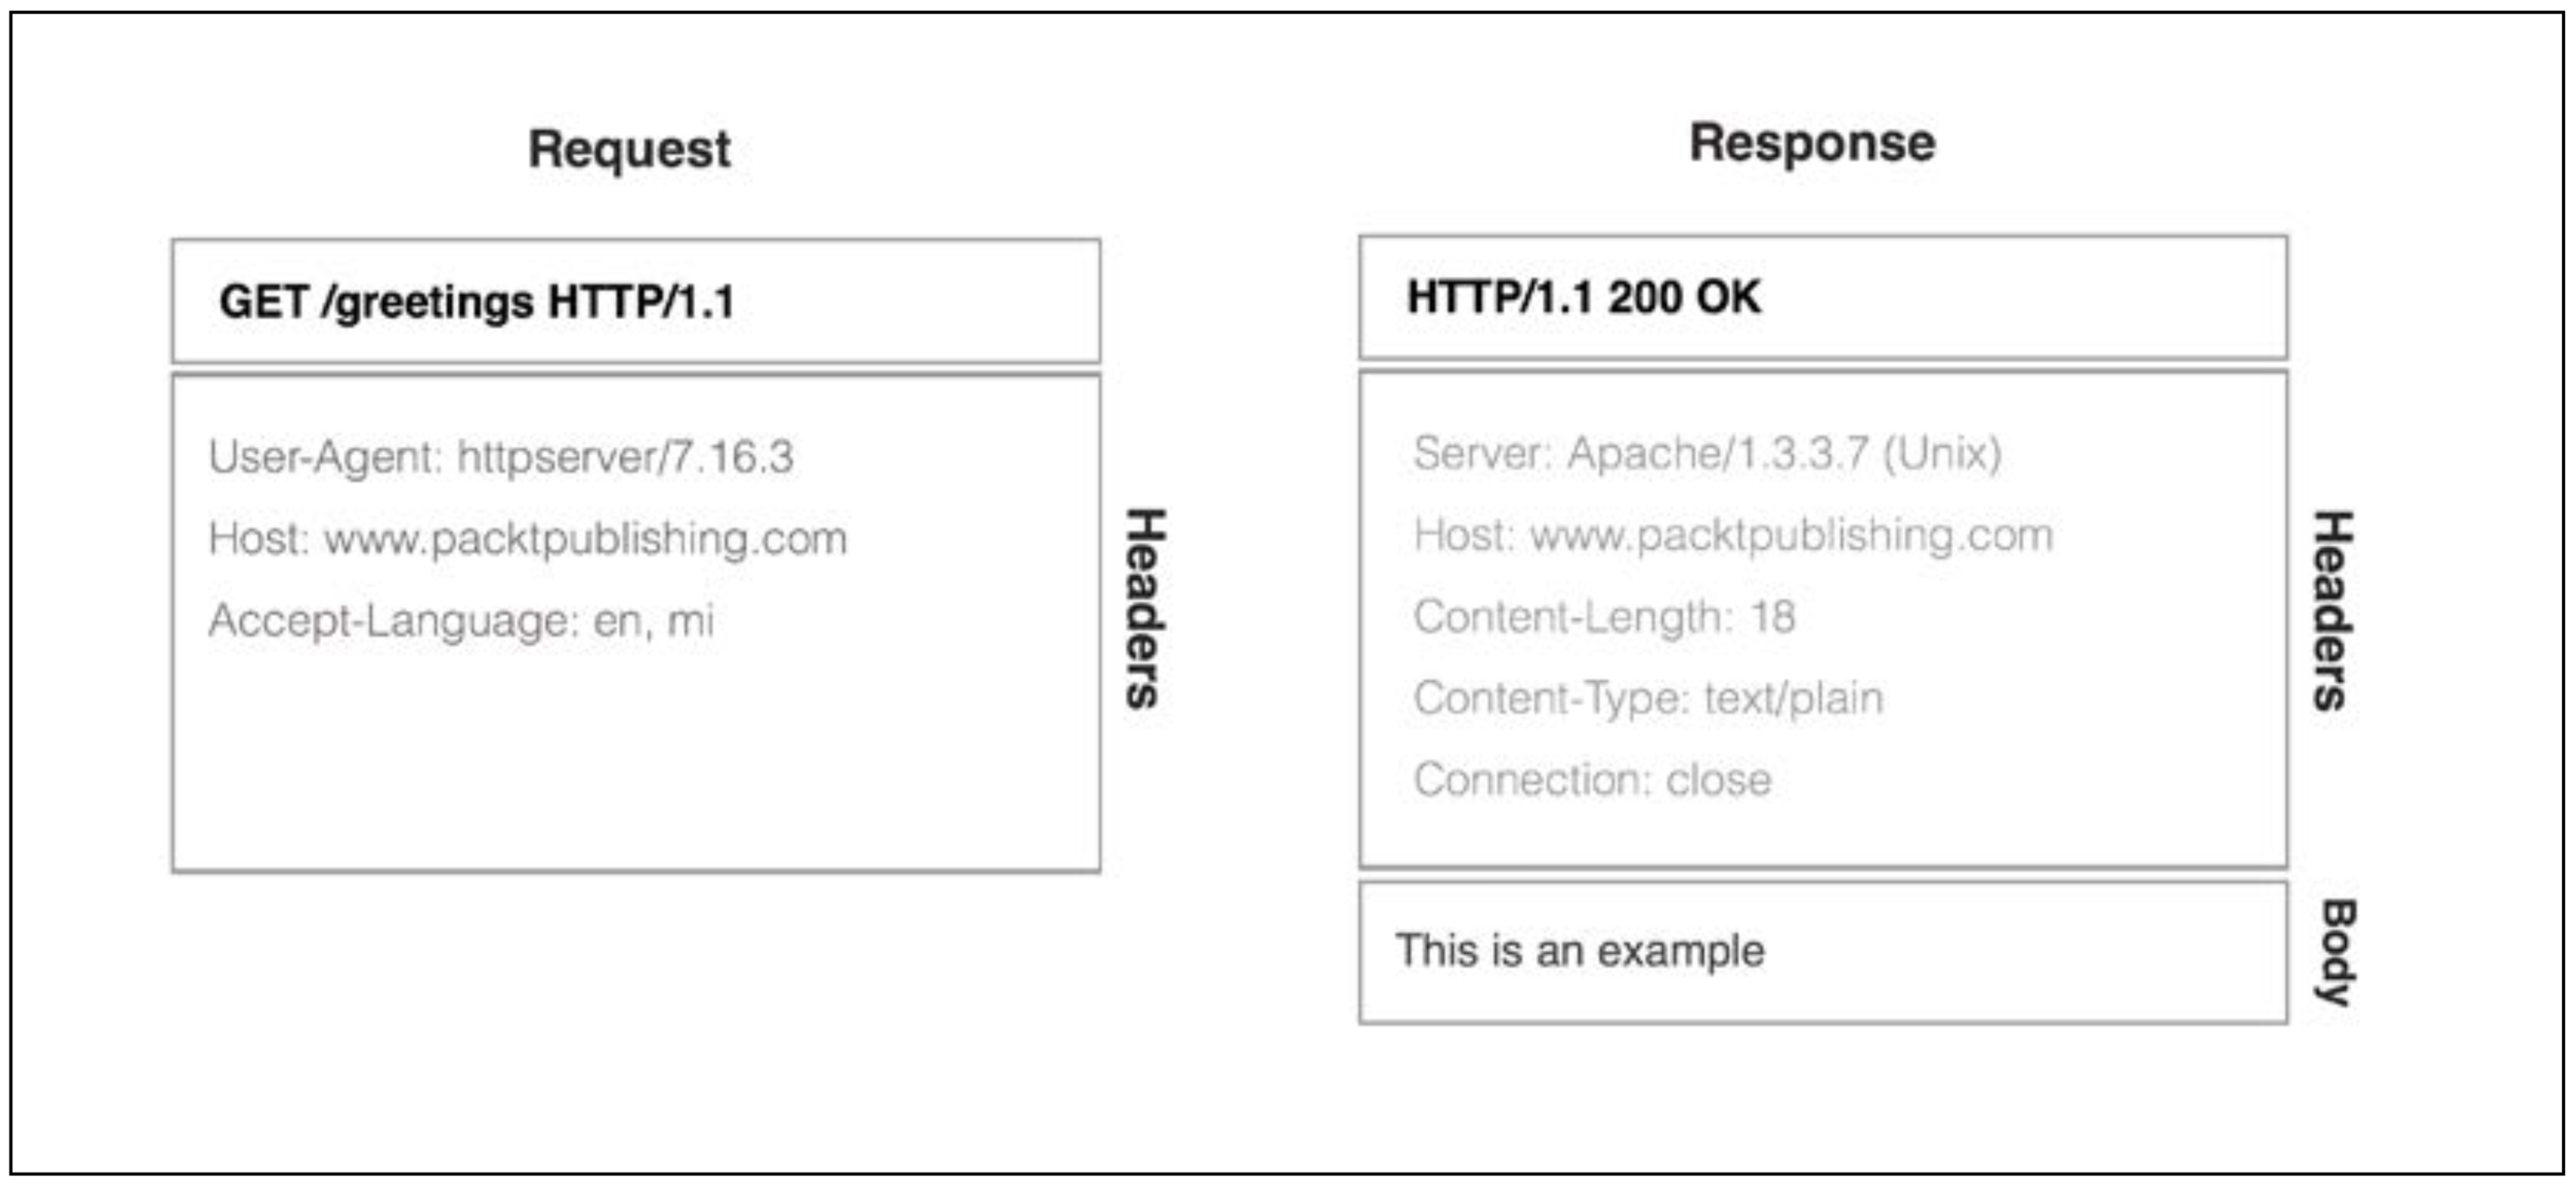
Retrieving a text response
Interacting with JSON web APIs
Plain Old Java Object (POJO)
Converting Java objects to JSON
JSONPlaceHolder http://jsonplaceholder.typicode.com/
compile 'com.google.code.gson:gson:2.5'
Interacting with XML web APIs
Converting Java objects to XML
SimpleXML http://simple.sourceforge.net/
Converting XML to Java objects
Mockble https://www.mockable.io/
Customizing HTTP timeouts
Communicating securely over SSL sessions
Certi cate Authorities (CAs)
Summary
In this chapter, we explored in detail the HttpUrlConnection Android HTTP client and we built a basic and expandable asynchronous client to interact with HTTP web APIs.
In the rst section, we exposed the main differences between the HttpUrlConnection client and the deprecated Apache HTTP client available on pre-Marshmallow SDKs.
Next, we wrote the core classes and callback interfaces for our asynchronous client and we expanded our high-level client to interact with JSON and Web APIs. Additionally, we built the code to convert from our Java models to a JSON or an XML document.
Later, we learned how to con gure the HTTP timeouts and to set up secure communications that are able to use our own signed certi cates, keys, and CAs. In our example, we created and prepared an SSL context to be used to establish a secure channel based on a prepared Java secure keystore.
In the next chapter, we will introduce and explore the JNI (Java Native Interface) to create asynchronous tasks in native code (C/C++). This interface is able to interact with compiled code that runs directly on the device’s CPU.
第9章 Asynchronous Work on the Native Layer
Java Native Interface (JNI)
Application Binary Interface (ABI)
- Introduction to JNI
- Android NDK
- Calling C functions from Java code
- Calling C++ member/static functions from Java code
- Accessing Java objects from native code
- Executing native background work on Java threads
- Executing asynchronous work on a native thread
- Interacting with a Java monitor from native code
- Handling Java exceptions on the native layer
Introduction to JNI
Java Virtual Machine (JVM)
-
Accelerate some critical portions of your application. Since the code runs directly on the hardware, it could make use of specific instruction sets to improve the execution:
- Example: The use of SIMD instructions to accelerate audio or video floating-point operations.
-
Integrate existing C/C++ libraries in to your Android application. You can port any legacy code or library written to the Android platform and use it on your Android application:
- Example: The integration of open source libraries such as opencv, libgdx, and box2d into your application runtime.
-
To use a platform dependent feature that is not accessible from the Java API:
- Example: Low-level OS features such as poll and semaphores or native APIS such as OpenGL, OpenSL ES, or OpenMAX AL.
Android NDK (Native Development Kit)
http:// developer.android.com/ndk/index.html
Calling C functions from Java code
public class MyNativeActivity extends Activity {
    @Override
    protected void onCreate(Bundle savedInstanceState) {
        ...
            cTv.setText(isPrime(2) ? "true" : "false");
    }
    ...
    private native boolean isPrime(int number );
}
A javah is able to help the developer to generate native method prototypes with name conventions used by the JNI interface, the SDK becomes a handy tool that generates a header le for all your class native methods.
$ javah -d jni -classpath <sdk_direcory>/android.jar:../../build/intermediates/classes/debug/ com.packpublishing.asynchronousandroid. chapter9.MyNativeActivity
com_..._chapter9_MyNativeActivity.h
JNIEXPORT jboolean JNICALL Java_com_packpublishing_asynchronousandroid_chapter9_MyNativeActivity_isPrime(JNIEnv *, jobject, jint);
Calling C++ functions from native code
Accessing Java objects from native code

Executing native background work on Java threads
Executing asynchronous work on a native thread
ndk {
    moduleName "mylib"
    stl "c++_shared"
    cppFlags.add("-frtti")
    cppFlags.add("-exceptions)
}
Attaching and detaching native threads from JVM
JNI references explained
Interacting with UI from native threads
Starting the native threads
Stopping the native threads
Handling Java exceptions in the native layer
Interacting with a Java monitor from native code
Wrapping native data objects
Summary
In this chapter we introduce you to the JNI, a standard API available on Java to interact with native code written in Assembly, C or C++ that it is available to any Android Developer with the Android NDK kit installed.
In the rst section we explain how to setup a project with JNI code on Android Studio and how to call C function and C++ member functions from any Java class on your application.
ter, we use the JNI interface to execute a Loader asynchronous background work on a native function. The native function was able to convert a colorful image to a gray image on a Java background thread created by the AsyncTaskLoader.
Next, we discover how to attach and detach a pure native thread created using the C++ standard library to the JVM. The attached thread worked as a normal Java thread and managed its own JNI Environment, resources and references.
In the meantime, we also discovered the differences between JNI global and Local references and how to access a Java object eld from the native code scope.
We also learned a technique to wrap native objects on Java objects and we de ne a concrete interface to dispose JNI resources attached to Java objects.
At the end of the chapter, we learned how to detect and handle a pending exception thrown on the JVM by a Java function.
We all the techniques explained on this chapter you should be able to integrate any code written in C/C++ in your asynchronous background execution. Beyond that, you can also make use of the native code to optimize a crucial functionality in your application or integrate with some native handy libraries.
In the next chapter, we will learn how to use the Google GCM to push and pull ef ciently realtime messages from your server and how to schedule work with Google Play Services framework.
第10章 Network Interactions with GCM
- Polling versus pushing messaging
- How to setup and configure GCM for your application
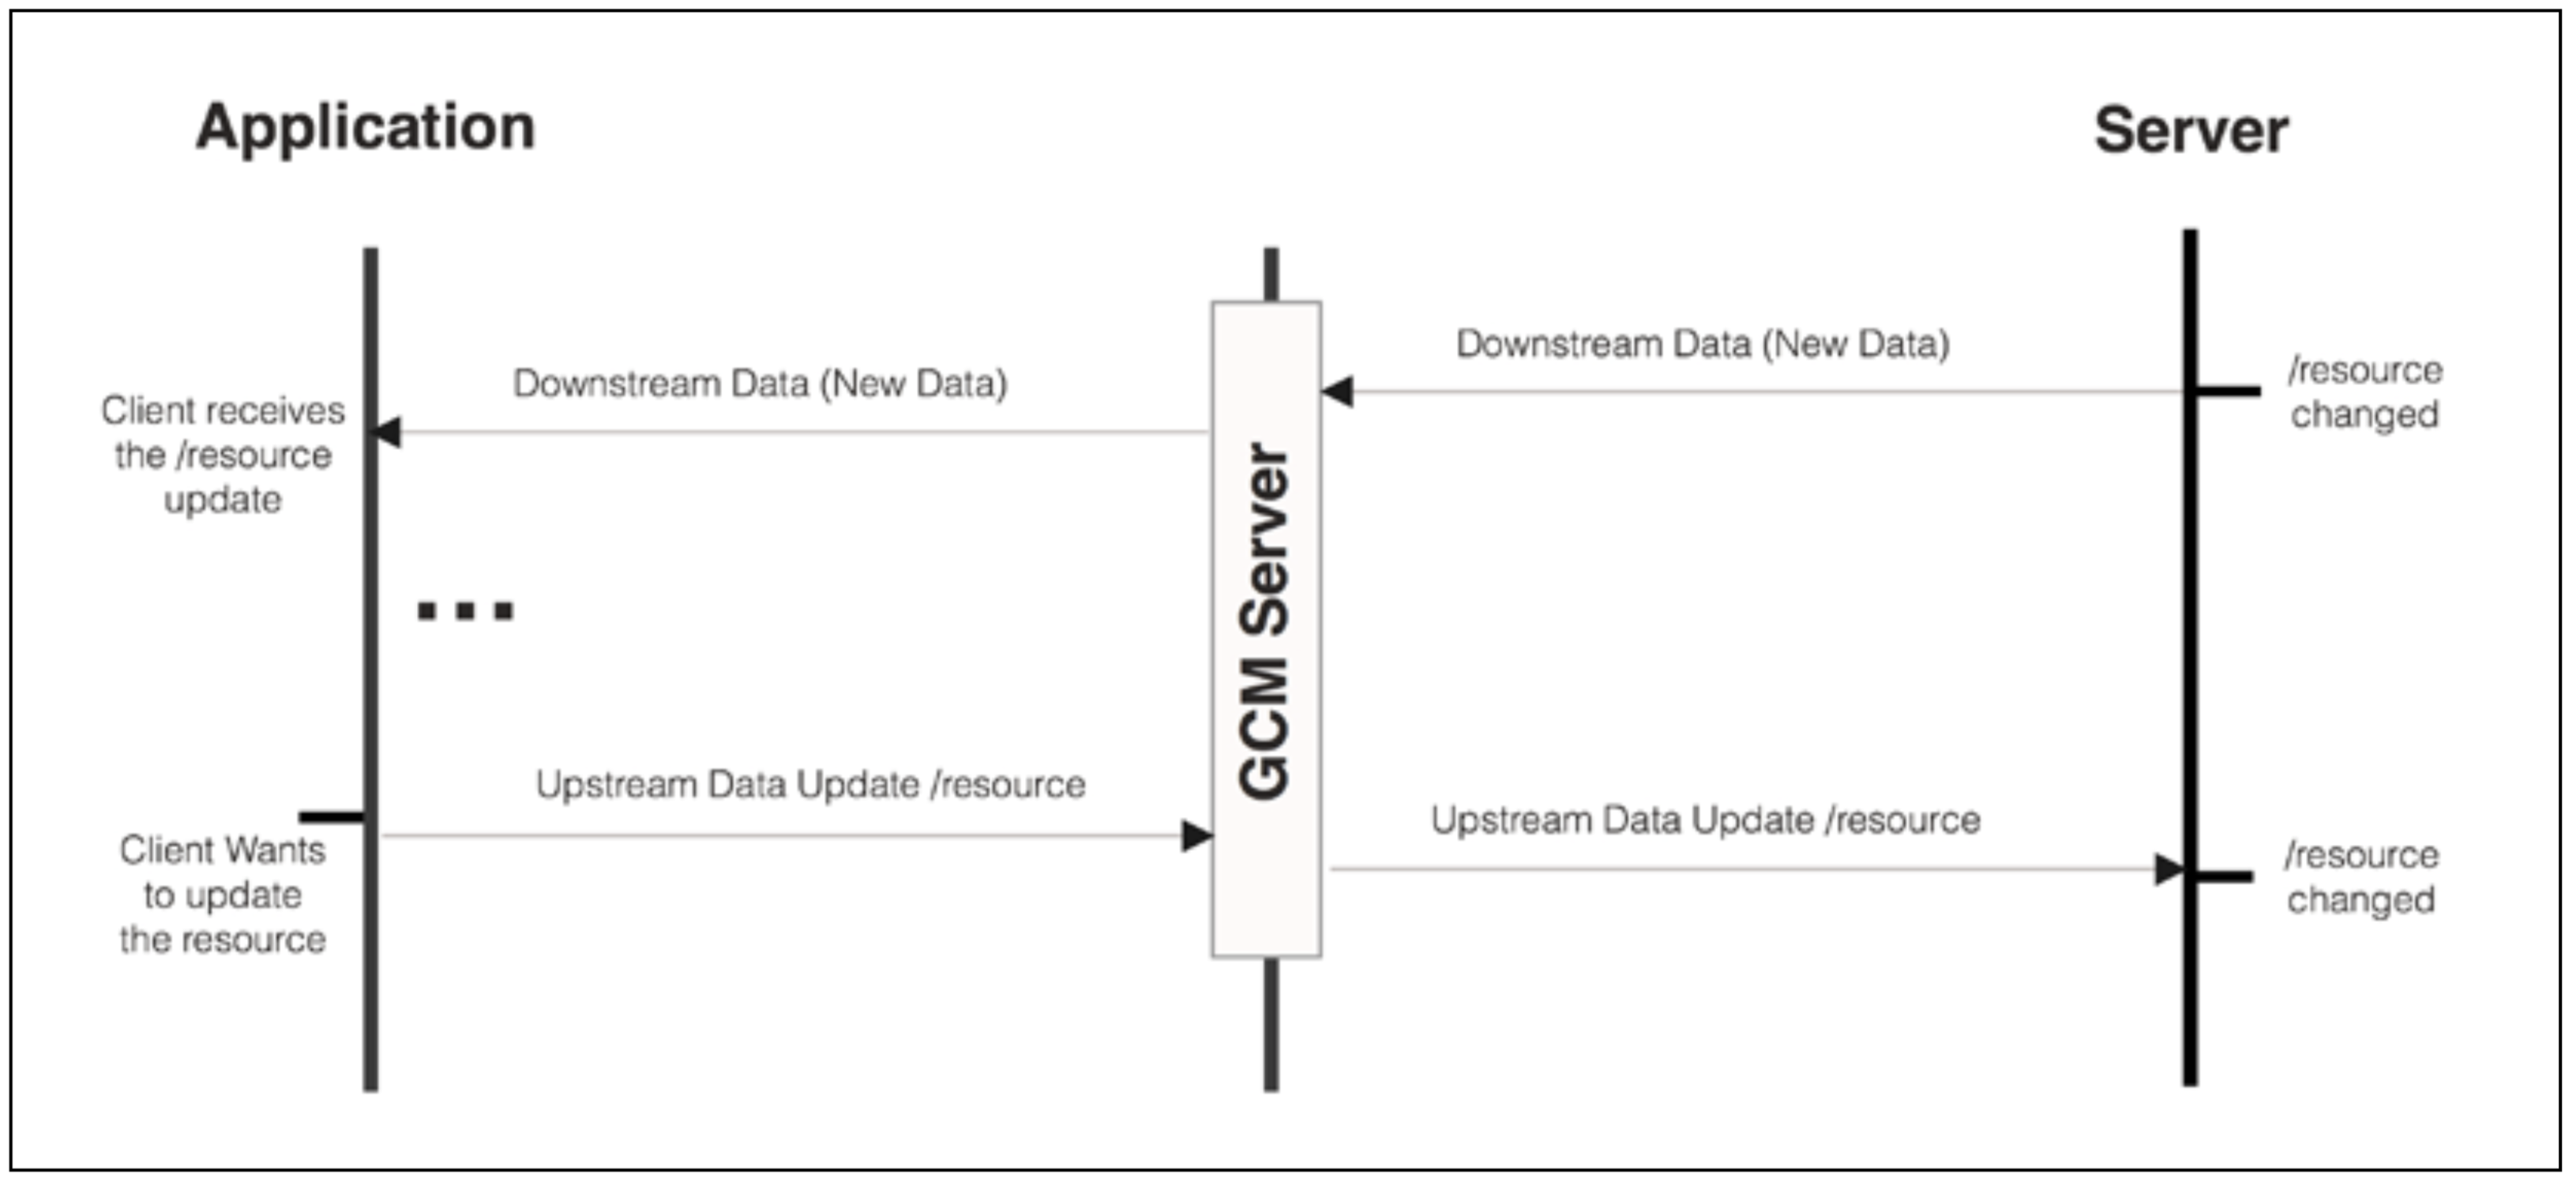
- Receiving downstream messages from the server with GCM
- Receiving downstream messages from GCM topic streams
- Sending upstream messages to your server with GCM
- Registering one shot and periodic network tasks with GcmNetworkManager
Introduction to GCM
Setting up and con guring GCM for your application
- First pick Android App Platform
- Specify your application name Example:Asynchronous Android
- Supply your application package name Example: com.packpublishing.asynchronousandroid
- Select Cloud Messaging Services and Enable Google Cloud Messaging
- Generate the con guration les and download the JSON con guration le google-services.json to your computer.
- Save your credentials (Server APIKey, SenderId) to authenticate with the GCM platform
*
buildscript {
    repositories {
        jcenter()
    }
    dependencies {
        classpath 'com.android.tools.build:gradle:1.5.0'
        classpath 'com.google.gms:google-services:1.5.0-beta2'
    }
}
..
app/build.gradle
apply plugin: 'com.android.application'

android {
    compileSdkVersion 23
    buildToolsVersion "21.1.1"
    defaultConfig {
        applicationId "com.packpublishing.asynchronousandroid"
        minSdkVersion 9
        targetSdkVersion 23
    }
}

dependencies {
    ...
    compile 'com.google.android.gms:play-services-gcm:8.3.0'
}
apply plugin: 'com.google.gms.google-services'
AndroidManifast.xml
<uses-permission android:name="android.permission.INTERNET" />
<!-- Required to wakeup the device and deliver messages -->
<uses-permission android:name="android.permission.WAKE_LOCK" />
<permission android:name="<Package>.permission.C2D_MESSAGE" android:protectionLevel="signature"/>
<uses-permission android:name="<Package>.permission.C2D_MESSAGE"/>
...
</manifest>
Registering the GCM Receiver
AndroidManisfest.xml
<receiver android:name="com.google.android.gms.gcm.GcmReceiver" android:exported="true" android:permission="com.google.android.c2dm.permission.SEND" >
    <intent-filter>
        <action android:name="com.google.android.c2dm.intent.RECEIVE" />
        <category android:name="<Package>" />
    </intent-filter>
</receiver>
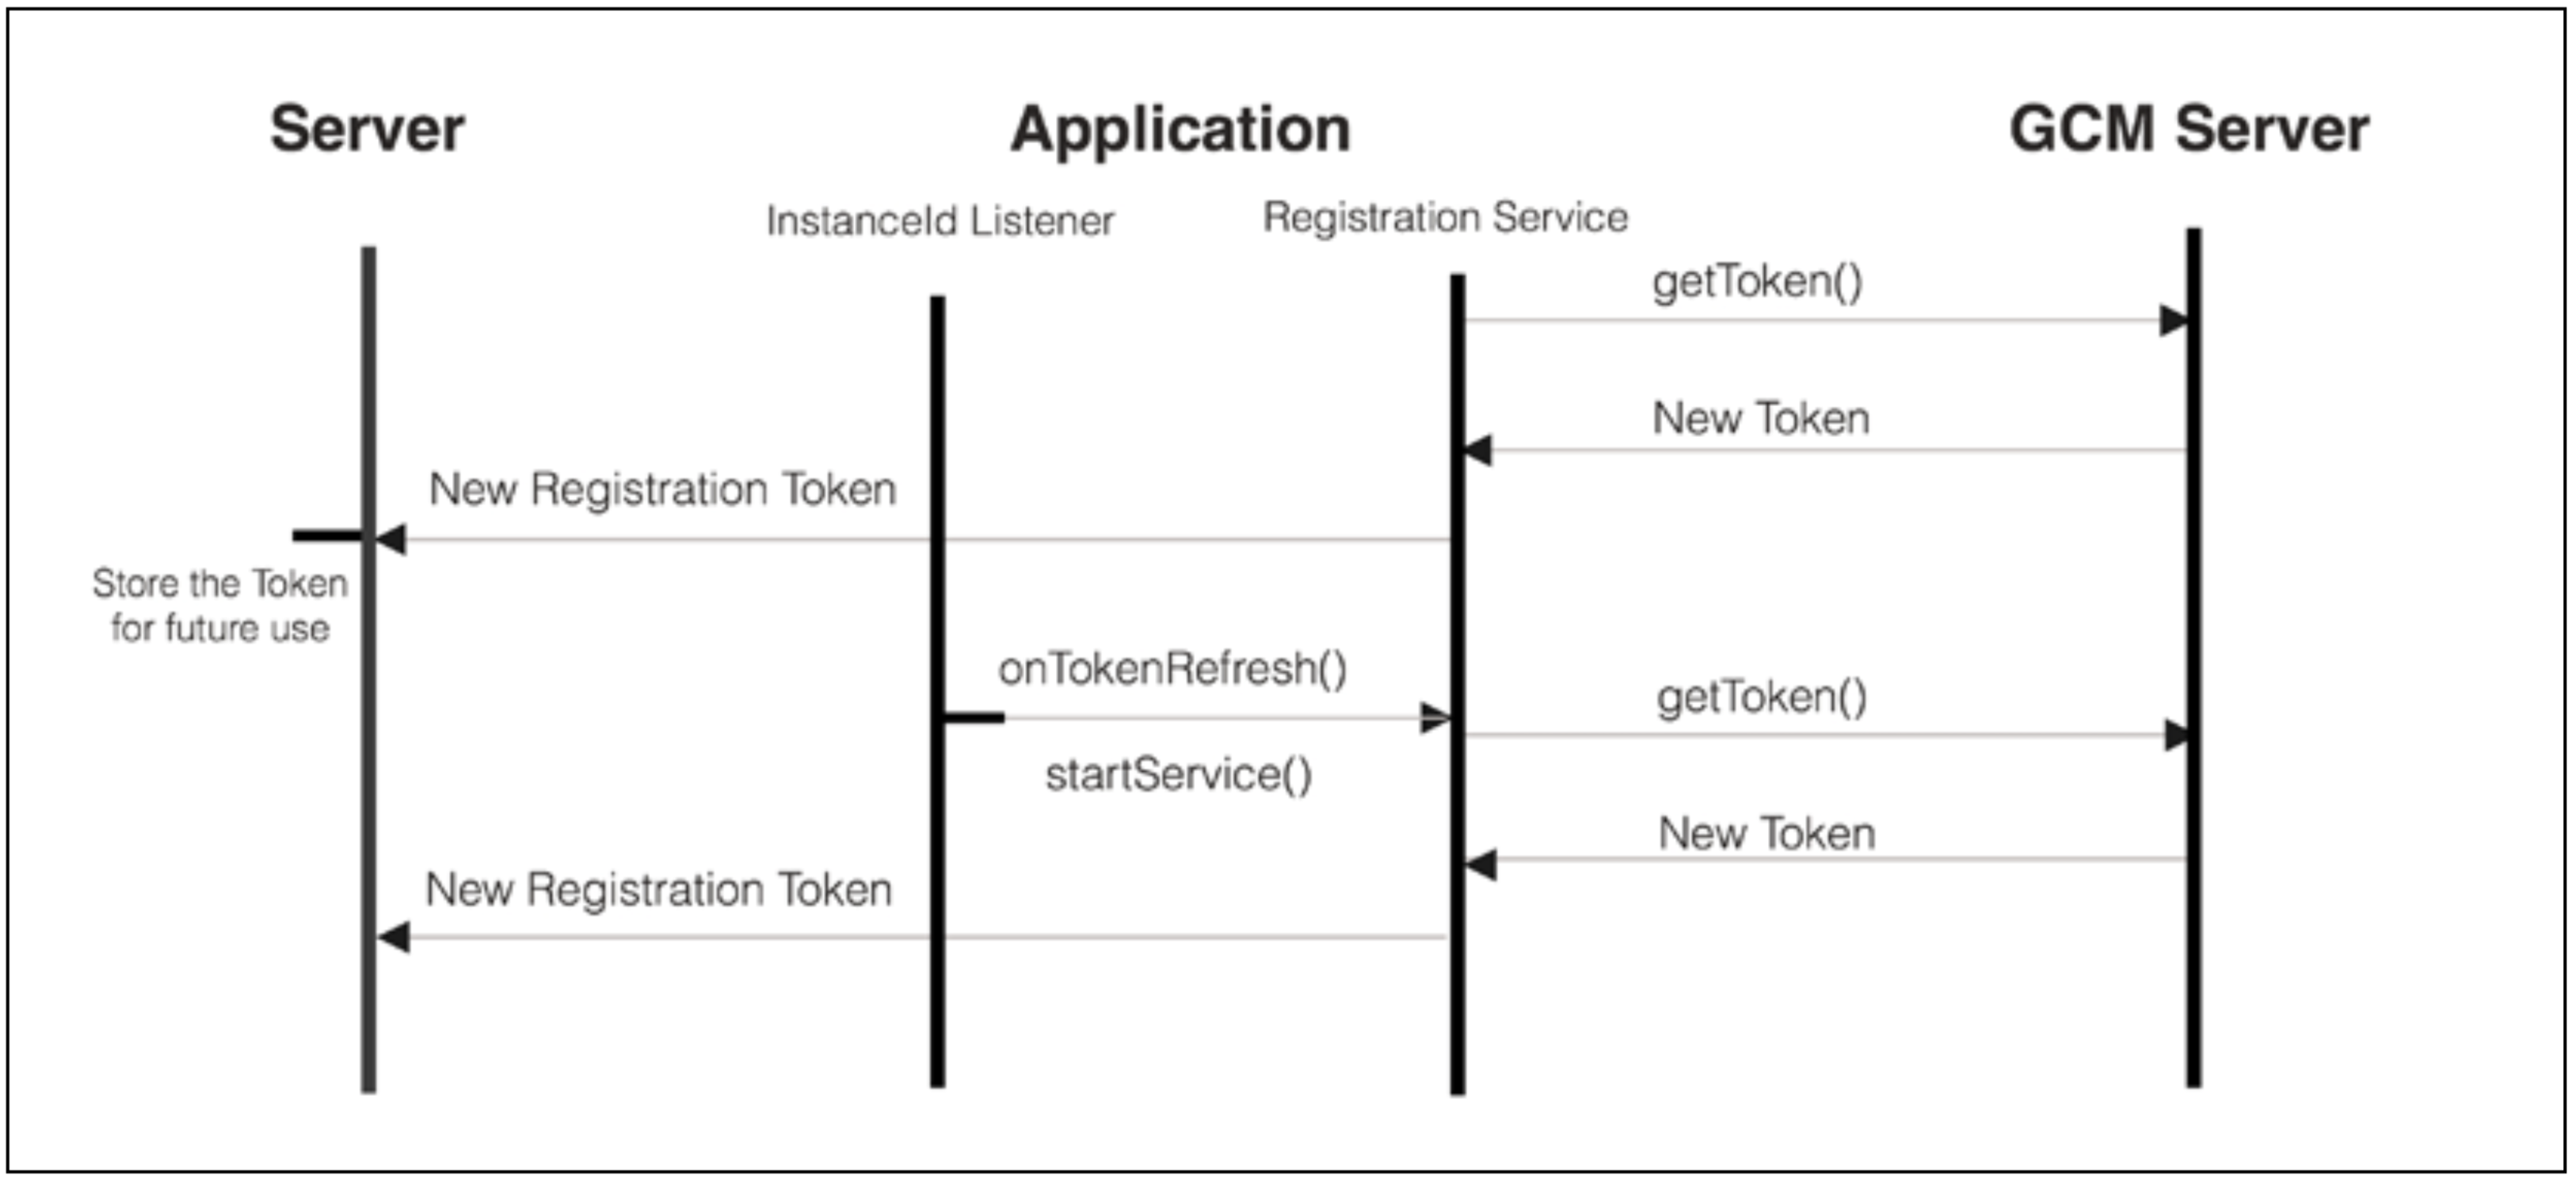
Setting up a registration service
AndroidManisfest.xml
<service android:name=".chapter10.RegistrationIntentService" android:exported="false">
</service>
InstanceID listener
- The application explicitly deletes Instance ID (Instance.deleteToken)
- The device is factory reset
- The application is uninstalled
- The user clears application data
Receiving downstream messages
Receiving messages from topic
Sending upstream messages
- The address of our server on the GCM platform:
@gcm. googleapis.com. - A unique message identifier (message_id)
- A message payload with a custom key/value pairs
GcmListenerService delivery callbacks
void send (String to, String msgId, long timeToLive, Bundle data)
Executing tasks with GCM Network Manager
- When certain network connectivity is available (any network available, unmetered network connectivity)
- When the device is plugged to the charger
- A task that runs within a predefined time window in the future
- Specify the task to run even after a reboot
Building a one shot task
- Execution Window Range (Mandatory)
- Tag Identifier (Mandatory)
- GcmTaskService subclass that runs our task(Mandatory)
- Extra Arguments (Optional)
- Job Persistence (Optional)
- Required Network (Optional)
- Charging Required (Optional)
- Update Current Task (Optional)
Summary
In this chapter we learned how to send and receive data using a battery-ef cient communication channel provide by GCM Platform.
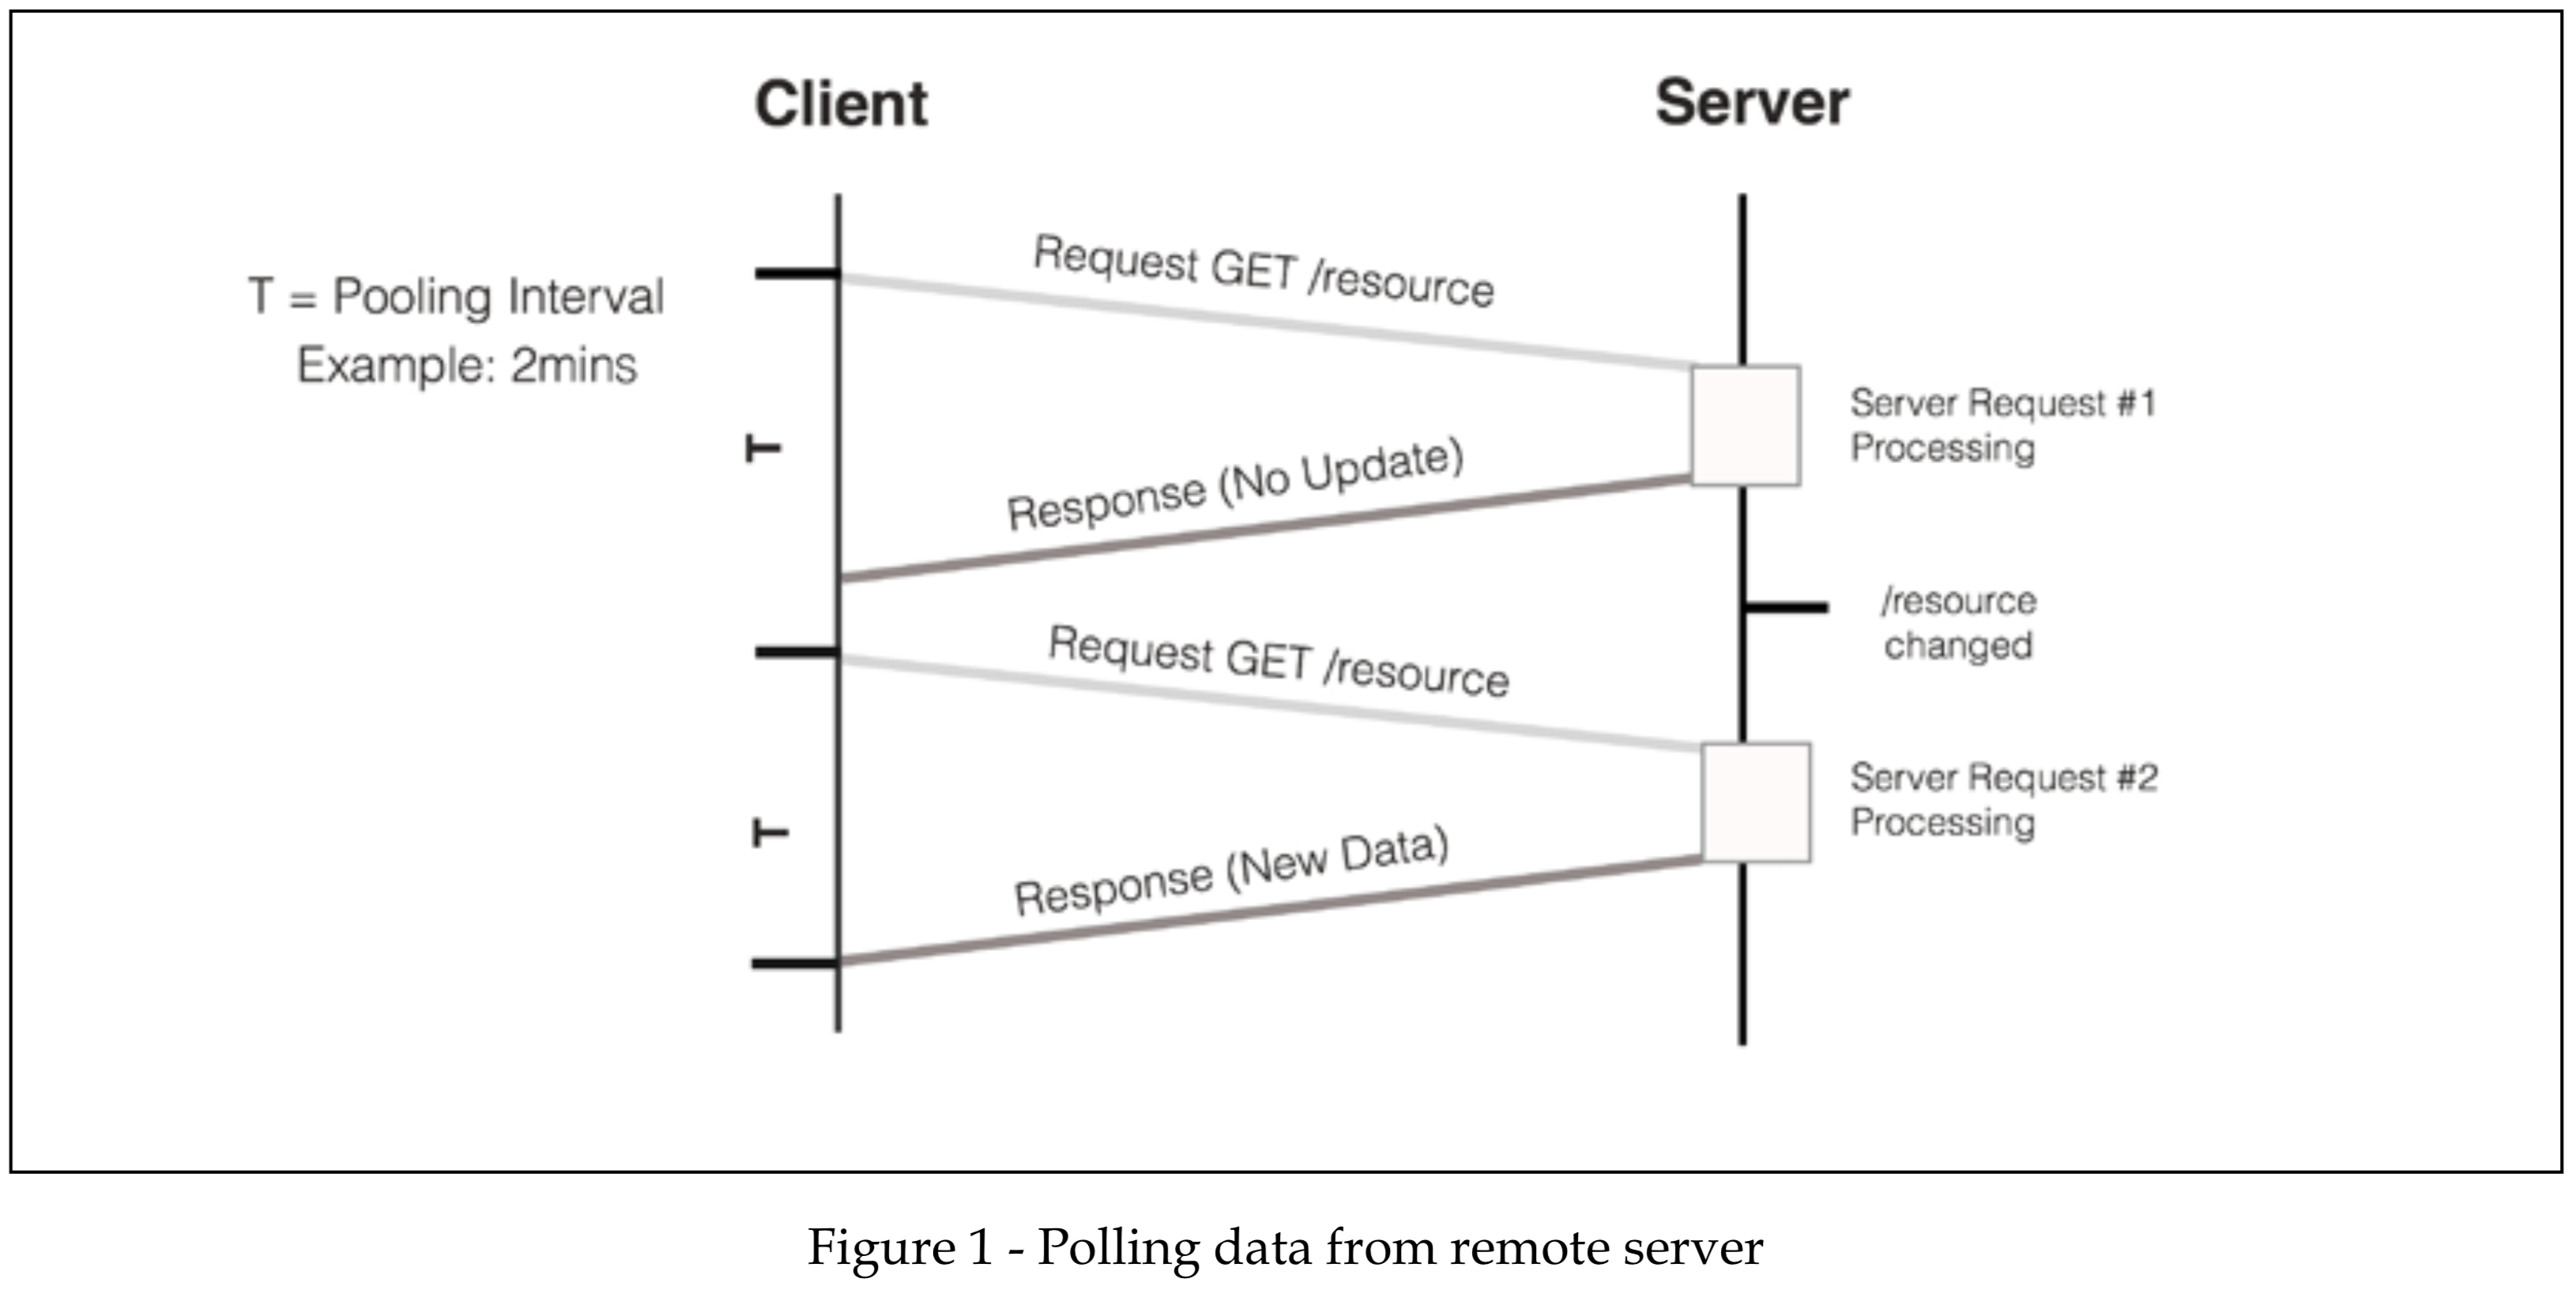
First, we learned the differences between polling and push/pull communication techniques to interact with network servers. The push and pull messaging used by GCM is able to reduce the battery ef ciency of your application by avoiding redundant server queries to keep the user’s data up to date.
In the meantime, we learned how to setup and con gure the GCM library on our application. To interact with Google Services, our device obtained a instanceID and registration token to authenticate and identify our device on the GCM service.
Next, we learned how handle noti cation messages and topic messages on our application and we interacted with a custom XMPP server using GCM upstream messages. At the same time, we built group chat system that is able to aggregate messages from different users in a uni ed stream of messages displayed on the screen.
Finally, we learned how to use GCM Network Manager to schedule network tasks that run when certain criteria are meet on the device such as the device is connected to the WIFI network.
In the next chapter, we will introduce the reader to the RXJava, a library used to compose asynchronous and event-based tasks on Java by using observable data streams.
第11章 Exploring Bus-based Communications
- Introducing bus-based communication
- Setting up an EventBus library in your project
- Registering subscribers
- Processing events asynchronously with threadMode
- Posting and removing sticking events
Introduction to bus-based communication
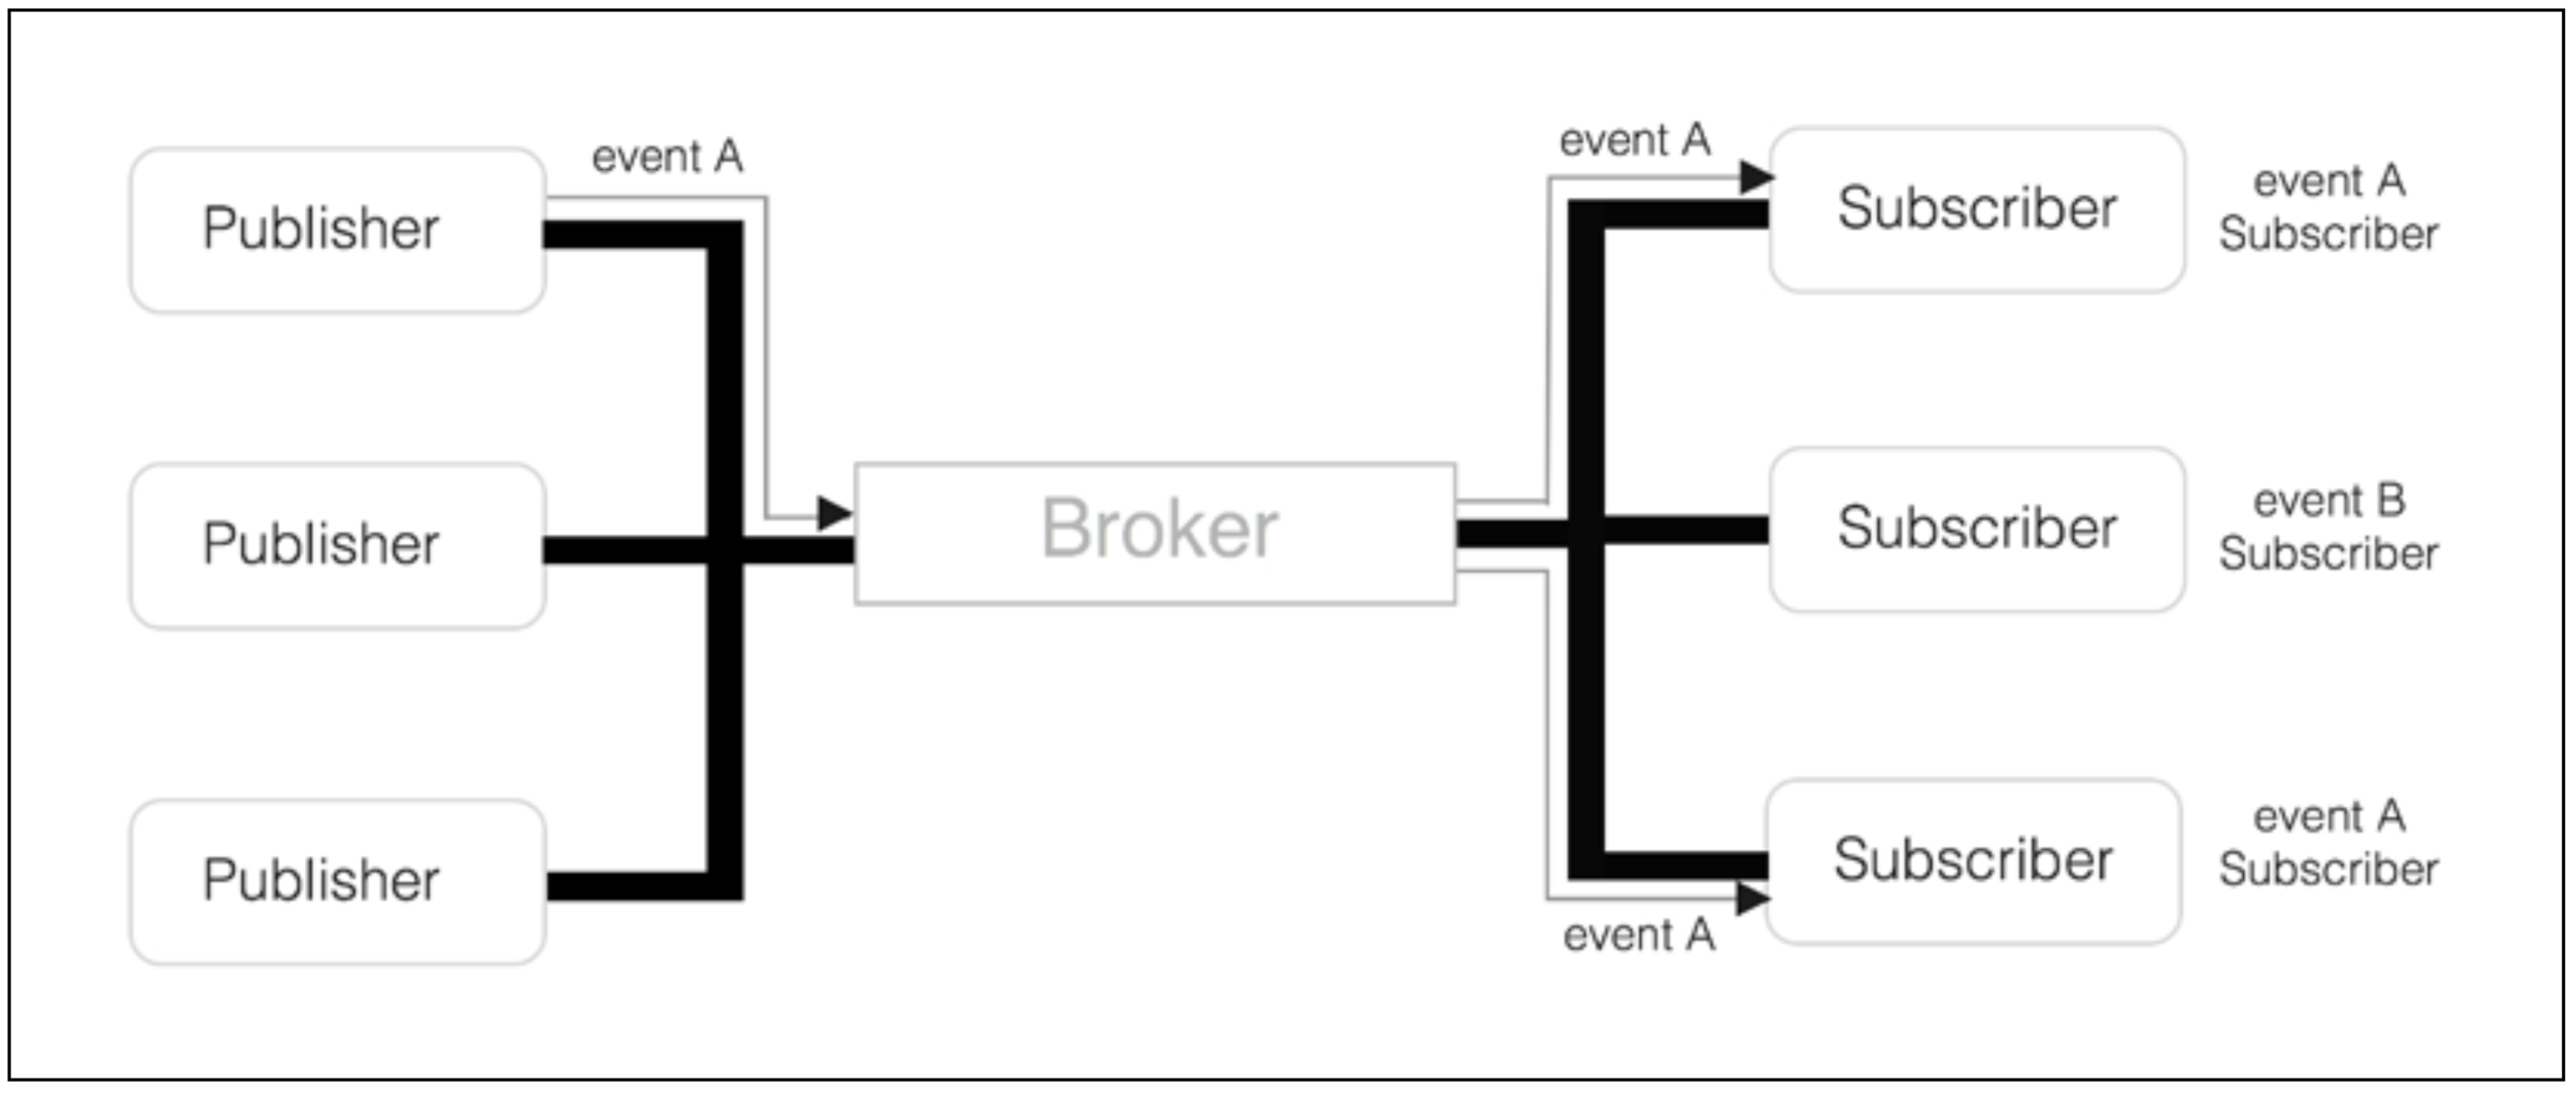
The Bus based communication software pattern, also known as Publish/Subscribe, is a pattern that allows sender and receiver entities to communicate without requiring them to explicitly know each other.
- publisher
- subscriber
- event
- bus
- broker
The publisher submits events to a shared messaging pipeline, named bus, controlled by an entity called broker, that governs the stream of events submitted and forwards them to a list of interested entities, called subscribers, that previously registered in the broker to receive certain kinds of event.
EventBus library
http://greenrobot.org/eventbus/
- Annotation-based subscription – You can define an subscription method by annotating an Android Activity, Service, or Fragment instance method
- Background and main thread event delivery – The subscriber could define in which thread the event will be delivered regardless of whether it was generated in a background or main thread
- Event and subscriber inheritance – We can construct events or subscribers by extending (Java subclass) other events or subscribers:
- class OtherEvent extends MyEvent
- No configuration required – The library, by default, allows us to use a ready-to-use default Bus that does not require explicit instantiation, and can be used to submit events from anywhere in the application:
- EventBus.getDefault().post(new MyEvent());
build.gradle
dependencies {
    compile 'org.greenrobot:eventbus:3.0.0'
}
Defining events
public class MobileNetConnectedEvent {
    public final String detailedState;
    public MobileAvailableEvent(String detailedState) {
        this.detailedState = detailedState;
    }
}
public class MobileNetDisconnectedEvent {}
Submitting events
EventBus.getDefault().post(new MobileNetConnectedEvent(info.getState().toString()));
Registering sbscribers
@Subscribe
void on<EventClassname>(EventClassname event) {
    ...
}
@Subscribe
public void onMobileNetConnectedEvent(MobileNetConnectedEvent event){
    String message = String.format(
            "Mobile connection is available State - %s\n",
            event.getDetailedState());
    appendToConsole(message);
}
@Override
public void onStart() {
    super.onStart();
    EventBus.getDefault().register(this);
}

@Override
protected void onStop() {
    EventBus.getDefault().unregister(this);
    super.onStop();
}
Thread mode
There are four modes supported by EventBus that we can use to control the event delivering behavior:
- ThreadMode.POSTING – The subscribers callback will be invoked in the same thread where the sender posted the event. This is default behavior and the events will be delivery synchronously to all the entities that subscribed to the dispatched event.
- ThreadMode.MAIN - The Bus will invoke the subscriber’s callback in the main UI thread. Thus, if the sender is running in the background thread when it posts the event to the Bus, the bus will queue the message in the main Looper and the event will get delivered in the main thread. For more details about how Looper and Handlers work, see Chapter 2, Performing Work with Looper, Handler, and HandlerThread. When the event is produced in the main thread it behaves as the ThreadMode.POSTING mode.
- ThreadMode.BACKGROUND – The bus will invoke the subscriber’s callback in a background thread that prevents the event handling from blocking the UI thread. Notice that EventBus uses only one background thread to invoke all the callbacks, so, any long-running component could defer the delivery of subsequent events. When the event is produced in the background thread it is in the ThreadMode.POSTING mode.
- ThreadMode.ASYNC- The Bus will invoke the subscriber’s callback using a group of threads managed by the Bus. The thread pool of worker threads, created from Executors.newCachedThreadPool, is going to be recycled and might be used to execute blocking operations, such as network or long computing operations.
// Execute the callback on a  Background Thread
// managed by EventBus
@Subscribe(threadMode = ThreadMode.BACKGROUND )
public void onMyEvent(MyEvent event) {...}
Posting sticking events
Removing sticky events
- removeStickyEvent(
) – Removes and gets the recent sticky event for the given event type - removeStickyEvent(Object event) - Removes the sticky event if it equals the passed event
- removeAllStickyEvents() - Removes the sticky events for all types
Summary
In this chapter, we learned about the publish/subscribe messaging pattern used to communicate between decoupled entities on an Android application. This pattern must be applied to send event noti cations or data to one or more Android component recipients.
Next, we introduced to the reader the EventBus, an optimized open source library that delivers the publish-subscribe pattern for the Android platform and provides advanced features such as sticky events and asynchronous event delivery.
Following that, we learned how set up the library, how to model events, and how to dispatch events on the default Bus. The Bus, a shared entity that receives the events, will act as a broker and proxy for the events to the nal recipients that previously subscribed to them.
We took a detailed look at Eventbus threadMode feature of EventBus that allows us to de ne the thread in which the Bus delivers the event to the subscriber. Hence, we were able to consume events in different threads (background, main thread, and asynchronous threads) from the posting thread.
To nish our journey, we learned about sticky events, events that are cached on the Bus and delivered to new sticky subscribers during the registration and prevent such methods from waiting for the next event, in case of the absence of new data.
第12章 Asynchronous Programing with RxJava
- Introduction to RxJava
- Creating Observables
- Transforming Observables
- Understanding Schedulers
- Performing Asynchronous IO with Schedulerso
- Composing Tasks with RxJava
- Observing UI events with RxJava
- Combining Tasks with RxJava
- Working with Subjects
Introduction to RxJava
Cold versus Hot Observable
RxJava setup
dependencies {
    ...
    compile 'io.reactivex:rxandroid:1.1.0'
    compile 'io.reactivex:rxjava:1.1.0'
}
Creating Observables
Transforming Observables
- map: Applies a function to each item emitted and emits the result of the function as a new item.
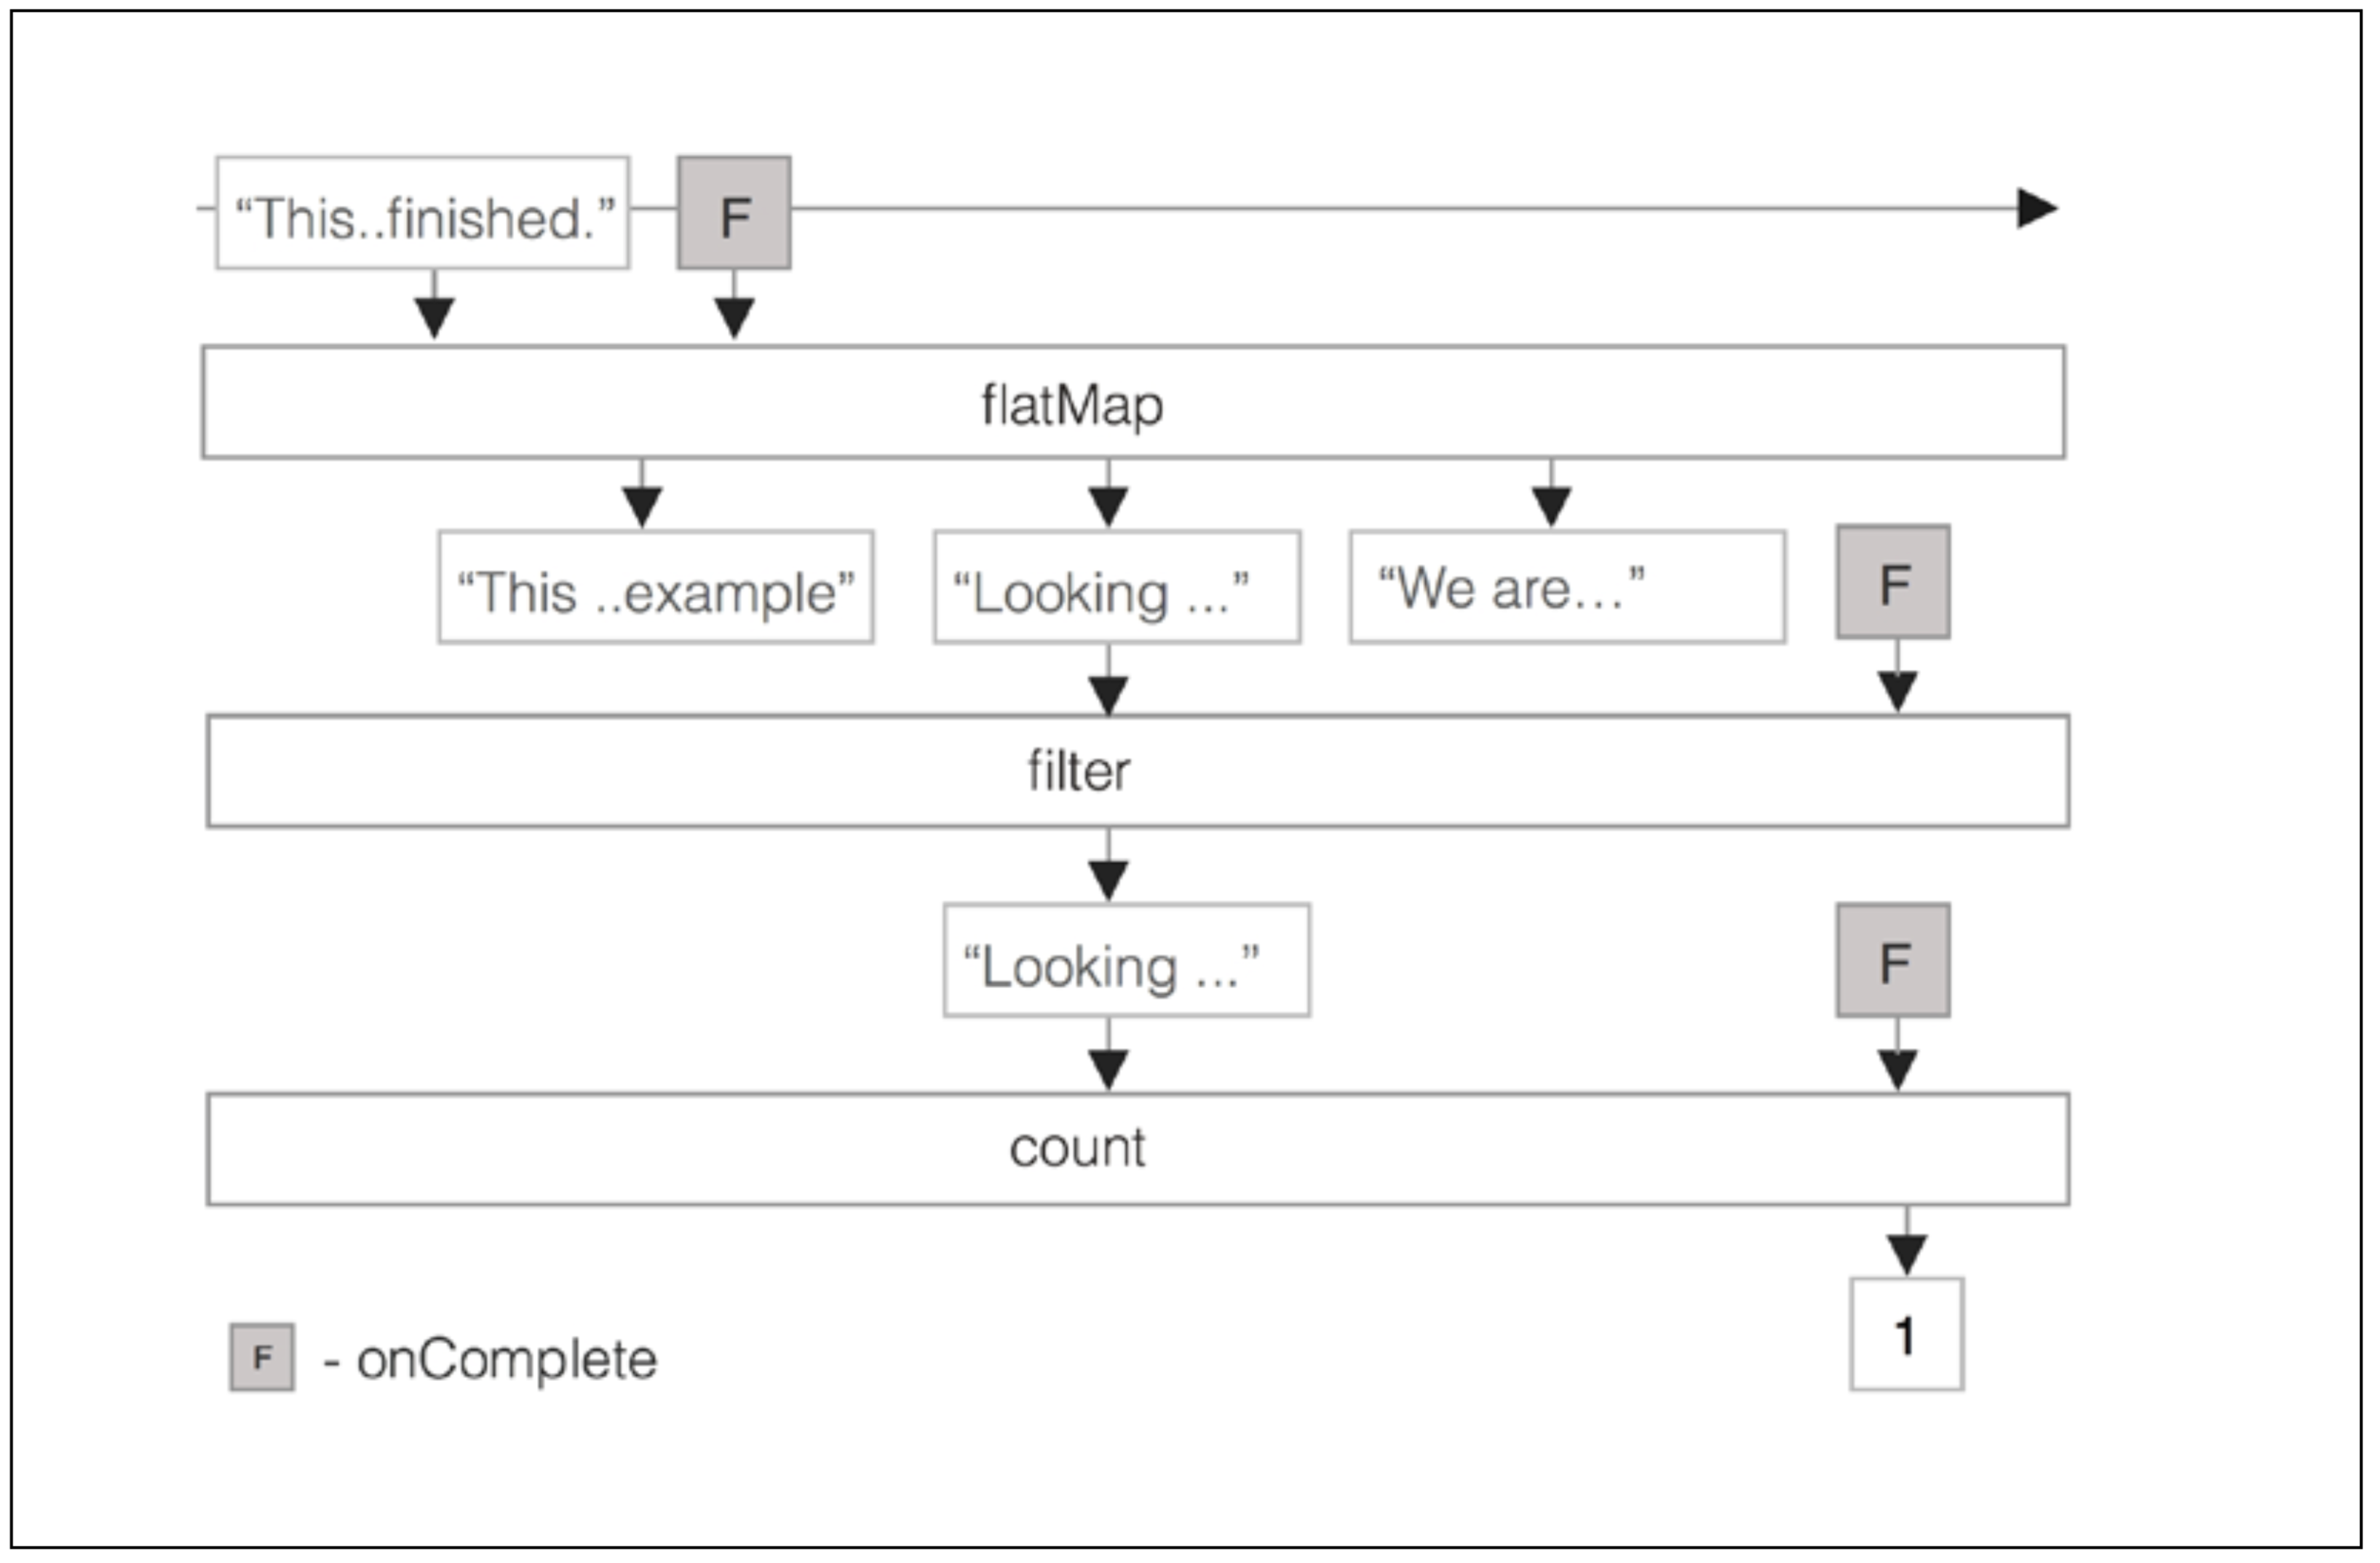
- flatMap: Applies a function to each item emitted by the source Observable where the function returns an Observable that could emit a different number of items or a different type of event.
- filter: A transformation operator that uses a function that verifies if each item emitted by the source Observable satisfies a condition. If the condition passes the item, it is forwarded to the following Subscriber.
- first: Emits only the first item emitted by the source Observable.
- count: Emits the number of items received from the original Observable.
- zip: Combines the emissions of two Observables using a function that receives the N item of each original Observable as an argument.
- contains: Emits a Boolean event that indicates whether the source Observable has a specified Object.
- merge: Merges the events of multiple Observers into one event stream.
- delay: Delays the emission of an item by a specified amount of time.
Understanding Schedulers
- Schedulers.immediate(): Default Scheduler that returns a Scheduler that executes the work immediately in the current thread.
- Schedulers.trampoline(): Returns a Scheduler that queues work in the current thread to be executed after the current work completes.
- Schedulers.newThread(): Returns a Scheduler, spawns a new thread, and executes the work on the new Thread.
- Schedulers.computation(): Returns a Scheduler intended for computational intensive work. This can be used for event loops, processing callbacks, and other computational work. Do not perform blocking IO work on this Scheduler. This Scheduler uses a fixed thread pool size where the size is dependent on the CPUs to optimize CPU usage and minimize CPU switching.
- Schedulers.io(): Creates and returns a Scheduler that executes the work of a cached pool of threads that grows and shrinks as needed, reusing already created threads that are idle to execute the require work. This Scheduler is intended for asynchronously performing blocking IO tasks, such as network or file system read and write.
- Scheduler.from(Executor): Creates a Scheduler that will execute the unit of work on the java.util.concurrent.Executor passed as argument.
- AndroidSchedulers.mainThread(): Creates a Scheduler that executes the required work on the Android application main thread. This Android Scheduler, provided by the RxAndroid library, is based on the HandlerThread that runs the unit of work serially.
- HandlerScheduler.from(Handler): Creates a Scheduler that executes work on a specified Handler. The AndroidSchedulers.mainThread() is of specialization of this Scheduler that runs on a Handler attached to the Android UI thread.
Performing IO operations with Schedulers
Canceling subscriptions
Composing Observables
Monitoring the event stream
- doOnSubscribe(Action0): Registers an Action0 function to get called when a Subscriber subscribes to the Observable.
- doOnUnsubscribe(Action0): Registers an Action0 function to get called when a Subscriber unsubscribes from the Observable.
- doOnNext(Action1): Registers an Action1 to be called when a new event is emitted from the source Observable. The Event
object is also passed as an argument to the Action1 function. - doOnCompleted(Action0): Registers an Action0 function to be called when the source Observable emits the onComplete event.
- doOnError(Action1): Registers an Action1 function to be called when an error is emitted from the source Observable. The Throwable emitted on the OnError is also passed to the Action1.call function.
- doOnTerminate(Action0): Registers an Action0 function to be invoked when an error or onComplete is emitted by the source Observable. This callback function also means that the previous Observable will emit no more items.
Combining Observables
Observing UI Events with RxJava
Working with Subjects
- AsyncSubject: Subjects that will only emit the last item emitted by the source Observable when the source Observer completes the stream by calling onComplete()
- PublishSubject: The Subject only delivers to the Observers the events emitted after their subscription
- ReplaySubject: Emits all the events emitted by the source Observable, even those that were emitted before the subscription is made
- BehaviorSubject: Emits the last emitted item by the source Observable when the subscription is done, then continues to any other items emitted by the source observable
Summary
In this nal chapter, we learned how to use RxJava, an open source library that helps to process our Android application data or event streams using functional and reactive processing pipelines.
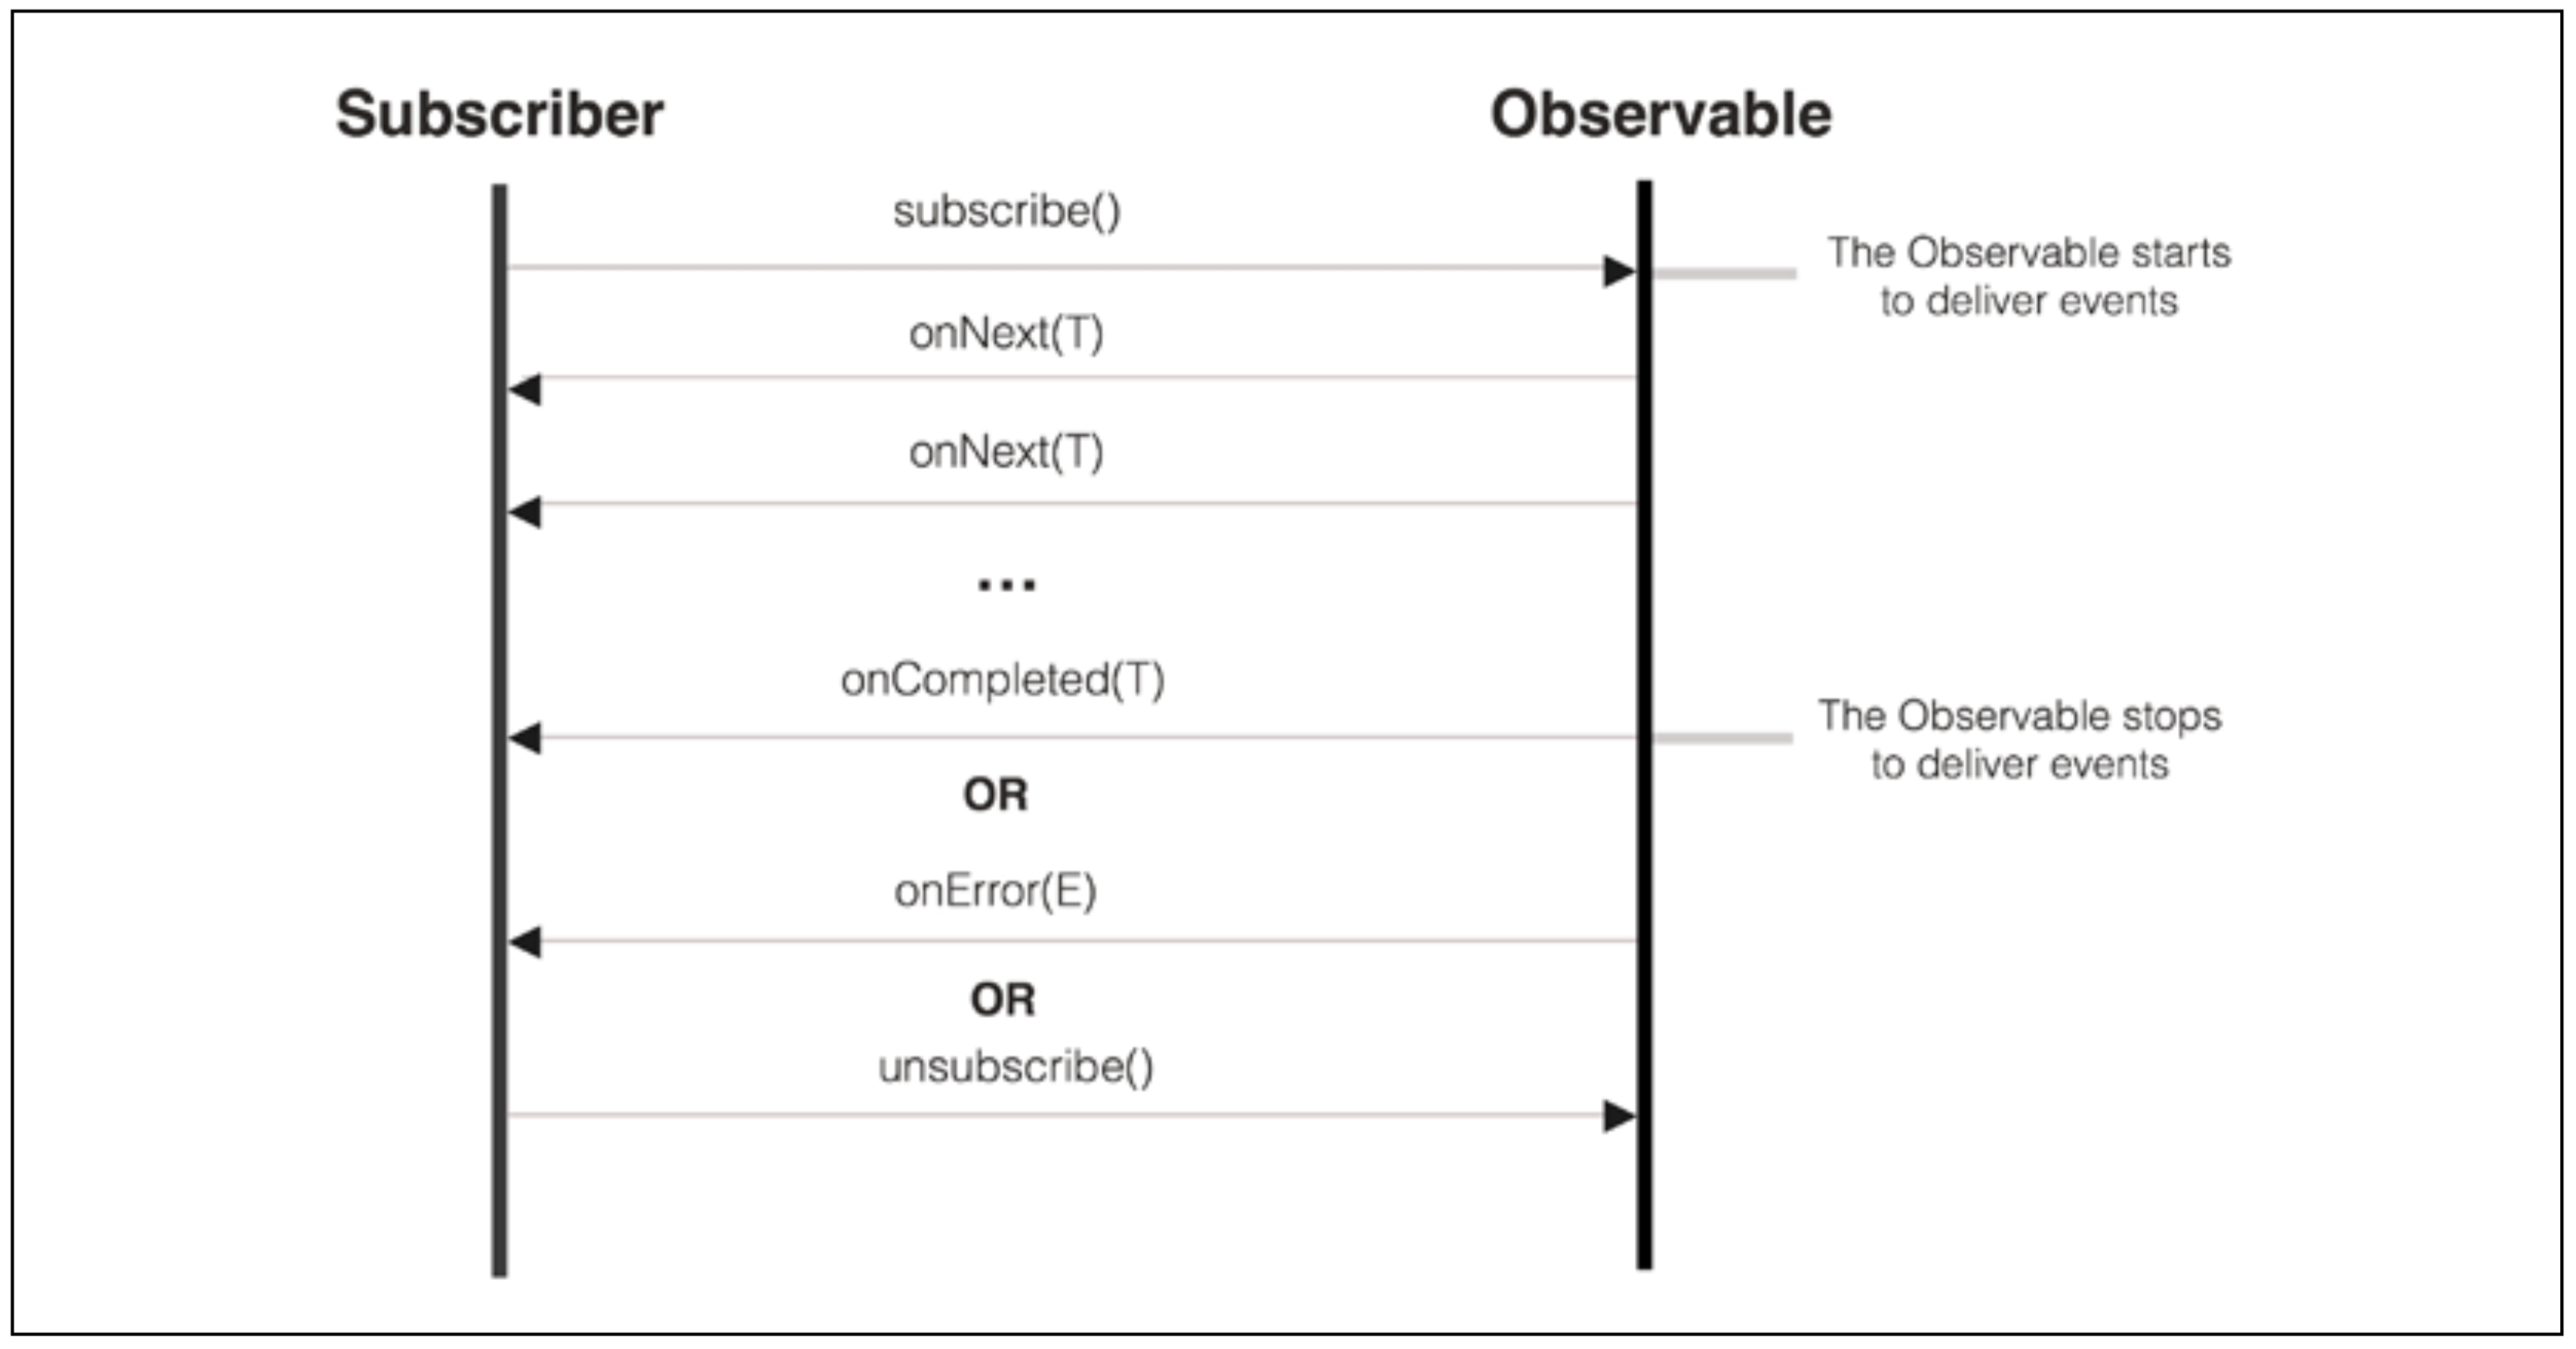
In the rst sections, we learned in detail some of RxJava basic building blocks— Observable, Observer, and Subscriber.
Next, we introduced some of RxJava most common operators that are able to manipulate, transform, and combine event streams generated by an Observable.
In order to perform operations asynchronously and concurrently, we learned about the Scheduler, a magic RxJava entity that controls the concurrency, and is able to schedule RxJava units of work to run in background threads and feed the results back to the main Android Thread.
Next, using custom Observables and combining operators, we learned how to associate and compose interdependent complex blocking or long computing operations, such as REST API network operation.
In the meantime, we also learned how to react to a custom Observable that emits Android Widget UI events using a RxJava event functional pipeline.
Finally, we learned about the Subject RxJava entity, an entity that can act as an Observer and Observable and can act as a proxy between our source Observable and the nal Observer.