学习 Kotlin 编程! Kotlin Apprentice 是一本专为 Kotlin (适用于 Android 开发的现代语言)的初学者而设计的书。
By Eli Ganim, Irina Galata, Cosmin Pupăză, Ellen Shapiro, Matt Galloway and Ben Morrow
| Version | Platform | Language | Editor |
|---|---|---|---|
| Second Edition | Android 10 | Kotlin 1.3 | IDEA |
这本书是给谁看的 1
对于 Kotlin 的完整初学者。无需事先编程经验!
这是一本面向新的现代 Kotlin 语言的初学者的书。
本书涵盖的概念
- Kotlin 开发环境
- 数字和字符串
- 做出决定
- 函数 和 Lambda
- 集合 类型
- 建立自己的类型
- 函数编程
- 协程
- Kotlin 平台和脚本
- Kotlin /原生和多平台
本书中的所有内容都在干净,现代的开发环境中进行,这意味着您可以专注于使用 Kotlin 语言进行编程的核心功能,而不必陷入构建应用程序的许多细节中。
这是 《Android学徒》2 的姊妹书,《Android学徒》 侧重于为 Android 开发应用程序,而 Kotlin 学徒侧重于 Kotlin 语言基础。
在你开始之前
本节告诉您开始之前需要了解的一些知识,例如对硬件和软件的需求,在何处可以找到本书的项目文件等等。
Section I: Kotlin Basics 第一节: Kotlin 基础
本节中的各章将向您介绍 Kotlin 编程的基础知识。从计算机工作原理到语言结构,您将涵盖足够多的语言,以便能够处理数据并组织代码的行为。
本节开始一些基础让你开始,那么你有机会做的事与你新学到的数据类型。最后,您将越过一直使用的具有具体值的变量和常量,移到更棘手的数据类型上。
这些基础知识将助您一臂之力,在不知不觉中,您将为以后的更高级主题做好准备。让我们开始吧!
Your Kotlin Development Environment 您的 Kotlin 开发环境
通过本书,可以快速入门 Kotlin ,以及如何使用 Intellij IDEA 3 处理项目。
fun main() {
  println("Hello, Kotlin!")
}
要点
- ntelliJ IDEA 是 JetBrains 的集成开发环境,它是 Kotlin 语言的创建者,您可以在其中编写和运行 Kotlin 代码。
- IntelliJ IDEA 社区版是用于书中项目的免费版本。
- Kotlin 代码在许多平台上运行,其中最突出的是 Java 虚拟机,它将用于本书的多数内容。
- 要使用 IntelliJ IDEA 构建 Kotlin 项目,您需要安装 Java 开发工具包(版本 8)或以上。
- IntelliJ IDEA 应用窗口由多个面板组成,其中最相关的是 “项目” 面板、编辑器面板和”运行”面板。
- 可以通过从 IntelliJ IDEA 菜单中选择 “文件 + 打开” 菜单并选择相应项目的根文件夹来打开书籍入门、最终项目和挑战项目。
Expressions, Variables & Constants 表达式,变量和常量
就是这样,您对编程世界的狂热介绍!您将从计算机和编程的概述开始,然后花时间处理代码注释,算术运算,常量和变量。
pseudo-code 伪代码
Step 1. Load photo from hard drive.
Step 2. Resize photo to 400 pixels wide by 300 pixels high.
Step 3. Apply sepia filter to photo.
Step 4. Print photo.
Code comments 注释
单行注释
// This is a comment. It is not executed.
多行注释
/* This is also a comment.
   Over many..
   many...
   many lines. */
嵌套注释
/* This is a comment.

 /* And inside it
 is
 another comment.
 */

 Back to the first.
 */
Printing out 打印输出
println("Hello, Kotlin Apprentice reader!")
Shift operations 移位运算
- Shift left: shl
- Shift right: shr
Naming data 命名数据
Constants 常量
val number: Int = 10
Variables 变量
var variableNumber: Int = 42
variableNumber = 0
variableNumber = 1_000_000
camel case 骆驼命名风格
- 以小写字母开头。
- 如果名称由多个单词组成,请将它们连接在一起,并每隔一个单词以大写字母开头。
- 如果这些单词中有一个是缩写,请用相同的大小写下整个缩写(例如
sourceURL和urlDescription)
Types & Operations 类型与操作
您将学习有关处理不同类型的信息,包括允许您表示文本的字符串。您将学习有关在类型之间进行转换的知识,还将介绍类型推断,这使您作为程序员的生活变得更加简单。
Pairs and Triples 元组
Pair 二元元组
val coordinates: Pair<Int, Int> = Pair(2, 3)
val coordinatesInferred = Pair(2, 3)
val coordinatesWithTo = 2 to 3
// Inferred to be of type Pair<Double, Double>
val coordinatesDoubles = Pair(2.1, 3.5)
// Inferred to be of type Pair<Double, Int>
val coordinatesMixed = Pair(2.1, 3)
val x1 = coordinates.first
val y1 = coordinates.second
// x and y both inferred to be of type Int
val (x, y) = coordinates
Triples 三元元组
val coordinates3D = Triple(2, 3, 1)
val (x3, y3, z3) = coordinates3D

val coordinates3D = Triple(2, 3, 1)
val x3 = coordinates3D.first
val y3 = coordinates3D.second
val z3 = coordinates3D.third

val (x4, y4, _) = coordinates3D
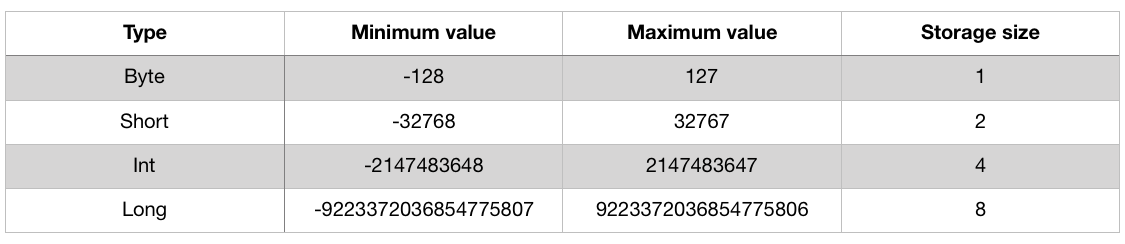
Number types 数字类型

Any, Unit, and Nothing Types
- Any: 任意类型,不包括
nullable,类似 Java 中的Object - Unit: 类似
voidfun add(): Unit { val result = 2 + 2 println(result) } - Nothing: 是一种有助于声明函数不仅不会返回任何东西,而且永远不会完成的类型。
  fun doNothingForever(): Nothing {
      while(true) {

      }
  }
要点
- 类型转换允许您将一种类型的值转换为另一种类型。
- 当使用混合类型的运算符(例如基本算术运算符(
+,-,*,/))时,Kotlin 会为您转换类型。 - 通过类型推断,您可以在 Kotlin 已经知道类型的情况下忽略它。
- Unicode 是将字符映射到数字的标准。
- Unicode 中的单个映射称为
code point代码点。 - 字符数据类型存储单个字符。 String 数据类型存储字符或字符串的集合。
- 您可以使用加法运算符组合字符串。
- 您可以使用字符串模板就地构建字符串。
- 您可以使用
Pair二元组和Triple三元组将数据分组为单个数据类型。 - 有许多类型的数字类型具有不同的存储和精度功能。
Any是所有非空类型之母,Unit有点像 Java 中的 void,Nothing就是什么也没有。
Basic Control Flow 基本控制流程
您将学习如何使用语法来控制流程,从而在程序中制定决策并重复执行任务。您还将了解布尔值(代表真值和假值),以及如何使用它们比较数据。
The if expression
if (2 > 1) {
  println("Yes, 2 is greater than 1.")
}
if-else
val animal = "Fox"

if (animal == "Cat" || animal == "Dog") {
  println("Animal is a house pet.")
} else {
  println("Animal is not a house pet.")
}
val a = 5
val b = 10

val min: Int
if (a < b) {
  min = a
} else {
  min = b
}

val max: Int
if (a > b) {
  max = a
} else {
  max = b
}
简化成一行
val a = 5
val b = 10

val min = if (a < b) a else b
val max = if (a > b) a else b
else-if
val hourOfDay = 12

val timeOfDay = if (hourOfDay < 6) {
  "Early morning"
} else if (hourOfDay < 12) {
  "Morning"
} else if (hourOfDay < 17) {
  "Afternoon"
} else if (hourOfDay < 20) {
  "Evening"
} else if (hourOfDay < 24) {
  "Late evening"
} else {
  "INVALID HOUR!"
}
println(timeOfDay)
Loops 循环
While loops
while (<CONDITION>) {
  <LOOP CODE>
}
死循环
while (true) {
}
Repeat-while loops
do {
  <LOOP CODE>
} while (<CONDITION>)
示例
sum = 1

do {
  sum = sum + (sum + 1)
} while (sum < 1000)
Breaking out of a loop
sum = 1

while (true) {
  sum = sum + (sum + 1)
  if (sum >= 1000) {
    break
  }
}
要点
- 您使用布尔数据类型
Boolean表示true和false。 - 全部返回布尔值的比较运算符为:
Equal:==
Not equal:!=
Less than:<
Greater than:>
Less than or equal:<=
Greater than or equal:>= - 您可以将布尔逻辑与
&&和||结合使用以组合比较条件。 - 您可以使用
if表达式根据条件做出简单的决定,然后返回一个值。 - 您可以在表达式中使用
else和else-if来将决策扩展到单个条件之外的if。 - 您可以使用单行
if-else表达式使代码更加清晰简洁。 - 短路 确保仅评估布尔表达式的最少必需部分。
- 变量和常量属于一定范围,超出范围您将无法使用它们。范围从其父级继承可见变量和常量。
while循环使您可以多次执行特定任务,直到满足条件为止。break语句使您摆脱循环。
Advanced Control Flow 高级控制流程
继续讲代码不是直线运行的主题,您将学到另一个称为 for 循环的循环。您还将了解何时在 Kotlin 中特别有用的表达式。
Ranges
closed range
// (0, 1, 2, 3, 4, 5)
val closedRange = 0..5
half-open range
// (0, 1, 2, 3, 4)
val halfOpenRange = 0 until 5
downTo
// (5, 4, 3, 2, 1, 0)
val decreasingRange = 5 downTo 0
For loops
for (<CONSTANT> in <RANGE>) {
  <LOOP CODE>
}
example
val count = 10

var sum = 0
for (i in 1..count) {
  sum += i
}
Labeled statements 标签语句
sum = 0
rowLoop@ for (row in 0 until 8) {
  columnLoop@ for (column in 0 until 8) {
    if (row == column) {
      continue@rowLoop
    }
    sum += row * column
  }
}
when expressions 表达式
val number = 10

when (number) {
  0 -> println("Zero")
  else -> println("Non-zero")
}
Returning values 返回值
val numberName = when (number) {
  2 -> "two"
  4 -> "four"
  6 -> "six"
  8 -> "eight"
  10 -> "ten"
  else -> {
    println("Unknown number")
    "Unknown"
  }
}

println(numberName) // > ten
Advanced when expressions 高级 when 表达
timeOfDay = when (hourOfDay) {
  in 0..5 -> "Early morning"
  in 6..11 -> "Morning"
  in 12..16 -> "Afternoon"
  in 17..19 -> "Evening"
  in 20..23 -> "Late evening"
  else -> "INVALID HOUR!"
}
if
when {
  number % 2 == 0 -> println("Even")
  else -> println("Odd")
}
要点
- 您可以使用范围来创建数字序列,然后递增以从一个值移动到另一个值。
- 封闭范围包括起始值和结束值。
- 半开范围包括起始值,并在终止值之前停止。
for循环允许您遍历一个范围。- 在
continue语句让你完成一个循环的当前迭代,并开始下一次迭代。 - 带 标签 的语句使您可以在外部循环上使用
break和continue。 - 您可以使用
when表达式来确定要运行的代码,具体取决于变量或常量的值。 - 一个的更强的
when表达来自 正则匹配:利用复杂规则匹配值。
Functions 函数
函数是在 Kotlin 中用于构造代码的基本构建块。您将学习如何定义将代码分组为可重用单元的函数。
Function basics 函数基础
fun printMyName() {
  println("My name is Joe Howard.")
}

printMyName()
Function parameters 函数参数
fun printMultipleOfFive(value: Int) {
  println("$value * 5 = ${value * 5}")
}
printMultipleOfFive(10)
named arguments 命名参数
fun printMultipleOf(multiplier: Int, andValue: Int) {
  println("$multiplier * $andValue = ${multiplier * andValue}")
}
printMultipleOf(4, 2)

printMultipleOf(multiplier = 4, andValue = 2)
default value 默认值
fun printMultipleOf(multiplier: Int, value: Int = 1) {
  println("$multiplier * $value = ${multiplier * value}")
}

printMultipleOf(4)
Return values 返回值
fun multiply(number: Int, multiplier: Int): Int {
  return number * multiplier
}
省略 { }
fun multiplyInferred(number: Int, multiplier: Int) = number * multiplier
Parameters as values 参数默认不可修改
fun incrementAndPrint(value: Int) {
  value += 1
  print(value)
}

// Val cannot be reassigned
declaring a new variable
fun incrementAndPrint(value: Int): Int {
  val newValue = value + 1
  println(newValue)
  return newValue
}
Overloading 重载
fun getValue(value: Int): Int {
  return value + 1
}

fun getValue(value: String): String {
  return "The value is $value"
}
Functions as variables 函数做变量
fun add(a: Int, b: Int): Int {
  return a + b
}
method reference operator :: 方法引用运算符
var function = ::add
function(4, 2)
example
fun printResult(function: (Int, Int) -> Int, a: Int, b: Int) {
  val result = function(a, b)
  print(result)
}
printResult(::add, 4, 2)
The land of no return 无需返回的地方
fun infiniteLoop(): Nothing {
  while (true) {

  }
}
它很有用,因为编译器知道函数永远不会返回,它可以在生成代码来调用函数时进行某些优化。
Writing good functions 写好的函数
要点
- 使用函数定义任务,无需多次编写代码即可执行多次任务。
- 函数可以包含零个或多个参数,并可以选择返回值。
- 为了在调用站点中清楚起见,您可以在调用函数时使用命名参数。
- 指定默认函数值可以使这些函数更易于使用,并减少必须编写的代码量。
- 函数可以具有相同的名称,具有不同的参数,这称为 重载。
- 您可以将函数分配给变量并将其传递给其他函数。
- 函数可以具有特殊的无返回类型
Nothing,以通知 Kotlin 此函数永远不会退出。 - 努力创建具有清晰命名的函数,并且具有一个具有可重复输入和输出的工作。
Nullability 可空性
许多编程语言都遭受空值的“十亿美元错误”。您将了解 Kotlin 如何保护您免受可怕的空指针异常的影响。
Introducing null 介绍
Sentinel values 哨兵值
var errorCode = 0
null 表示值缺失
Introducing nullable types 可空类型
var errorCode: Int?

errorCode = 100
errorCode = null
Checking for null
var result: Int? = 30
println(result)

println(result + 1) // ERROR
// Operator call corresponds to a dot-qualified call 'result.plus(1)' which is not allowed on a nullable receiver 'result'.
Not-null assertion operator 非空断言操作符 !!
var authorName: String? = "Joe Howard"
var authorAge: Int? = 24

val ageAfterBirthday = authorAge!! + 1
println("After their next birthday, author will be $ageAfterBirthday")

// After their next birthday, author will be 25
fail
authorAge = null
println("After two birthdays, author will be ${authorAge!! + 2}")
// Exception in thread "main" kotlin.KotlinNullPointerException
Smart casts 智能转换
var nonNullableAuthor: String
var nullableAuthor: String?

if (authorName != null) {
  nonNullableAuthor = authorName
} else {
  nullableAuthor = authorName
}
Safe calls 安全调用
var nameLength = authorName?.length
println("Author's name has length $nameLength.")
// > Author's name has length 10.
chain
val nameLengthPlus5 = authorName?.length?.plus(5)
println("Author's name length plus 5 is $nameLengthPlus5.")
// > Author's name length plus 5 is 15.
The let() function
authorName?.let {
  nonNullableAuthor = authorName
}
Elvis operator 简洁三目运算符
var nullableInt: Int? = 10
var mustHaveResult = nullableInt ?: 0
等于以下
var nullableInt: Int? = 10
var mustHaveResult = if (nullableInt != null) nullableInt else 0
要点
- null 表示缺少值。
- 非空变量和常量必须始终具有非空值。
- 可用变量和常量就像包含值或空(空)的框。
- 若要在可 null 中处理值,通常必须首先检查该值是否为 null。
- 使用 nullable 值最安全的方法是使用安全呼叫或 Elvis 运算符。仅在适当的时候使用非空断言,因为它们可能会生成运行时错误。
Section II: Collections & Lambdas 第二节: 集合 和 Lambda
到目前为止,您几乎已经看到单个元素形式的数据。尽管成对和三元组可以包含多个数据,但是您只能将两个或三个项目组合在一起。在本节中,您将了解 Kotlin 中的 集合 类型。 集合 是灵活的“容器”,可让您将任意数量的值存储在一起。
本节中的各章将为您提供组织数据和代码所需的基础,以便您可以开始在 Kotlin 中进行更复杂的编程!
Arrays & Lists 数组和列表
数组和列表是您将在 Kotlin 中遇到的最常见的 集合 类型。它们都像常规变量和常量一样键入,并在单个数据结构中存储多个值。了解如何遍历数组和列表以及如何修改其内容。
Array
Creating arrays 创建数组
val evenNumbers = arrayOf(2, 4, 6, 8)
创建一个数组并将其所有值都设置为默认值:
val fiveFives = Array(5, { 5 }) // 5, 5, 5, 5, 5
Arrays of primitive types 基本类型数组
val oddNumbers = intArrayOf(1, 3, 5, 7)
val zeros = DoubleArray(4) // 0.0, 0.0, 0.0, 0.0
val otherOddNumbers = arrayOf(1, 3, 5, 7).toIntArray()
The type of
otherOddNumbersisIntArrayand notArray<Int>.
Arguments to main() main() 的参数
fun main(args: Array<String>) {
}

Lists 列表
- 数组:固定大小
- 列表:动态调整大小
- ArrayList
- LinkedList
Creating lists
val innerPlanets = listOf("Mercury", "Venus", "Earth", "Mars")
明确:ArrayList
val innerPlanetsArrayList = arrayListOf("Mercury", "Venus", "Earth", "Mars")
空列表
val subscribers: List<String> = listOf()
val subscribers = listOf<String>()
Mutable lists 可变列表
val outerPlanets = mutableListOf("Jupiter", "Saturn", "Uranus", "Neptune")
val exoPlanets = mutableListOf<String>()
Accessing elements 访问元素
Using properties and methods 使用属性和方法
val players = mutableListOf("Alice", "Bob", "Cindy", "Dan")
print(players.isEmpty())
// > false
if (players.size < 2) {
  println("We need at least two players!")
} else {
  println("Let's start!")
}
// > Let's start!
var currentPlayer = players.first()
println(currentPlayer) // > Alice
println(players.last()) // > Dan
val minPlayer = players.min()
minPlayer.let {
  println("$minPlayer will start") // > Alice will start
}
println(arrayOf(2, 3, 1).first())
// > 2
println(arrayOf(2, 3, 1).min())
// > 1
val maxPlayer = players.max()
if (maxPlayer != null) {
  println("$maxPlayer is the MAX") // > Dan is the MAX
}
Using indexing 使用索引
val firstPlayer = players[0]
println("First player is $firstPlayer")
// > First player is Alice
val secondPlayer = players.get(1)
val player = players[4] // > IndexOutOfBoundsException
Using ranges to slice 使用范围进行切片
val upcomingPlayersSlice = players.slice(1..2)
println(upcomingPlayersSlice.joinToString()) // > Bob, Cindy
Checking for an element 检查元素
fun isEliminated(player: String): Boolean {
  return player !in players
}
println(isEliminated("Bob")) // > false

players.slice(1..3).contains("Alice") // false
Modifying lists 修改列表
Appending elements 追加元素
players.add("Eli")
players += "Gina"
println(players.joinToString())
// > "Alice", "Bob", "Cindy", "Dan", "Eli", "Gina"
var array = arrayOf(1, 2, 3)
array += 4
println(array.joinToString()) // > 1, 2, 3, 4
Inserting elements 插入元素
players.add(5, "Frank")
Removing elements 移除元素
val wasPlayerRemoved = players.remove("Gina")
println("It is $wasPlayerRemoved that Gina was removed")
// > It is true that Gina was removed

val removedPlayer = players.removeAt(2)
println("$removedPlayer was removed") // > Cindy was removed
Updating elements 更新元素
println(players.joinToString())
// > "Alice", "Bob", "Dan", "Eli", "Frank"
players[4] = "Franklin"
println(players.joinToString())
// > "Alice", "Bob", "Dan", "Eli", "Franklin"

players[3] = "Anna"
players.sort()
println(players.joinToString()) // > "Alice", "Anna", Bob", "Dan", "Franklin"

players.set(3, "Anna")

val arrayOfInts = arrayOf(1, 2, 3)
arrayOfInts[0] = 4
println(arrayOfInts.joinToString()) // > 4, 2, 3
Iterating through a list 遍历列表
for (player in players) {
  println(player)
}
// > Alice
// > Anna
// > Bob
// > Dan
// > Franklin

for ((index, player) in players.withIndex()) {
  println("${index + 1}. $player")
}
// > 1. Alice
// > 2. Anna
// > 3. Bob
// > 4. Dan
// > 5. Franklin

fun sumOfElements(list: List<Int>): Int {
  var sum = 0
  for (number in list) {
    sum += number
  }
  return sum
}
println(sumOfElements(scores))  // > 19
Nullability and collection types 可空性和集合类型
var nullableListOfNullables: List<Int?>? = listOf(1, 2, null, 4)
nullableListOfNullables = null
要点
- 数组是相同类型的值的有序集合。
- 有一些特殊的类,例如
IntArray创建为Java基本类型数组的类。 - 列表类似于数组,但具有动态调整大小的附加功能。
- 您可以在可变列表中添加,删除,更新和插入元素。
- 使用索引或许多方法之一来访问和更新元素。
- 当心访问超出范围的索引。
- 您可以使用
for循环或使用遍历数组或列表的元素forEach。 - 您可以使用来检查数组或列表中的元素
in。 - 使用可为空的列表和具有可为空的元素的列表时,应特别注意。
Maps & Sets 映射 和 集合
当您想通过标识符查找值时, 映射 很有用。例如,本书的目录将章节名称 映射 到其页码,从而可以轻松跳至您要阅读的章节。对于数组,只能按其索引获取值,该索引必须是整数,并且所有索引必须是顺序的。在 映射 中,键可以是任何类型,并且通常没有特定的顺序。您还将了解 集合 ,该 集合 使您可以在 集合 中存储唯一值。
Creating maps
var yearOfBirth = mapOf("Anna" to 1990, "Brian" to 1991, "Craig" to 1992, "Donna" to 1993)
可变
var namesAndScores = mutableMapOf("Anna" to 2, "Brian" to 2, "Craig" to 8, "Donna" to 6)
println(namesAndScores) // > {Anna=2, Brian=2, Craig=8, Donna=6}
容量
pairs = HashMap<String, Int>(20)
Accessing values 访问值
Using the index operator 使用索引运算符
namesAndScores = mutableMapOf("Anna" to 2, "Brian" to 2, "Craig" to 8, "Donna" to 6)
// Restore the values

println(namesAndScores["Anna"])
// > 2

namesAndScores["Greg"] // null
Using properties and methods 使用属性和方法
println(namesAndScores.get("Craig"))
// > 8
namesAndScores.isEmpty() // false
namesAndScores.size      // 4
Modifying mutable maps 修改可变映射
Adding pairs 添加对
val bobData = mutableMapOf(
  "name" to "Bob",
  "profession" to "CardPlayer",
  "country" to "USA")

bobData.put("state", "CA")
bobData["city"] = "San Francisco"
Updating values 更新值
bobData.put("name", "Bobby") // Bob

bobData["profession"] = "Mailman"

val pair = "nickname" to "Bobby D"
bobData += pair

println(bobData)
// > {name=Bobby, profession=Mailman, country=USA, state=CA, city=San Francisco, nickname=Bobby D}
Removing pairs 删除对
bobData.remove("city")
bobData.remove("state", "CA") // key, value
Iterating through maps 遍历映射
for ((player, score) in namesAndScores) {
  println ("$player - $score")
}
// > Anna - 2
// > Brian - 2
// > Craig - 8
// > Donna - 6

for (player in namesAndScores.keys) {
  print("$player, ") // no newline
}
println() // print a newline
// > Anna, Brian, Craig, Donna,
Running time for map operations 映射操作的运行时间
println("some string".hashCode())
// > 1395333309

println(1.hashCode())
// > 1
println(false.hashCode())
// > 1237
要点
- 一个映射是键值对的无序集合。
- 映射的键都是相同的类型,值都是相同的类型。
- 使用索引获取值以及添加,更新或删除对。
- 如果键不在映射中,则查找返回
null。 - 内置的
Kotlin类型(例如String,Int,Double)具有开箱即用的有效哈希值。 - 使用
HashMap<K, V>性能关键代码。
Sets 集合
Creating sets 创建集合
val names = setOf("Anna", "Brian", "Craig", "Anna")
println(names)
// > [Anna, Brian, Craig]

val hashSet = HashSet<Int>()
Set from arrays 从数组设置
val someArray = arrayOf(1, 2, 3, 1)
println(someSet) // > [1, 2, 3]

var someSet = mutableSetOf(*someArray)
Accessing elements 访问元素
println(someSet.contains(1))
// > true
println(4 in someSet)
// > false
Adding and removing elements 添加和删除元素
someSet.add(5)

val removedOne = someSet.remove(1)
println(removedOne) // > true

println(someSet)
// > [2, 3, 5]
要点
- 集合是相同类型的唯一值的无序集合。
- 当您需要了解集合中是否包含某些内容时,集合最有用。
Lambdas
上一章教了您有关函数的知识。但是 Kotlin 还有另一种可用于将代码分解为可重用块的构造:lambda。它们有很多用途,在处理列表或 映射 之类的 集合 时特别有用。
Lambda 表达式 只是一个没有名称的 函数。您可以将其分配给变量,然后像其他任何值一样传递给它。本章向您展示 lambda 的便捷性和实用性。
Lambdas basics
Lambda 也称为 匿名函数,它们的名称来自 Alonzo Church 的 Lambda演算,其中所有函数都是匿名的。
Lambda 也是 闭包 的同义词,在许多其他编程语言中都使用该名称。
var multiplyLambda: (Int, Int) -> Int
Lambda 的类型是 函数类型。
multiplyLambda = { a: Int, b: Int -> Int
  a * b
}

val lambdaResult = multiplyLambda(4, 2) // 8
Shorthand syntax 速记语法
var multiplyLambda: (Int, Int) -> Int

multiplyLambda = { a, b ->
  a * b
}
it keyword it 关键字
var doubleLambda = { a: Int ->
  2 * a
}

doubleLambda = { 2 * it }
val square: (Int) -> Int = { it * it }
Lambdas as arguments Lambda作为参数
fun operateOnNumbers(a: Int, b: Int, operation: (Int, Int) -> Int): Int {
  val result = operation(a, b)
  println(result)
  return result
}

val addLambda = { a: Int, b: Int ->
  a + b
}
operateOnNumbers(4, 2, operation = addLambda) // 6

fun addFunction(a: Int, b:Int) = a + b
operateOnNumbers(4, 2, operation = ::addFunction) // 6
inline 内联
operateOnNumbers(4, 2, operation = { a: Int, b: Int ->
  a + b
})
省略参数
operateOnNumbers(4, 2, operation = Int::plus)
尾随 lambda 语法
只有当 lambda 是传递给函数的最后一个参数时,才可以这样做。在这种情况下,您可以将 lambda 移到函数调用之外:
operateOnNumbers(4, 2) { a, b ->
  a + b
}
Lambdas with no meaningful return value 没有有意义的返回值的Lambda
Unit 当 lambda 不需要返回任何有意义的值时,这很方便。
var unitLambda: () -> Unit = {
  println("Kotlin Apprentice is awesome!")
}
unitLambda()
如果您确实希望lambda不返回值,则必须使用 Nothing 类型。
var nothingLambda: () -> Nothing = { throw NullPointerException() }
Capturing from the enclosing scope 从封闭范围捕获
var counter = 0
val incrementCounter = {
  counter += 1
}
捕获来自封闭范围的变量
fun countingLambda(): () -> Int {
  var counter = 0
  val incrementCounter: () -> Int = {
    counter += 1
    counter
  }
  return incrementCounter
}
该函数创建的两个计数器是互斥的,并且是独立计数的。
val counter1 = countingLambda()
val counter2 = countingLambda()

println(counter1()) // > 1
println(counter2()) // > 1
println(counter1()) // > 2
println(counter1()) // > 3
println(counter2()) // > 2
Custom sorting with lambdas 使用 Lambda 进行自定义排序
val names = arrayOf("ZZZZZZ", "BB", "A", "CCCC", "EEEEE")
names.sorted() // A, BB, CCCC, EEEEE, ZZZZZZ

val namesByLength = names.sortedWith(compareBy {
  -it.length
})
println(namesByLength) // > [ZZZZZZ, EEEEE, CCCC, BB, A]
Iterating over collections with lambdas 使用 Lambda 遍历集合
filter,map,fold,reduce
val values = listOf(1, 2, 3, 4, 5, 6)
values.forEach {
  println("$it: ${it * it}")
}
// > 1: 1
// > 2: 4
// > 3: 9
// > 4: 16
// > 5: 25
// > 6: 36

var prices = listOf(1.5, 10.0, 4.99, 2.30, 8.19)
filter
val largePrices = prices.filter {
  it > 5.0
}
// [10.0, 8.19]

public inline fun <T> Iterable<T>.filter(predicate: (T) -> Boolean): List<T>
map
val salePrices = prices.map {
  it * 0.9
}
// [1.35, 9.0, 4.4910000000000005, 2.07, 7.3709999999999996]

val userInput = listOf("0", "11", "haha", "42")
val numbers = userInput.map {
  it.toIntOrNull()
}
println(numbers) // > [0, 11, null, 42]

val numbers2 = userInput.mapNotNull {
  it.toIntOrNull()
}
println(numbers2) // > [0, 11, 42]
fold
它需要一个初始值和一个 lambda。Lambda 接受两个值:当前值和列表中的元素。lambda 返回应作为当前值参数传递给 lambda 的下一个值。
var sum = prices.fold(0.0) { a, b ->
  a + b
}

println(sum) // > 26.980000000000004
reduce
sum = prices.reduce { a, b ->
  a + b
}
println(sum) // > 26.980000000000004
要点
- Lambda 是没有名称的函数。它们可以分配给变量,并作为参数传递给函数。
- Lambda 具有速记语法,这使它们比其他功能更易于使用。
- Lambda 可以从其周围的上下文中捕获变量和常量。
- Lambda 可以用于指示集合的排序方式。
- 集合上有一组方便的函数,可用于迭代集合和转换集合。转换包括将每个元素映射到新值,滤除某些值,以及将集合折叠或缩小为单个值。
Section III: Building Your Own Types 第三节:建立自己的类型
您可以通过将变量和函数组合到新的类型定义中来创建自己的类型。例如,整数和双精度可能不足以满足您的目的,并且可能需要创建一种类型来存储复数。或者可能在三个独立变量中存储名字、中间名和姓氏变得难以管理,所以您决定创建一个 FullName 类型。
创建新类型时,请给它起一个名字。因此,这些自定义类型称为命名类型。命名类型是用于对现实概念建模的强大工具。您可以将相关的概念,属性和方法封装到一个统一的模型中。
自定义类型使您可以利用到目前为止已学习的基本构建块来构建大型和复杂的事物。现在是时候将您的 Kotlin 学徒提升到一个新的水平!
class 类
在本章中,您将熟悉被称为类型的类。类是面向对象编程的基石之一,这是一种类型同时具有数据和行为的编程风格。在类中,数据采用 属性 的形式,并且行为使用称为 方法 的 函数 来实现。
Creating classes
primary constructor 主要构造函数
class Person(var firstName: String, var lastName: String) {
  val fullName
    get() = "$firstName $lastName"
}
在类名后面的括号内是该类的 主要构造函数,并且 Person 指出有两个可变的字符串属性 firstName 和 lastName。
花括号中的所有内容都是该类的成员。
val john = Person(firstName = "Johnny", lastName = "Appleseed")
getter custom 自定义 get
println(john.fullName) // > Johnny Appleseed
Reference types 引用类型
class SimplePerson(val name: String)

var var1 = SimplePerson(name = "John")
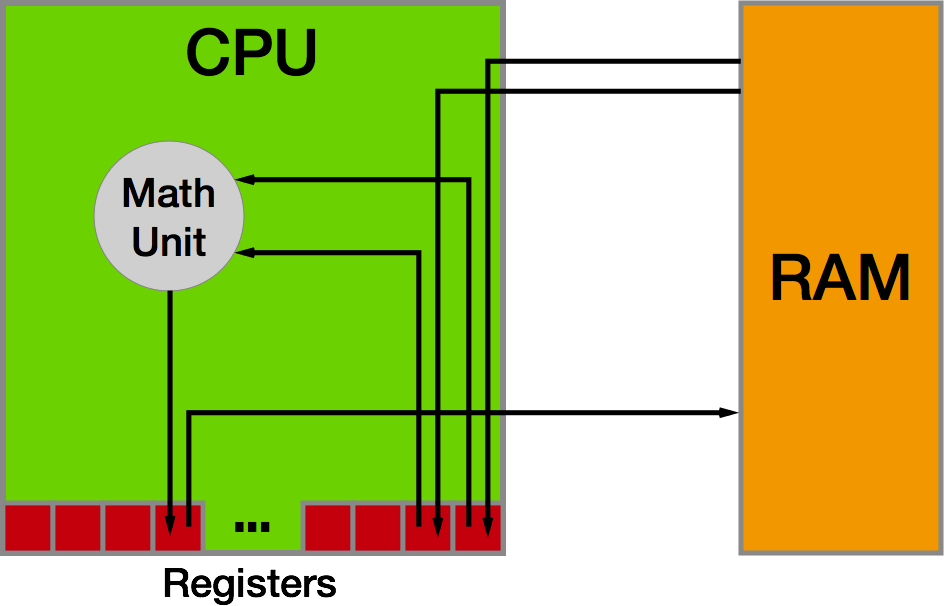
堆与栈
当您创建诸如类之类的引用类型时,系统会将实际实例存储在称为堆的内存区域中。对类实例的引用存储在称为栈的内存区域中,除非该引用是类实例的一部分,在这种情况下,引用与其他类实例一起存储在堆中。
堆和栈在任何程序的执行中都具有重要作用:
-
系统使用栈将任何内容存储在执行的直接线程中;它由
CPU严格管理和优化。当函数创建变量时,栈会存储该变量,然后在函数退出时销毁它。由于栈组织得井井有条,因此非常高效,因此速度也很快。 -
系统使用堆存储引用类型的实例。堆通常是一个很大的内存池,系统可以从中请求并动态分配内存块。生命周期是灵活而动态的。堆不会像栈一样自动破坏其数据;为此,还需要进行其他工作。与在栈上相比,这会使在堆上创建和删除数据的过程变慢。
创建类的实例时,您的代码会在堆上请求一个内存块来存储实例本身。它将内存的地址存储在栈上的命名变量中。
这只是对堆和栈的动态性的简要介绍,但是到此为止您已经了解了足够的知识来理解将用于类的引用语义。
var homeOwner = john
john.firstName = "John"

println(john.firstName)      // > John
println(homeOwner.firstName) // > John
Object identity 对象身份
== 运算符检查两个值是否相等一样,=== 身份运算符比较两个引用的内存地址。它告诉您引用的值是否相同。也就是说,它们指向堆上的同一数据块。
val impostorJohn = Person(firstName = "John", lastName = "Appleseed")

john === homeOwner // true
john === impostorJohn // false
impostorJohn === homeOwner // false

// Assignment of existing variables changes the instances the variables reference.
homeOwner = impostorJohn
john === homeOwner // false

homeOwner = john
john === homeOwner // true
Understanding state and side effects 了解状态和副作用
Data classes 数据类
class Student(var firstName: String, var lastName: String, var id: Int) {

  override fun hashCode(): Int {
    val prime = 31
    var result = 1

    result = prime * result + firstName.hashCode()
    result = prime * result + id
    result = prime * result + lastName.hashCode()

    return result
  }

  override fun equals(other: Any?): Boolean {
    if (this === other)
      return true

    if (other == null)
      return false

    if (javaClass != other.javaClass)
      return false

    val obj = other as Student?

    if (firstName != obj?.firstName)
      return false

    if (id != obj.id)
      return false

    if (lastName != obj.lastName)
      return false

    return true
  }

  override fun toString(): String {
    return "Student (firstName=$firstName, lastName=$lastName, id=$id)"
  }

  fun copy(firstName: String = this.firstName,
           lastName: String = this.lastName,
           id: Int = this.id)
      = Student(firstName, lastName, id)
}
print 实例和复制实例都是非常常见的动作:
val albert = Student(firstName = "Albert", lastName = "Einstein", id = 1)
val richard = Student(firstName = "Richard", lastName = "Feynman", id = 2)
val albertCopy = albert.copy()

println(albert)  // > Student (firstName=Albert, lastName=Einstein, id=1)
println(richard) // > Student (firstName=Richard, lastName=Feynman, id=2)
println(albert == richard) // > false
println(albert == albertCopy) // > true
println(albert === albertCopy) // > false
简化成一行 data class
data class StudentData(var firstName: String, var lastName: String, var id: Int)
使用
val marie = StudentData("Marie", "Curie", id = 1)
val emmy = StudentData("Emmy", "Noether", id = 2)
val marieCopy = marie.copy()

println(marie) // > StudentData(firstName=Marie, lastName=Curie, id=1)
println(emmy)  // > StudentData(firstName=Emmy, lastName=Noether, id=2)
println(marie == emmy) // > false
println(marie == marieCopy) // > true
println(marie === marieCopy) // > false
Destructuring declarations 解构声明
val (firstName, lastName, id) = marie

println(firstName) // > Marie
println(lastName)  // > Curie
println(id)        // > 1
要点
- 类是可以具有
属性和方法的 命名类型。 - 类使用分配时共享的引用。
- 类实例称为
对象。 - 对象是可变的。
- 可变性引入了
state,这增加了管理对象时的复杂性。 - 数据类使您可以创建简单的模型对象,从而避免了很多用于比较,打印和复制对象的样板。
- 解构声明使您可以轻松提取数据类对象的多个属性。
Objects 对象
Kotlin 有一个特殊的关键字对象,可以很容易地在项目中遵循 Singleton 模式,还可以用于创建特定于类而不是其实例的属性。您还可以使用关键字创建匿名类。
Singletons 单例
Kotlin 通过为您提供创建单例的内置方法来解决其中的一些问题。
Named objects 命名对象
object X {
    var x = 0
}
Decompile 反编译
public final class X {
   private static int x;
   public static final X INSTANCE;

   public final int getX() {
      return x;
   }

   public final void setX(int var1) {
      x = var1;
   }

   static {
      X var0 = new X();
      INSTANCE = var0;
   }
}
Singleton use cases 单例用例
data class Student(val id: Int, val firstName: String, val lastName: String) {
  var fullName = "$lastName, $firstName"
}

val marie = Student(1, "Marie", "Curie")
val albert = Student(2, "Albert", "Einstein")
val richard = Student(3, "Richard", "Feynman")
注册
object StudentRegistry {
  val allStudents = mutableListOf<Student>()

  fun addStudent(student: Student) {
    allStudents.add(student)
  }

  fun removeStudent(student: Student) {
    allStudents.remove(student)
  }

  fun listAllStudents() {
    allStudents.forEach {
      println(it.fullName)
    }
  }
}
使用
StudentRegistry.addStudent(marie)
StudentRegistry.addStudent(albert)
StudentRegistry.addStudent(richard)

StudentRegistry.listAllStudents()
// > Curie, Marie
// > Einstein, Albert
// > Feynman, Richard
另一个示例用例是用于为需要从应用程序中多个位置引用的常量和方法 object 提供 命名空间。
object JsonKeys {
  const val JSON_KEY_ID = "id"
  const val JSON_KEY_FIRSTNAME = "first_name"
  const val JSON_KEY_LASTNAME = "last_name"
}
与 class 比较
虽然不允许对象使用构造函数,但它们确实与类有很多相似之处:
- 对象可以具有属性和成员函数。
- 在使用之前,必须在声明或
init块中初始化对象的属性。 - 对象可以从类继承并实现接口。
Using static members 使用静态成员
companion objects 创建 伴随对象
class Scientist private constructor(
    val id: Int,
    val firstName: String,
    val lastName: String) {

  companion object {
    var currentId = 0

    fun newScientist(firstName: String, lastName: String): Scientist {
      currentId += 1
      return Scientist(currentId, firstName, lastName)
    }
  }

  var fullName = "$firstName $lastName"
}
工厂模式
object ScientistRepository {
  val allScientists = mutableListOf<Scientist>()

  fun addScientist(student: Scientist) {
    allScientists.add(student)
  }

  fun removeScientist(student: Scientist) {
    allScientists.remove(student)
  }

  fun listAllScientists() {
    allScientists.forEach {
      println("${it.id}: ${it.fullName}")
    }
  }
}
使用
val emmy = Scientist.newScientist("Emmy", "Noether")
val isaac = Scientist.newScientist("Isaac", "Newton")
val nick = Scientist.newScientist("Nikola", "Tesla")

ScientistRepository.addScientist(emmy)
ScientistRepository.addScientist(isaac)
ScientistRepository.addScientist(nick)

ScientistRepository.listAllScientists()
// 1: Emmy Noether
// 2: Isaac Newton
// 3: Nikola Tesla
Companion naming and accessing from Java Java中的伴生命名和访问
companion object Factory {
  // companion object members
}

Scientist isaac = Scientist.Factory.newScientist("Isaac", "Newton")
如果未为随播对象指定自定义名称,则将使用隐式名称 Companion。
Using anonymous objects 使用匿名对象
interface Counts {
  fun studentCount(): Int
  fun scientistCount(): Int
}
使用 object 关键字,冒号和接口名称创建计数器的实例。在大括号内,您重写了每个接口方法。
val counter = object : Counts {
  override fun studentCount(): Int {
    return StudentRegistry.allStudents.size
  }

  override fun scientistCount(): Int {
    return ScientistRepository.allScientists.size
  }
}

println(counter.studentCount()) // > 3
println(counter.scientistCount()) // > 3
Java代码(用于匿名对象):
<undefinedtype> counter = new Counts() {
  public int studentCount() {
    return StudentRegistry.INSTANCE.getAllStudents().size();
  }

  public int scientistCount() {
    return ScientistRepository.INSTANCE.getAllScientists().size();
  }
};
要点
- 单件模式,当你想在你的应用程序中创建只有一个类型的实例被使用。
- 在
object与class相比,Kotlin 内置 单例 与命名对象。它还允许您制作匿名对象,即Java匿名类的Kotlin版本。 - 类伴随对象为您提供了与
Java静态成员等效的Kotlin。 - 匿名对象(或对象表达式)使您可以创建接口的未命名实例,并覆盖类行为而无需子类化。
- 使用
Show Kotlin字节码并在IntelliJ IDEA中反编译是了解Kotlin编译器正在做什么的一种有用的方法。
Properties 属性
在本章中,您将了解有关 Kotlin 属性的更多信息,以及一些处理属性的技巧,如何监视属性值的变化以及如何延迟属性初始化。
在下面的示例中,Car 该类具有两个属性,两个属性均存储 String 值:
class Car(val make: String, val color: String)
Car 主要构造函数中提供的两个属性,它们为的每个实例存储不同的字符串值Car。
还可以使用自定义 访问器(accessors)(也称为 getter 和 setter)来设置属性。类主要构造函数中提供的属性使用访问器的默认实现,将数据存储在 backing字段 中。
在本章中,您将学到更多有关属性的知识。您将学习有关属性初始化程序,自定义访问器,委托属性,后期属性初始化和扩展属性的知识。
Constructor properties 构造函数属性
class Contact(var fullName: String, var emailAddress: String)

val contact = Contact(fullName = "Grace Murray", emailAddress = "grace@navy.mil")

contact.fullName = "Grace Hopper"
val grace = contact.fullName // Grace Hopper
如果您想防止某个值发生变化,则可以使用 val将属性定义为常量。
class Contact2(var fullName: String, val emailAddress: String)

var contact2 = Contact2(fullName = "Grace Murray", emailAddress = "grace@navy.mil")

// Error: Val cannot be reassigned
contact2.emailAddress = "grace@gmail.com"
Default values 默认值
class Contact3(
  var fullName: String,
  val emailAddress: String,
  var type: String = "Friend")
创建的任何联系人都将自动成为朋友
var contact3 = Contact3(fullName = "Grace Murray", emailAddress = "grace@navy.mil")
Property initializers 属性初始化器
class Person(val firstName: String, val lastName: String) {
  val fullName = "$firstName $lastName"
}
fullName 使用传递到主要构造函数中的值初始化属性:
val person = Person("Grace", "Hopper")
person.fullName // Grace Hopper
您可以使用属性的声明以及 init 块来设置属性的值:
class Address {
  var address1: String
  var address2: String? = null
  var city = ""
  var state: String

  init {
    address1 = ""
    state = ""
  }
}
在中 Address,address2 和 city 属性在其声明中初始化。在 address1 和 state 属性的内部初始化 init。由于的所有四个属性 Address 都在类定义内提供了值,因此您可以 Address 使用空的构造函数调用来创建实例:
val address = Address()
Custom accessors 定制访问器
class TV(var height: Double, var width: Double) {
  // 1
  val diagonal: Int
    get() {
      // 2
      val result = Math.sqrt(height * height + width * width)
      // 3
      return result.roundToInt()
    }
}
使用电视尺寸计算进行测试:
val tv = TV(height = 53.93, width = 95.87)
val size = tv.diagonal // 110

tv.width = tv.height
val diagonal = tv.diagonal // 76
- 属性初始化器 是存储属性
- 存储任何值 不是存储属性,动态变化
Custom setter 自定义 setter
由于该属性没有存储值的位置,因此设置器通常会间接设置一个或多个其他相关属性:
// 1
var diagonal: Int
  // 2
  get() {
    val result = Math.sqrt(height * height + width * width)
    return result.roundToInt()
  }
  set(value) {
    // 3
    val ratioWidth = 16.0
    val ratioHeight = 9.0
    // 4
    val ratioDiagonal = Math.sqrt(ratioWidth * ratioWidth + ratioHeight * ratioHeight)
    height = value.toDouble() * ratioHeight / ratioDiagonal
    width = height * ratioWidth / ratioHeight
  }
间接设置它们 diagonal
tv.diagonal = 70
println(tv.height) // 34.32...
println(tv.width)  // 61.01...
Companion object properties 伴随对象属性
class Level(val id: Int, var boss: String, var unlocked: Boolean) {
  companion object {
    var highestLevel = 1
  }
}

val level1 = Level(id = 1, boss = "Chameleon", unlocked = true)
val level2 = Level(id = 2, boss = "Squid", unlocked = false)
val level3 = Level(id = 3, boss = "Chupacabra", unlocked = false)
val level4 = Level(id = 4, boss = "Yeti", unlocked = false)
这意味着您不能在实例上访问此属性:
// Error: Unresolved reference
// Can't access members of the companion object on an instance
val highestLevel = level3.highestLevel
相反,您可以在 类本身 上访问它:
val highestLevel = Level.highestLevel // 1
对于 JVM 上的 Kotlin,可以使用 @JvmStatic 注解将属性强制为带有静态 getter 和 setter 的字节码中的 static 字段。这将使您避免在 Java 代码中使用单例名称。考虑以下替代版本 Level:
class Level(val id: Int, var boss: String, var unlocked: Boolean) {
  companion object {
    @JvmStatic var highestLevel = 1
  }
}
从 Java,您可以 highestLevel 进行以下访问:
Level.getHighestLevel() // Fine, thanks to @JvmStatic
Level.Companion.getHighestLevel() // Fine too, and necessary if @JvmStatic were not used
Delegated properties 代理属性 by
class DelegatedLevel(val id: Int, var boss: String) {
  companion object {
    var highestLevel = 1
  }
  var unlocked: Boolean by Delegates.observable(false) {
    _, old, new ->
    if (new && id > highestLevel) {
      highestLevel = id
    }
    println("$old -> $new")
  }
}
Observable properties 可观察的性质
val delegatedlevel1 = DelegatedLevel(id = 1, boss = "Chameleon")
val delegatedlevel2 = DelegatedLevel(id = 2, boss = "Squid")

println(DelegatedLevel.highestLevel) // 1

delegatedlevel2.unlocked = true

println(DelegatedLevel.highestLevel) // 2
Limiting a variable 限制变量
class LightBulb {
  companion object {
    const val maxCurrent = 40
  }
  var current by Delegates.vetoable(0) {
    _, _, new ->
    if (new > maxCurrent) {
      println("Current too high, falling back to previous setting.")
      false
    } else {
      true
    }
  }
}
Give it a try:
val light = LightBulb()
light.current = 50
var current = light.current // 0
light.current = 40
current = light.current // 40
Lazy properties 延迟属性
只计算一次
class Circle(var radius: Double = 0.0) {
  val pi: Double by lazy {
    ((4.0 * Math.atan(1.0 / 5.0)) - Math.atan(1.0 / 239.0)) * 4.0
  }
  val circumference: Double
    get() = pi * radius * 2
}

val circle = Circle(5.0) // got a circle, pi has not been run

val circumference = circle.circumference // 31.42
// also, pi now has a value
lateinit
如果只想表示创建类实例时属性没有值,则可以使用 lateinit 关键字。
class Lamp {
  lateinit var bulb: LightBulb
}

val lamp = Lamp()
// ... lamp has no lightbulb, need to buy some!

println(lamp.bulb)
// Error: kotlin.UninitializedPropertyAccessException:
// lateinit property bulb has not been initialized

// ... bought some new ones
lamp.bulb = LightBulb()
Extension properties 扩展属性
val Circle.diameter: Double
  get() = 2.0 * radius

val unitCircle = Circle(1.0)
println(unitCircle.diamater) // > 2.0
要点
- 属性是属于命名类型的变量和常量。
- 可以使用默认值将值分配给类定义中的属性。
- 属性初始化器和
init块用于确保在创建对象时初始化对象的属性。 - 自定义访问器用于在访问或设置属性时执行自定义代码。
- 在伴随对象认为是普遍的一个特定类的所有实例的属性。
- 当您要观察,限制或延迟创建属性时,将使用委派的属性。
- 当属性的初始值需要大量计算时,或者直到初始化对象后才知道属性的初始值时,您将希望使用惰性属性。
lateinit可用于将属性引用的值的设置推迟到创建实例之后。- 扩展属性使您可以向类定义之外的类添加属性,例如,如果您正在使用库中的类。
Methods 方法
方法仅仅是驻留在类中的函数。在本章中,您将仔细研究方法,并了解如何将方法添加到其他人创建的类上。
Method refresher 方法更新
val numbers = arrayListOf(1, 2, 3)
numbers.removeAt(numbers.lastIndex)
println(numbers) // > [1, 2]
Comparing methods to getters and setters 将方法与 getter & setter 进行比较
询问自己是否想要设置值并获取值。
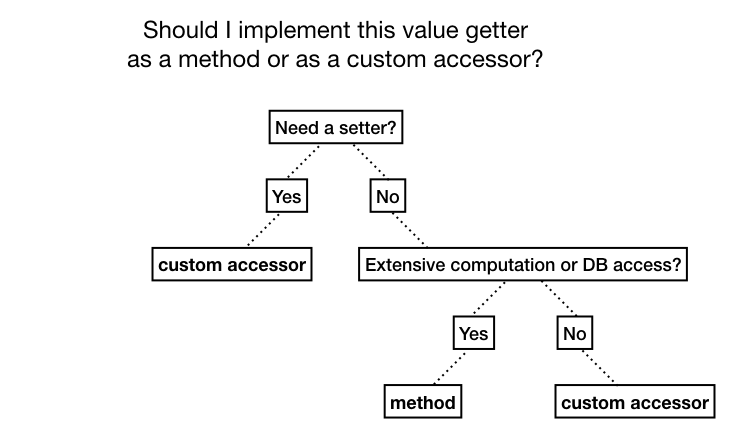
属性可以在其中包含一个自定义设置器来写入值。要考虑的另一个问题是该计算是否需要大量计算或从数据库中读取。即使是简单的值,一种方法也可以帮助您向未来的开发人员表明该调用在时间和计算资源上都是昂贵的。如果调用很轻(如固定时间O(1)),请使用自定义访问器。
Turning a function into a method 将函数转换为方法
val months = arrayOf(
    "January", "February", "March",
    "April", "May", "June",
    "July", "August", "September",
    "October", "November", "December"
)

class SimpleDate1(var month:String)

fun monthsUntilWinterBreak(from: SimpleDate1): Int {
  return months.indexOf("December") - months.indexOf(from.month)
}
方法就像在类定义中移动函数一样容易:
class SimpleDate2(var month:String) {
  fun monthsUntilWinterBreak(from: SimpleDate2): Int {
    return months.indexOf("December") - months.indexOf(from.month)
  }
}
方法实际上只是一个类或对象中的函数。
val date2 = SimpleDate2("October")
println(date2.monthsUntilWinterBreak(date2)) // > 2

date.monthsUntilWinterBreak() // Error!
Introducing this
// 1
fun monthsUntilWinterBreak(): Int {
  // 2
  return months.indexOf("December") - months.indexOf(this.month)
}
引用 this
val date3 = SimpleDate3("September")
date3.monthsUntilWinterBreak() // 3
不使用 this Kotlin 会理解您的意图
return months.indexOf("December") - months.indexOf(month)
Object methods 对象方法
class MyMath {
  // 1
  companion object {
    fun factorial(number: Int): Int {
      // 2
      return (1..number).fold(1) { a, b -> a * b }
    }
  }
}

// 3
MyMath.factorial(6) // 720
Extension methods 扩展方法
fun SimpleDate.monthsUntilSummerBreak(): Int {
  val monthIndex = months.indexOf(month)
  return if (monthIndex in 0..months.indexOf("June")) {
    months.indexOf("June") - months.indexOf(month)
  } else if (monthIndex in months.indexOf("June")..months.indexOf("August")) {
    0
  } else {
    months.indexOf("June") + (12 - months.indexOf(month))
  }
}
使用
val date = SimpleDate()
date.month = "December"
println(date.monthsUntilSummerBreak()) // > 6
将扩展方法添加到内置类型
fun Int.abs(): Int {
  return if (this < 0) -this else this
}

println(4.abs())    // > 4
println((-4).abs()) // > 4
Companion object extensions 伴随对象扩展
fun MyMath.Companion.primeFactors(value: Int): List<Int> {
  // 1
  var remainingValue = value
  // 2
  var testFactor = 2
  val primes = mutableListOf<Int>()
  // 3
  while (testFactor * testFactor <= remainingValue) {
    if (remainingValue % testFactor == 0) {
      primes.add(testFactor)
      remainingValue /= testFactor
    } else {
      testFactor += 1
    }
  }

  if (remainingValue > 1) {
    primes.add(remainingValue)
  }

  return primes
}

MyMath.primeFactors(81) // [3, 3, 3, 3]
要点
- 方法是扩展类功能的行为。
- 典型的方法是在类或对象内部定义的函数。
- 方法可以使用关键字访问实例的值this。
- 伴随对象方法将行为添加到类而不是该类的实例。要定义伴随对象方法,请在类companion object块中添加一个函数。
- 您可以扩充现有的类定义,并使用扩展方法向其添加方法。
Advanced Classes 高级类
了解了创建类的基础知识之后,在本章中,您将看到面向对象编程的更高级方面,包括继承和限制成员可见性。
Introducing inheritance 继承介绍
data class Grade(val letter: Char, val points: Double, val credits: Double)

class Person(var firstName: String, var lastName: String) {
  fun fullName() = "$firstName $lastName"
}

class Student(var firstName: String, var lastName: String,
  var grades: MutableList<Grade> = mutableListOf<Grade>()) {

  fun recordGrade(grade: Grade) {
    grades.add(grade)
  }
}
Student 继承 Person
open class Person(var firstName: String, var lastName: String) {
  fun fullName() = "$firstName $lastName"
}

class Student(firstName: String, lastName: String,
    var grades: MutableList<Grade> = mutableListOf<Grade>())
    : Person(firstName, lastName) {

  open fun recordGrade(grade: Grade) {
    grades.add(grade)
  }
}
减少重复的代码,效果不变。
val john = Person(firstName = "Johnny", lastName = "Appleseed")
val jane = Student(firstName = "Jane", lastName = "Appleseed")

john.fullName() // Johnny Appleseed
jane.fullName() // Jane Appleseed
只有 Student 对象将具有在中定义的所有属性和方法 Student:
val history = Grade(letter = 'B', points = 9.0, credits = 3.0)
jane.recordGrade(history)
// john.recordGrade(history) // john is not a student!
子类化的规则非常简单:
- Kotlin 类只能从另一个类继承,这一概念称为单一继承。
- Kotlin 类只能从
open的类继承。 - 子类化的深度没有限制,这意味着你可以从一类是继承也是一个子类,像下面:
open class Student(firstName: String, lastName: String,
    var grades: MutableList<Grade> = mutableListOf<Grade>())
    : Person(firstName, lastName) {

  open fun recordGrade(grade: Grade) {
    grades.add(grade)
  }
}

open class BandMember(firstName: String,lastName: String) : Student(firstName, lastName) {
  open val minimumPracticeTime: Int
    get() { return  2 }
}

class OboePlayer(firstName: String, lastName: String): BandMember(firstName, lastName) {
  // This is an example of an override, which we’ll cover soon.
  override val minimumPracticeTime: Int = super.minimumPracticeTime * 2
}
Polymorphism 多态
fun phonebookName(person: Person): String {
  return "${person.lastName}, ${person.firstName}"
}

val person = Person(firstName = "Johnny", lastName = "Appleseed")
val oboePlayer = OboePlayer(firstName = "Jane", lastName = "Appleseed")

phonebookName(person)     // Appleseed, Johnny
phonebookName(oboePlayer) // Appleseed, Jane
Runtime hierarchy checks 运行时层次结构检查
var hallMonitor = Student(firstName = "Jill", lastName = "Bananapeel")
is
println(hallMonitor is OboePlayer) // true, since assigned it to oboePlayer
println(hallMonitor !is OboePlayer) // also have !is for "not-is"
println(hallMonitor is Person) // true, because Person is ancestor of OboePlayer
as
- as:不安全地强制转换为在编译时成功的特定类型,例如强制转换为超类。
- as?:安全转换(到子类型)。如果强制转换失败,则表达式的结果将为
null。
(oboePlayer as Student).minimumPracticeTime // Error: No longer a band member!

(hallMonitor as? BandMember)?.minimumPracticeTime
// 4 if hallMonitor = oboePlayer was run, else null
Kotlin 具有强大的类型系统,对特定类型的解释可能会影响静态分派,或者影响在编译时选择哪个特定操作的决定。
它将选择包含的更具体的版本。
fun afterClassActivity(student: Student): String {
  return "Goes home!"
}

fun afterClassActivity(student: BandMember): String {
  return "Goes to practice!"
}

afterClassActivity(oboePlayer) // Goes to practice!
afterClassActivity(oboePlayer as Student) // Goes home!
Inheritance, methods and overrides 继承,方法和覆盖
class StudentAthlete(firstName: String, lastName: String): Student(firstName, lastName) {
  val failedClasses = mutableListOf<Grade>()

  override fun recordGrade(grade: Grade) {
    super.recordGrade(grade)

    if (grade.letter == 'F') {
      failedClasses.add(grade)
    }
  }

  val isEligible: Boolean
    get() = failedClasses.size < 3
}
override
val math = Grade(letter = 'B', points = 9.0, credits = 3.0)
val science = Grade(letter = 'F', points = 9.0, credits = 3.0)
val physics = Grade(letter = 'F', points = 9.0, credits = 3.0)
val chemistry = Grade(letter = 'F', points = 9.0, credits = 3.0)

val dom = StudentAthlete(firstName = "Dom", lastName = "Grady")
dom.recordGrade(math)
dom.recordGrade(science)
dom.recordGrade(physics)
println(dom.isEligible) // > true
dom.recordGrade(chemistry)
println(dom.isEligible) // > false
Introducing super 超类介绍
override fun recordGrade(grade: Grade) {
  var newFailedClasses = mutableListOf<Grade>()
  for (grade in grades) {
    if (grade.letter == 'F') {
      newFailedClasses.add(grade)
    }
  }
  failedClasses = newFailedClasses

  super.recordGrade(grade)
}
Preventing inheritance 防止继承
通过不标记 FinalStudent 类 open,可以告诉编译器阻止任何类从继承FinalStudent。Kotlin 旨在通过仅在需要时才允许继承来改善对继承的使用。
class FinalStudent(firstName: String, lastName: String): Person(firstName, lastName)

class FinalStudentAthlete(firstName: String, lastName: String)
    : FinalStudent(firstName, lastName) // Build error!
open
open class AnotherStudent(firstName: String, lastName: String)
    : Person(firstName, lastName) {

  open fun recordGrade(grade: Grade) {}
  fun recordTardy() {}
}

class AnotherStudentAthlete(firstName: String, lastName: String)
    : AnotherStudent(firstName, lastName) {

  override fun recordGrade(grade: Grade) {} // OK
  override fun recordTardy() {} // Build error! recordTardy is final
}
Abstract classes 抽象类
=
在某些情况下,您可能希望阻止实例化一个类,但仍然可以从该类继承该类。这将允许您定义所有子类共有的属性和行为。您只能创建子类的实例,而不能创建基类,父类。这样的父类称为 abstract。
默认情况下,使用 abstract 关键字声明的类是 open 的,并且可以从中继承。在抽象类中,您还可以声明标 abstract 没有主体的抽象方法。必须在子类中覆盖抽象方法:
abstract class Mammal(val birthDate: String) {
  abstract fun consumeFood()
}

class Human(birthDate: String): Mammal(birthDate) {
  override fun consumeFood() {
    // ...
  }
  fun createBirthCertificate() {
    // ...
  }
}

val human = Human("1/1/2000")
val mammal = Mammal("1/1/2000") // Error: Cannot create an instance of an abstract class
Sealed classes 密封类
当您要确保给定类型的值只能来自特定的有限子类型集时,密封类很有用。它们允许您定义严格的类型层次结构。密封的类本身是抽象的,无法实例化。
密封类的行为与枚举类非常相似,您将在下一章中对其进行了解,但允许子类型具有多个实例并具有状态。
考虑 Shape 具有子类型 Circle 和的密封类 Square:
sealed class Shape {
  class Circle(val radius: Int): Shape()
  class Square(val sideLength: Int): Shape()
}
您已使用关键字 sealed 将其标记 Shape 为密封类。圆形和正方形都是形状,但是圆形具有半径,而正方形具有边长。
与枚举类不同,可以在密封的类中创建每种类型的多个实例:
val circle1 = Shape.Circle(4)
val circle2 = Shape.Circle(2)
val square1 = Shape.Square(4)
val square2 = Shape.Square(2)
并且定义的函数 Shape 可以使用 when 表达式来区分不同的子类型:
fun size(shape: Shape): Int {
  return when (shape) {
    is Shape.Circle -> shape.radius
    is Shape.Square -> shape.sideLength
  }
}

circle1.size // radius of 4
square2.size // sideLength of 2
Secondary constructors 次要构造函数(辅助构造函数)
主要构造函数
class Person(var firstName: String, var lastName: String) {
  fun fullName() = "$firstName $lastName"
}

// is the same as

class Person constructor(var firstName: String, var lastName: String) {
  fun fullName() = "$firstName $lastName"
}
次要构造函数
一个辅助构造函数正在使用单个Int参数调用另一个。
open class Shape {
  constructor(size: Int) {
    // ...
  }

  constructor(size: Int, color: String) : this(size) {
    // ...
  }
}
子类化时,可以使用以下命令从子类中的构造函数调用父类中的构造函数super:
class Circle : Shape {
  constructor(size: Int) : super(size) {
    // ...
  }

  constructor(size: Int, color: String) : super(size, color) {
    // ...
  }
}
Nested and inner classes 嵌套类和内部类
class Car(val carName: String) {
  class Engine(val engineName: String)
}
无法从嵌套类访问 Car 属性
class Car(val carName: String) {
  class Engine(val engineName: String) {
    override fun toString(): String {
      return "$engineName in a $carName" // Error: cannot see outer scope!
    }
  }
}
inner
class Car(val carName: String) {
  inner class Engine(val engineName: String) {
    override fun toString(): String {
      return "$engineName engine in a $carName"
    }
  }
}

val mazda = Car("mazda")
val mazdaEngine = mazda.Engine("rotary")
println(mazdaEngine) // > rotary engine in a mazda
Visibility modifiers 可见性修改器
public:在子类,其他文件和其他项目模块中的任何地方都可以看到;如果未指定可见性修改器,则默认为public。private:仅在相同class的类中可见,并且在相同的文件中对于顶级功能和其他非类定义才可见。protected:仅在类层次结构的子类中可见internal:仅在同一 模块(例如,IntelliJ IDEA 模块)中可见。
data class Privilege(val id: Int, val name: String)

open class User(val username: String, private val id: String, protected var age: Int)

class PrivilegedUser(username: String, id: String, age: Int): User(username, id, age) {
  private val privileges = mutableListOf<Privilege>()

  fun addPrivilege(privilege: Privilege) {
    privileges.add(privilege)
  }

  fun hasPrivilege(id: Int): Boolean {
    return privileges.map { it.id }.contains(id)
  }

  fun about(): String {
    //return "$username, $id" // Error: id is private
    return "$username, $age" // OK: age is protected
  }
}
age 属性是 protected,因此子类 PrivilegedUser 可以看到它:
val privilegedUser = PrivilegedUser(username = "sashinka", id = "1234", age = 21)
val privilege = Privilege(1, "invisibility")
privilegedUser.addPrivilege(privilege)
println(privilegedUser.about()) // > sashinka, 21
When and why to subclass 什么时候以及为什么要继承
- Single responsibility 单一责任
- Strong types 强类型
class Team { var players = mutableListOf<StudentAthlete>() val isEligible: Boolean get() { for (player in players) { if (!player.isEligible) { return false } } return true } } - Shared base classes 共享基类
// A button that can be pressed. open class Button { fun press() { } } // An image that can be rendered on a button. class Image // A button that is composed entirely of an image. class ImageButton(var image: Image): Button() // A button that renders as text. class TextButton(val text: String): Button() - Extensibility
- Identity
要点
- 类继承是类的最重要特征之一,它可以实现多态。
- 子类化是一个强大的工具,但是最好知道何时进行子类化。子类,当您要扩展对象时,可以从子类和超类之间的
is关系中受益,但要注意继承的状态和深层的类层次结构。 - 在
open的关键字用来允许类继承,也允许方法被重写的子类。 - 密封类允许您创建一个严格定义的类层次结构,该类层次结构类似于枚举类,但是允许创建每个子类型的多个实例并保持状态。
- 辅助构造函数允许您定义其他构造函数,这些构造函数比主要构造函数采用更多参数,并对这些参数采取不同的操作。
- 嵌套类使您可以在另一个类中命名一个类。
- 内部类是嵌套类,它们也可以访问外部类的其他成员。
- 可见性修改器使您可以控制在代码和项目中可以看到类成员和顶级声明的位置。
Enum Classes 枚举类
当您的数量可以包含一组有限的离散值时,枚举很有用。了解如何定义和使用枚举类,以及使用枚举类和何时表达式的一些示例。
Creating your first enum class
enum class DayOfTheWeek {
  Sunday,
  Monday,
  Tuesday,
  Wednesday,
  Thursday,
  Friday,
  Saturday
}

for (day in DayOfTheWeek.values()) {
  println("Day ${day.ordinal}: ${day.name}")
}
values(): 对枚举类伴侣功能为您提供了一个List类中的所有声明的情况下,很容易要经过所有的可能性,并找出可能存在多少。ordinal: 每个案例的属性在已声明案例的列表中给出该案例的索引。您会从打印出来的内容中注意到订单是零索引的。name: 每个案例的属性都采用代码中案例的名称,并返回该名称的String值。
val tuesday = DayOfTheWeek.valueOf("Tuesday")
println("Tuesday is day ${tuesday.ordinal}")
// Tuesday is day 2
如果您仅列出简单的案例列表,则无需使用 分号 结尾。但是,由于您打算为该枚举类添加更多功能,因此需要添加分号以确保编译器看到案例列表已经结束,并且其他功能声明已经开始。
Enum class properties and functions 枚举类的属性和函数
enum class DayOfTheWeek(val isWeekend: Boolean = false) {
  Monday,
  Tuesday,
  Wednesday,
  Thursday,
  Friday,
  Saturday(true),
  Sunday(true);
}
companion object
companion object {
  fun today(): DayOfTheWeek {
    // 1
    val calendarDayOfWeek = Calendar.getInstance().get(Calendar.DAY_OF_WEEK)
    // 2
    var adjustedDay = calendarDayOfWeek - 2
    // 3
    val days = DayOfTheWeek.values()
    if (adjustedDay < 0) {
      adjustedDay += days.count()
    }
    // 4
    val today = days.first { it.ordinal == adjustedDay }
    return today
  }
}

val today = DayOfTheWeek.today()
val isWeekend = "It is${if (today.isWeekend) "" else " not"} the weekend"
println("It is $today. $isWeekend.")
// It is Monday. It is not the weekend.
成员方法
fun daysUntil(other: DayOfTheWeek): Int {
  if (this.ordinal < other.ordinal) { // 1
    return other.ordinal - this.ordinal // 2
  } else {
    return other.ordinal - this.ordinal + DayOfTheWeek.values().count() //3
  }
}
在枚举类中使用 when
when (today) {
  DayOfTheWeek.Monday -> println("I don't care if $today's blue")
  DayOfTheWeek.Tuesday -> println("$today's gray")
  DayOfTheWeek.Wednesday -> println("And $today, too")
  DayOfTheWeek.Thursday -> println("$today, I don't care 'bout you")
  DayOfTheWeek.Friday -> println("It's $today, I'm in love")
  DayOfTheWeek.Saturday -> println("$today, Wait...")
  DayOfTheWeek.Sunday -> println("$today always comes too late")
  else -> println("I don't feel like singing")
}
密封类与枚举类
正如您在上一章中简要看到的那样,密封类具有数量有限的直接子类,它们都与密封类本身在同一文件中定义。它被称为sealed与相对final,因为尽管允许某些子类化(实际上,这是必需的,正如您稍后会看到的),但是子类化的范围极为有限。
希望这种技术允许程序员利用子类化的一些灵活性,而不必允许他们创建大量的继承树,这些继承树会导致可怕的,难以理解的代码。
关于密封类,有一些要点:
- 它们是抽象的。这意味着您不能直接实例化密封类的实例,只能实例化一个已声明的子类。
- 与该要求相关的是,密封类可以具有abstract成员,该成员必须由密封类的所有子类实现。
- 与枚举类不同,枚举类中的每种情况都是该类的单个实例,而您可以具有一个密封类的子类的多个实例。
- 您不能在声明该文件的文件之外创建密封类的直接子类,并且密封类的构造函数始终是私有的。
- 您可以在声明了它们的文件之外创建间接子类(例如,从密封类的子类中继承一个),但是由于上述限制,这种方法通常效果不佳。
创建一个密封的类
sealed class AcceptedCurrency {
  class Dollar: AcceptedCurrency()
  class Euro: AcceptedCurrency()
  class Crypto: AcceptedCurrency()
}

val currency = AcceptedCurrency.Crypto()
println("You've got some $currency!")
// You've got some AcceptedCurrency$Crypto@76ed5528!
枚举为状态机
enum class DownloadState {
  Idle,
  Starting,
  InProgress,
  Error,
  Success
}

when (downloadState) {
  DownloadState.Idle -> println("Download has not yet started.")
  DownloadState.Starting -> println("Starting download...")
  DownloadState.InProgress -> println("Downloading data...")
  DownloadState.Error -> println("An error occurred. Download terminated.")
  DownloadState.Success -> println("Download completed successfully.")
}
Nullables and enums 空值和枚举
利用枚举类的可空性,可以表示未收到信息或收到意外信息的状态,而不必显式创建“空闲”或“未知”状态。
var downloadState: DownloadState? = null
要点
- 枚举类是一种功能强大的工具,用于处理一条数据将(或至少应是)已定义的一组预先存在的值之一的情况。枚举类带有许多免费工具,例如获取所有已声明案例的列表,以及访问案例的顺序和名称的功能。
- 密封类是一种强大的工具,可用于处理以下情况:数据片段(或至少应该是)已定义的一组现有类型之一。
- 枚举类和密封类都使您可以利用Kotlin的强大when表达来清楚地概述您要如何处理各种情况。
- 枚举类对于在状态机中创建,更新和清除有关当前状态的信息特别有用。
Interfaces 接口
当您要创建同时包含状态和行为的类型时,使用类。当您需要主要允许行为规范的类型时,最好使用接口。
Introducing interfaces
interface Vehicle {
  fun accelerate()
  fun stop()
}
Interface syntax
class Unicycle: Vehicle {
  var peddling = false

  override fun accelerate() {
    peddling = true
  }

  override fun stop() {
    peddling = false
  }
}
默认方法实现
interface SpaceVehicle {
  fun accelerate()
  fun stop() {
    println("Whoa, slow down!")
  }
}

class LightFreighter: SpaceVehicle {
  override fun accelerate() {
    println("Proceed to hyperspace!")
  }
}

val falcon = LightFreighter()
falcon.accelerate() // > Proceed to hyperspace!
falcon.stop() // > "Whoa, slow down!
接口中的属性
interface VehicleProperties {
  val weight: Int // abstract
  val name: String
    get() = "Vehicle"
}
实现带有属性的接口的类型可以给抽象属性一个值,或者提供一个实现:
class Car: VehicleProperties {
  override val weight: Int = 1000
}

class Tank: VehicleProperties {
  override val weight: Int
    get() = 10000

  override val name: String
    get() = "Tank"
}
接口继承 Interface inheritance
interface WheeledVehicle: Vehicle {
  val numberOfWheels: Int
  var wheelSize: Double
}

class Bike: WheeledVehicle {
  var peddling = false
  var brakesApplied = false

  override val numberOfWheels = 2
  override var wheelSize = 622.0

  override fun accelerate() {
    peddling = true
    brakesApplied = false
  }

  override fun stop() {
    peddling = false
    brakesApplied = true
  }
}
Implementing multiple interfaces 实现多个接口
interface Wheeled {
  val numberOfWheels: Int
  val wheelSize: Double
}

class Tricycle: Wheeled, Vehicle {
  // Implement both Vehicle and Wheeled
}
Interfaces in the standard library 标准库中的接口
Iterator 迭代器
val cars = listOf("Lamborghini", "Ferrari", "Rolls-Royce")
val numbers = mapOf("Brady" to 12, "Manning" to 18, "Brees" to 9)

for (car in cars) {
  println(car)
}
for (qb in numbers) {
  println("${qb.key} wears ${qb.value}")
}
Comparable
public interface Comparable<in T> {
  public operator fun compareTo(other: T): Int
}
要点
- 接口定义了类,对象和其他自定义类型可以实现的协定。
- 通过实现接口,需要通过实现接口的所有方法和属性来使类型符合接口。
- 一个类型可以实现任意数量的接口,从而允许子类不允许的准多重继承。
- Kotlin 标准库广泛使用接口。您可以
Comparable在自己的类型上使用其中的许多功能。
Generics 泛型
在某些时候,您将需要能够创建超出常规类和函数可用范围的抽象。您将学习如何使用泛型来增强您的类和函数的功能。
Anatomy of standard library generic types 标准库泛型类型的剖析
- Lists
public interface List<out E> : Collection<E>
- Map
public interface Map<K, out V>
Extension functions on types with generic constraints 具有通用约束的类型的扩展功能
fun <T> List<T>.toBulletedList(): String {
  val separator = "\n - "
  return this.map { "$it" }.joinToString(separator, prefix = separator, postfix = "\n")
}
Creating your own generic constraints 创建自己的通用约束
fun moveEverythingToTruck() {
  while (thingsLeftInOldPlace.count() > 0) {
    val item = thingsLeftInOldPlace.removeAt(0)

    if (item is BreakableThing) {
      if (!item.isBroken) {
        thingsInTruck.add(item)
        println("Moved your $item to the truck!")
      } else {
        println("Could not move your $item to the truck")
      }
    } else {
      thingsInTruck.add(item)
      println("Moved your $item to the truck!")
    }
  }
}
Interfaces 接口
interface Checkable {
  fun checkIsOK(): Boolean
}
class Mover<T: Checkable>(
  thingsToMove: List<T>,
  val truckHeightInInches: Int = (12 * 12)
)
Generic interfaces 通用接口
// 1
interface Container<T> {
  // 2
  fun canAddAnotherItem(): Boolean
  fun addItem(item: T)
  // 3
  fun canRemoveAnotherItem(): Boolean
  fun removeItem(): T
  // 4
  fun getAnother(): Container<T>
  // 5
  fun contents(): List<T>
}
Type erasure 类型擦除
Star projection 星投影
if (item is Container<*>) {}
“这可以是 Container 任何东西,但我可以告诉您,它绝对是一个 Container。”
if (item is Container<*>) {
  val itemInContainer = item.removeItem()
}
Reified type parameters 修饰类型参数
inline fun <reified R> Iterable<*>.filterIsInstance(): List<R>
要点
泛型是一个巨大的话题,因此请回顾一下 Kotlin 中关于它们的一些最重要的事情要记住:
- 泛型允许您创建在编写该类或接口的代码时未知的类型上运行的类或接口。
- 通用编程可以使您以高度可重用且易于调试的方式集中功能。
- 类型擦除意味着,在采用通用类型的类或接口中,除非使用注解类型
reified并内联函数,否则在编译时您将不会获得有关该类型的任何信息。 - 仅允许
in或允许out泛型类型的变化,您可以限制泛型类型可以传递到扩展中,还是可以从子类或特定泛型接口或类上的其他函数返回。反过来,这使您和编译器都可以对通用类型如何相互关联进行假设。
Section IV: Intermediate Topics 第四节:中级主题
您已经到了本书的最后一节!在本节中,您将探究一些重要但又更中间的主题,以完善您的 Kotlin 学徒制。
Kotlin/Java Interoperability Kotlin / Java 互操作性
Kotlin 从一开始就被设计为与 Java 和 Java 生态系统 100% 兼容。了解如何在单个项目中一起使用 Kotlin 和 Java,以及如何在两者之间来回调用。
Free functions 自由函数
// 1
fun labelFor(user: User, type: AddressType): String {
    // 2
    val address = user.addressOfType(type)
    if (address != null) {
        // 3
        var label = "-----\n"
        label += "${user.fullName}\n${address.forPostalLabel()}\n"
        label += "-----\n"
        return label
    } else {
        return "\n!! ${user.fullName} does not have a $type address set up !!\n"
    }
}

// 4
fun printLabelFor(user: User, type: AddressType) {
    println(labelFor(user, type))
}
Java nullability annotations Java 可空性注解
@Nullable
public List<Address> getAddresses() { ... }
java 能调用默认参数
如果要添加 @JvmOverloads 默认构造函数,则必须显式使用 constructor 关键字,以便生成适当的重载构造函数。
data class Address @JvmOverloads constructor (...)
Accessing nested Kotlin objects 访问嵌套的 Kotlin 对象
object JSONKeys {
  val streetLine1 = "street_1"
  val streetLine2 = "street_2"
  val city = "city"
  val stateOrProvince = "state"
  val postalCode = "zip"
  val addressType = "type"
  val country = "country"
}
java 调用
Address.JSONKeys keys = Address.JSONKeys.INSTANCE;
不需要生成 getter 和 setter 方法
data class Address @JvmOverloads constructor (
    @JvmField val streetLine1: String,
    @JvmField val streetLine2: String?,
    @JvmField val city: String,
    @JvmField val stateOrProvince: String,
    @JvmField val postalCode: String,
    @JvmField var addressType: AddressType,
    @JvmField val country: String = "United States") { ... }
“Static” values and functions from Kotlin Kotlin 的“静态”值和功能
companion object {
  const val sampleFirstLine = "123 Fake Street"

  @JvmStatic
  fun canadianSample(type: AddressType): Address {
    return Address(sampleFirstLine,
        "4th floor",
        "Vancouver",
        "BC",
        "A3G 4B2",
        type,
        "Canada")
  }
}
要点
- Kotlin 从一开始就设计为与
JVM兼容,并且Kotlin字节码可以在Java字节码运行的任何位置运行。 - 您可以在一个项目中混合
Kotlin和Java代码。 - 可以将
Kotlin扩展功能添加到用Java编写的类中,也可以从Java代码中调用Kotlin免费功能。 - 像
@JvmOverloads和@JvmStatic这样的注解可以帮助您集成 Java 和 Kotlin 代码。
异常
没有软件可以避免错误情况。了解如何在 Kotlin 中使用异常来对何时以及如何处理错误提供一些控制。
What is an exception?
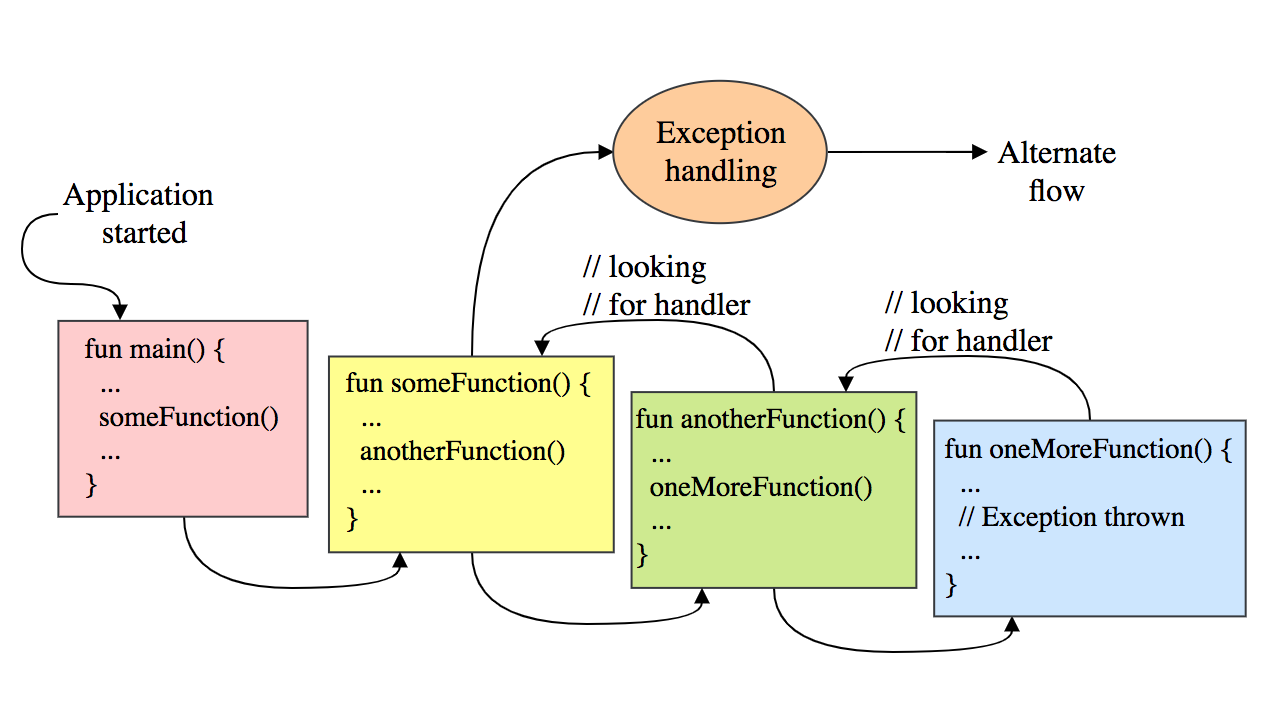
Throwing exceptions 抛出异常
fun launch() {
if (fuel < 5) {
throw Exception("Out of fuel. Can't take off.")
}
if (!isEngineInOrder) {
throw Exception("The engine is broken. Can't take off.")
}
if (!isConnectionAvailable) {
throw Exception("No connection with Earth. Can't take off.")
}
...
}
Handling exceptions 处理异常
fun investigateSpace(spaceCraft: SpaceCraft) {
try {
spaceCraft.launch()
} catch (exception: Exception) {
spaceCraft.sendMessageToEarth(exception.localizedMessage)
}
}
Creating custom exceptions 创建自定义异常
class OutOfFuelException :
Exception("Out of fuel. Can't take off.")
fun launch() {
if (fuel < 5) {
throw OutOfFuelException()
}
if (!isEngineInOrder) {
throw BrokenEngineException()
}
if (!isConnectionAvailable) {
throw SpaceToEarthConnectionFailedException()
}
...
}
fun investigateSpace(spaceCraft: SpaceCraft) {
try {
spaceCraft.launch()
} catch (exception: OutOfFuelException) {
spaceCraft.sendMessageToEarth(exception.localizedMessage)
} catch (exception: BrokenEngineException) {
spaceCraft.sendMessageToEarth(exception.localizedMessage)
} catch (exception: SpaceToEarthConnectionFailedException) {
spaceCraft.sendMessageToEarth(exception.localizedMessage)
}
}
Difference between Java and Kotlin exceptions
- Checked exceptions
Kotlin 中的所有异常均Checked,因此,您不必强制处理或声明它们。当抛出异常时,程序仍会终止。 - try as an expression try 作为表达
val date: Date = try { Date(userInput) // try to parse user input } catch (exception: IllegalArgumentException) { Date() // otherwise use current date } }
要点
- 异常是指程序中出现问题时发生的事件。
- 扩展
Exception类或其子类以创建自定义异常。 - 使用
throw关键字抛出异常。 - 不要捕获基类Exception,可以使用最具体的异常类。
- 为罕见情况创建自定义异常,以区分它们。
- 处理异常时,将无论是否发生异常都应执行的代码放在finally块中。
- 未选中
Kotlin中的所有异常。 - 不要忽略异常。
Try-catch是一个表达式。
函数式编程
Kotlin 不仅是一种面向对象的编程语言,它还提供了函数编程领域中的许多构造。通过学习如何将函数用作参数并从其他函数返回值,了解如何将函数视为一等公民。
What is functional programming? 什么是函数式编程?
side effects
函数式编程基于函数的使用,理想情况下,函数没有 副作用。
函数编程的另一个关键功能是使语言成为 一等公民。
First-class and higher-order functions
Function types
(Int, Int) -> Float
Passing a function as an argument
fun beginBattle(firstRobot: Robot, secondRobot: Robot,
onBattleEnded: (Robot) -> Unit) {
var winner: Robot? = null
battle(firstRobot, secondRobot)
winner = if (firstRobot.isAlive) firstRobot else secondRobot
onBattleEnded(winner)
}
fun main(args: Array<String>) {
val firstRobot = Robot("Experimental Space Navigation Droid")
val secondRobot = Robot("Extra-Terrestrial Air Safety Droid")
Battlefield.beginBattle(firstRobot, secondRobot, ::onBattleEnded)
}
fun onBattleEnded(winner: Robot) {
winner.report("Won!")
}
Returning functions
fun someFunction(): () -> Int {
return ::anotherFunction
}
fun anotherFunction(): Int {
return Random().nextInt()
}
Lambdas
val pow = { base: Int, exponent: Int -> Math.pow(base.toDouble(), exponent.toDouble()) }
pow(2, 4)
val pow: (Int, Int) -> Double
= { base, exponent -> Math.pow(base.toDouble(), exponent.toDouble()) }
it
val root: (Int) -> Double = { Math.sqrt(it.toDouble()) }
fun main(args: Array<String>) {
val firstRobot = Robot("Experimental Space Navigation Droid")
val secondRobot = Robot("Extra-Terrestrial Air Safety Droid")
Battlefield.beginBattle(firstRobot, secondRobot) {
it.report("Won!")
}
}
How do lambdas work?
java code
final class MainKt$main$onBattleEnded$1 extends Lambda
implements Function1 {
public static final MainKt$main$onBattleEnded$1 INSTANCE =
new MainKt$main$onBattleEnded$1;
public bridge invoke(Object arg0) {
MainKt$main$onBattleEnded$1.invoke((Robot)arg0);
}
public final invoke(Robot robot) {
robot.report("Won!");
}
Function1
/** A function that takes 1 argument. */
public interface Function1<in P1, out R> : Function<R> {
/** Invokes the function with the specified argument. */
public operator fun invoke(p1: P1): R
}
invoke
Function1 onBattleEnded =
(Function1)MainKt$main$onBattleEnded$1.INSTANCE;
onBattleEnded.invoke(winner);
Closures
public static final class IntRef implements Serializable {
public int element;
@Override
public String toString() {
return String.valueOf(element);
}
}
final IntRef result = new IntRef();
result.element = 0;
Function2 sum = (Function2)(new Function2() {
public Object invoke(Object var1, Object var2) {
this.invoke(((Number)var1).intValue(), ((Number)var2).intValue());
return Unit.INSTANCE;
}
public final void invoke(int a, int b) {
result.element = a + b;
}
});
sum.invoke(Integer.valueOf(5), Integer.valueOf(18));
Extension functions
fun String.print() = System.out.println(this)
val string = "Hello world"
string.print()
generated
public static final void print(@NotNull String $receiver) {
System.out.println($receiver);
}
Lambdas with receivers
fun beginBattle(firstRobot: Robot, secondRobot: Robot,
onBattleEnded: Robot.() -> Unit) {
var winner: Robot? = null
battle(firstRobot, secondRobot)
winner = if (firstRobot.isAlive) firstRobot else secondRobot
winner.onBattleEnded()
}
Anonymous functions
val reportOnWin = fun(robot: Robot) { robot.report("Won!") }
Battlefield.beginBattle(firstRobot, secondRobot, reportOnWin)
Returning from lambdas
fun calculateEven() {
var result = 0
(0..20).forEach loop@{
if (it % 3 == 0) return@loop
if (it % 2 == 0) result += it
}
println(result)
}
anonymous function
fun calculateEven() {
var result = 0
(0..20).forEach(fun(value) {
if (value % 3 == 0) return
if (value % 2 == 0) result += value
})
println(result)
}
Inline functions 内联函数
为避免这种情况,可以用 inline 关键字标记函数,该关键字将调用站点上的函数调用替换为函数的主体。使用 inline,不会生成其他类,并且此函数的调用和接收到的 lambda 被其主体替换。
inline fun beginBattle(firstRobot: Robot, secondRobot: Robot,
onBattleEnded: Robot.() -> Unit) {
...
}
java beginBattle() 函数没有调用
public static final void main(@NotNull String[] args) {
Robot firstRobot = new Robot("Experimental Space Navigation Droid");
Robot secondRobot = new Robot("Extra-Terrestrial Air Safety Droid");
Battlefield this_$iv = Battlefield.INSTANCE;
Robot winner$iv = (Robot)null;
this_$iv.battle(firstRobot, secondRobot);
winner$iv = firstRobot.isAlive() ? firstRobot : secondRobot;
winner$iv.report("Win!");
}
Noinline
如果您不希望将某些 lambda 参数与高阶函数一起内联,则可以将 lambda 标记为 noinline。FunctionN 仍然会为 noinline lambda 生成一个实例:
crossinline
inline fun someFunction(inlinedLambda: () -> Unit,
noinline nonInlinedLambda: () -> Unit) {
...
}
Tail recursive functions 尾递归函数
tailrec fun battle(firstRobot: Robot, secondRobot: Robot) {
...
}
public final void battle(@NotNull Robot firstRobot, @NotNull Robot secondRobot) {
do {
firstRobot.attack(secondRobot);
if (!secondRobot.isAlive()) {
return;
}
secondRobot.attack(firstRobot);
} while (firstRobot.isAlive());
}
Collections standard library
val topCategory = participants
// 1
.filter { it.strength > 80 }
// 2
.take(3)
// 3
.sortedBy { it.name }
Infix notation 中缀符号
infix fun attack(robot: Robot) {
val damage = random.randomDamage(strength)
robot.damage(damage)
}
firstRobot attack secondRobot
Sequences 序列
val random = Random()
// 1
val sequence = generateSequence {
// 2
random.nextInt(100)
}
sequence
// 3
.take(15)
// 4
.sorted()
// 5
.forEach { println(it) }
val factorial = generateSequence(1 to 1) {
it.first + 1 to it.second * (it.first + 1)
}
println(factorial.take(10).map { it.second }.last())
要点
- 函数式编程使用一流的函数,这些函数可以作为参数传递,返回或分配给变量。
- 高阶函数是接收另一个函数作为参数和/或返回一个的函数。
- lambda 是字面在大括号限定,并且可以被调用,传递给函数,返回或分配给一个变量的函数。
- 创建 lambda 时,将创建一个实现
FunctionN接口的隐式类,其中N是lambda接收的参数数量。 - Kotlin lambda 充当闭包,访问变量在 lambda 的外部范围中定义。
- 扩展函数隐式接收扩展类的实例作为第一个参数。
- 带接收器的 Lambda 与扩展功能相似。
- 使用 crossinline 关键字标记一个不支持非本地返回的 lambda 。
- 使用 tailrec 关键字优化尾递归函数。
- 使用 inline 关键字将函数调用替换为其主体。
- 如果一个函数是成员函数或扩展函数,并且仅接收一个参数,则可以用
infix关键字标记它,并在不使用点运算符或括号的情况下调用它。 - 使用序列创建延迟评估的集合。
约定和运算符重载
您将学习约定的概念,并了解如何使用约定实现操作符重载并编写更简洁但仍可读的代码。
What is operator overloading? 什么是运算符重载?
运算符重载主要是 语法糖,它可以让你使用各种运算,像那些在数学计算(例如,使用 +,-,*,+=,>= 等)与您的自定义的数据类型。您可以创建如下内容:
val fluffy = Kitten("Fluffy")
val snowflake = Kitten("Snowflake")
takeHome(fluffy + snowflake)
Using conventions 使用约定
一元运算符重载
operator fun inc(): Employee {
salary += 5000
println("$name got a raise to $$salary")
return this
}
++Julia // now Julia's salary is 105_000
它将被编译为:
Julia = Julia.inc();

二元运算符重载
operator fun plusAssign(increaseSalary: Int) {
salary += increaseSalary
println("$name got a raise to $$salary")
}
operator fun minusAssign(decreaseSalary: Int) {
salary -= decreaseSalary
println("$name's salary decreased to $$salary")
}
Mark += 2500
Alice -= 2000
它将被编译为:
Mark.plusAssign(2500);
Alice.minusAssign(2000);
处理集合
operator fun get(index: Int): Employee? {
return if (index < employees.size) {
employees[index]
} else {
null
}
}

运算符重载和 Java
Java为什么不允许开发人员自己重载运算符?
虽然重载的运算符可以简化您的代码,但它们也可能会引起误解。由于任何给定的运算符都有多种含义,因此不清楚在特定代码行中到底发生了什么。
委托的属性作为约定
class NameDelegate {
operator fun getValue(thisRef: Any?, property: KProperty<*>): String {
// return existing value
}
operator fun setValue(thisRef: Any?, property: KProperty<*>, value: String) {
// set received value
}
}
var name: String by NameDelegate()
要点
- 要使用重载运算符,必须遵守运算符的特定约定。
- 约定管理 Kotlin 中的多个功能,例如运算符重载,中缀函数和委托的属性。
- 操作员应始终保持可预测的行为;不要以使其他操作人员可能使用或读取您的代码的行为不清楚的方式重载运算符。
Kotlin 协程
Kotlin 协程使您可以简化异步代码并使之更具可读性。您将学习线程和协程之间的区别,并查看使用的协程示例。
Asynchronous programming 异步编程
与同步方法相反,异步编程允许同时并行执行多个任务。这样,您可以在应用程序还从服务器检索必要数据的同时渲染漂亮的加载器动画。或者,您可以将一个不重要的任务分解为几个简单的任务,然后同时执行它们以减少处理时间。
线程数
fun main() {
thread(start = true, name = "another thread") {
(0..10).forEach {
println("Message #$it from the ${Thread.currentThread().name}")
}
}
(0..10).forEach {
println("Message #$it from the ${Thread.currentThread().name}")
}
}
Coroutines 协程
Java 语言中没有即时更好的选择,但是在 Kotlin 中,您可以立即获得协程!协程主要是一种计算。它的定义特征是可以在计算的指定点挂起并恢复它,而不会阻塞线程。暂停是一项极为有效的操作。您可以创建数百甚至数千个协程并同时运行它们,因为它们是轻量级的,不需要太多额外的资源来执行。
协程可以在指定的悬挂点悬挂。这些点是对用 suspend 修饰符标记的函数的调用。这些挂起函数只能从协程或其他挂起函数以及在协程或挂起例程中内联的函数调用。
fun main() {
BuildingYard.startProject("Smart house", 20)
}
build.gradle
dependencies {
...
compile "org.jetbrains.kotlinx:kotlinx-coroutines-core:1.3.0"
}
之后,可以将 main.kt 中的 main() 函数更新为以下内容:
fun main() = runBlocking {
launch(Dispatchers.Default) {
(0..10).forEach {
println("Message #$it from the ${Thread.currentThread().name}")
}
}
(0..10).forEach {
println("Message #$it from the ${Thread.currentThread().name}")
}
}
Configuring coroutines 配置协程
- Job
- Dispatchers
- Dispatchers.Default
- Dispatchers.IO
- Dispatchers.Unconfined
- Optionally:
Dispatchers.Main
协程范围
public interface CoroutineScope {
public actual val coroutineContext: CoroutineContext
}
获取范围
- GlobalScope
- MainScope()
- CoroutineScope(context: CoroutineContext)
协程建造者
- runBlocking()
- launch()
- async() & await()
- withContext()
错误处理
try {
val userProfile = scope.withContext(Dispatchers.IO) { getProfile() }
} catch (e: NoSuchUserException) {
// handle exception
}
CoroutineExceptionHandler
val scope = CoroutineScope(Dispatchers.Default)
val handler = CoroutineExceptionHandler { context, exception ->
println(exception.message)
}
scope.launch(handler) {
uploadData()
}
要点
- 在异步的编程方法的重点是让你在同一时间执行多个操作。
- 当不需要大量线程来执行必要的任务时,就使用线程。
- 协程就像“轻量级线程”,因为它们不需要那么多的内存资源,也不基于 Java 线程等操作系统级别的线程。
- 大量协程可以在单个线程上执行而不会阻塞它。
- 每个协程都绑定一些 CoroutineContext。 CoroutineContext 负责协程的许多重要部分,例如 Job,Dispatcher 和CoroutineExceptionHandler。
- 使用协同程序建设者(runBlocking(),withContext(),launch(),async())创建和启动协同程序。
- 您可以使用决定何时启动协程 CoroutineStart。
- 使用分派器定义用于协程执行的线程。
- 协程基于状态机的概念,每个状态均指一个悬挂点。不需要在协程之间进行切换并恢复其状态的时间或资源。
用 Kotlin 编写脚本
Kotlin 不仅在 Android 或 JVM上 有用,而且还可以用于在命令行中编写脚本。了解如何使用 Kotlin 作为脚本语言。
Installing Kotlin for scripting
Installing SDKMan!
curl -s https://get.sdkman.io | bash
Installing Kotlin
sdk install kotlin
which kotlin
# /Users/[username]/.sdkman/candidates/kotlin/current/bin/kotlin
# Read-Evaluate-Print-Loop, or REPL
kotlinc-jvm
>>> println("Hello, world!")
Hello, world!
:quit
Creating script files
touch script.kts
script.kts
println("Hello, scripting!")
run kotlin script file
kotlinc -script script.kts
Running a script with IntelliJ IDEA
openproject- Add configuration
+Kotlin script- select
Script File - File ▸ Project Structure
- Project JDK:
1.8 - Apply
Handling arguments
- Edit Configurations
- Program arguments
kotlinc -script script.kts "Kotlin scripting is awesome"
Getting information from the system
import java.io.File
fun currentFolder(): File {
return File("").absoluteFile
}
fun File.contents(): List<File> {
return this.listFiles().toList()
}
val current = currentFolder()
println("Current folder contents:\n ${current.contents().joinToString("\n ")}")
要点
- 脚本正在文本编辑器中编写小型程序,该程序可从命令行运行,并可用于在计算机上进行各种类型的处理。
- 作为一种脚本语言,Kotlin 为您提供了其他脚本语言(如 Python 和 Ruby)所缺乏的静态类型。
- Kotlin 带有一个
Read-Evaluate-Print Loop或REPL,可用于以交互方式研究Kotlin代码。 - Kotlin 脚本以扩展名结尾
.kts,而普通的Kotlin代码以扩展名结尾.kt。 - 您可以将 IntelliJ IDEA 用作脚本编辑器,然后在 IDE 中或从 OS 上的命令行 shell 运行脚本。
- Kotlin 脚本在一个隐藏
main()函数中运行,并且可以args在命令行中访问传递给脚本的内容。脚本也可以导入 Kotlin 和 Java 库以访问其功能。 您可以使用 Kotlin 脚本来读取和写入文件系统上的文件和文件夹,还有更多!
Kotlin/Native 原生
安装并熟悉将 Kotlin 代码编译为适用于iOS和其他平台的原生二进制文件的 Kotlin/Native 工具。
Konan 和 LLVM
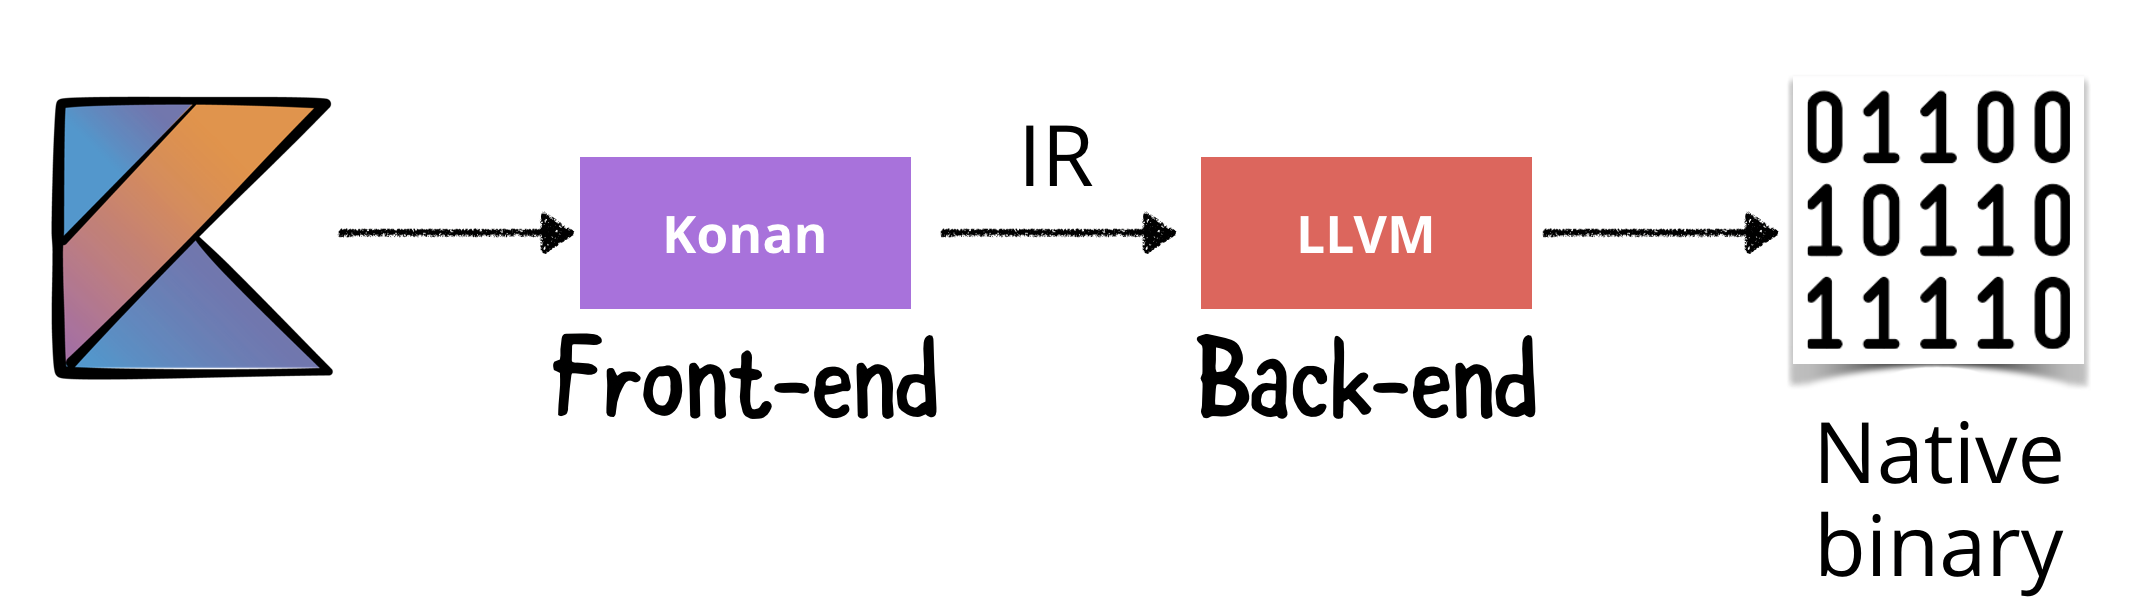
安装 4
https://github.com/JetBrains/kotlin/releases/latest
mkdir ~/bin
cd ~/bin
wget -c https://github.com/JetBrains/kotlin/releases/download/v1.4.21/kotlin-native-macos-1.4.21.tar.gz
tar xvf kotlin-native-macos-1.4.21.tar.gz
.bashrc or .zshrc
export PATH="$PATH:~/bin/kotlin-native-macos-1.4.21/bin"
生效
source ~/.bashrc
source ~/.zshrc
hello.kt
fun main() {
println("Hello, Kotlin/Native!")
}
run
konanc -o hello hello.kt
./hello.kexe
# Hello, Kotlin/Native!
Kotlin 标准库
可执行文件 hello.kexe 在 macOS 上约为 650 KB,这比用 C 编写的等效程序的可执行文件大 100 倍。 。这么大的大小是由于 Kotlin标准库静态 链接到可执行文件这一事实。
要点
- Kotlin/Native 用于将 Kotlin 代码编译为可以在没有虚拟机和 Kotlin 运行时的情况下运行的原生二进制文件。
- Kotlin/Native 编译器的名称为 Konan。运行 Konan 的命令是
konanc。 - Kotlin/Native 利用 LLVM 编译器生成原生二进制文件。Konan 充当 LLVM 的前端,为 LLVM 生成中间表示。
- Kotlin/Native 编译器可以从其 GitHub 页面的 https://github.com/kotlin-native 安装。
- 安装 Kotlin/Native 编译器时,请确保将其与用于创建 Java 字节码的kotlin-jvm编译器区分开。
- otlin/Native 代码从一个
main函数开始,类似于其他类似 C 的语言。 - Kotlin 标准库静态链接到 Kotlin/Native 可执行文件。
Kotlin 多平台
过使用共享的 Kotlin 模块创建项目,您可以在多个平台之间共享 Kotlin 代码。了解如何创建适用于 iOS 和 Android 的 Multiplatform 项目,以及如何使用期望关键字和实际关键字来实现特定于平台的行为。
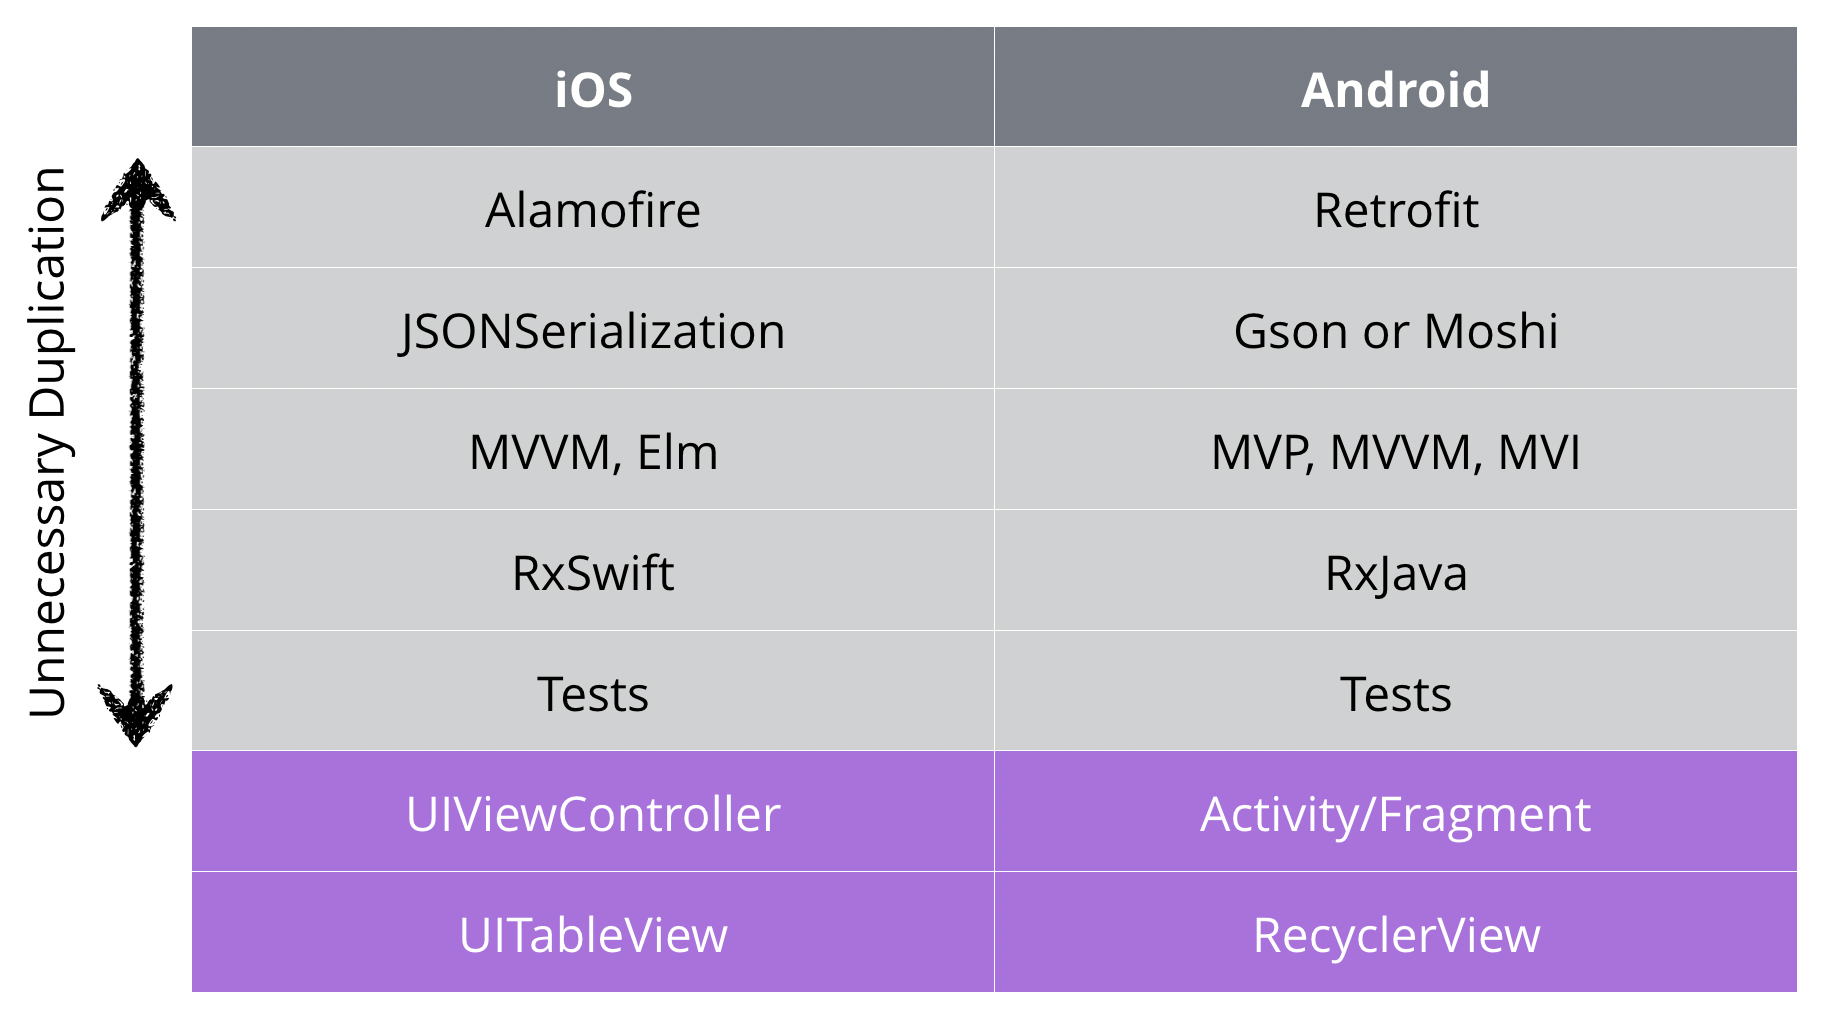
共享代码
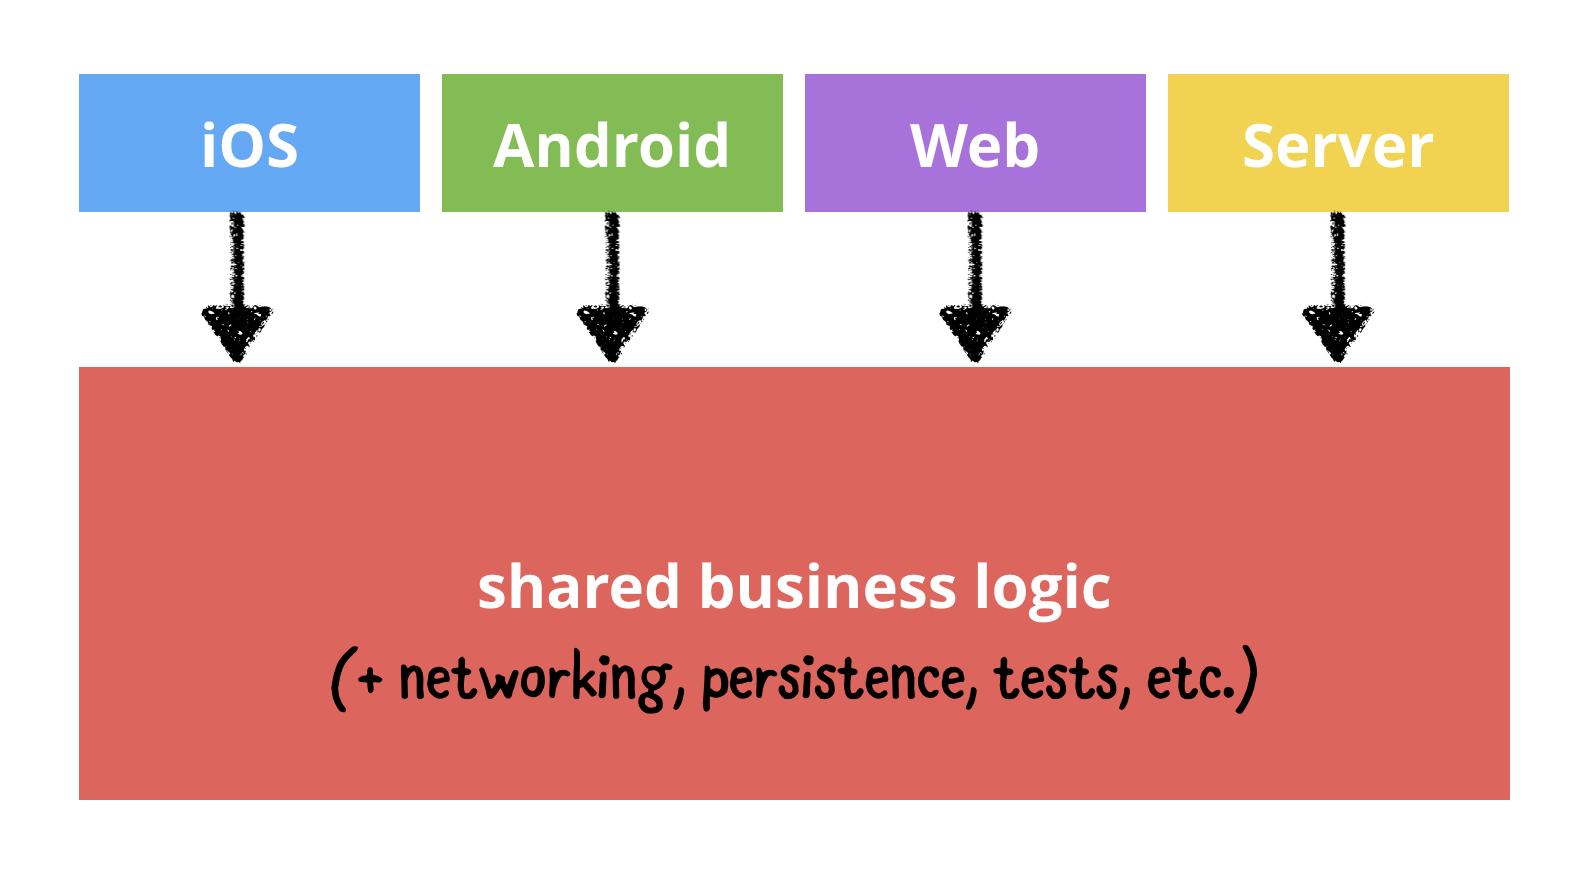
共享项目
mv app androidApp
rm androidApp/app.iml
settings.gradle
include ':androidApp'
rootProject.name='HelloKMP'
共享
mkdir -p shared/src/androidMain/kotlin
mkdir -p shared/src/commonMain/kotlin
mkdir -p shared/src/iosMain/kotlin
touch shared/src/commonMain/kotlin/common.kt
touch shared/src/androidMain/kotlin/android.kt
touch shared/src/iosMain/kotlin/ios.kt
touch shared/build.gradle.kts
共享代码构建文件
settings.gradle
include ':shared'
include ':androidApp'
rootProject.name = 'HelloKMP'
shared/build.gradle.kts
import org.jetbrains.kotlin.gradle.plugin.mpp.KotlinNativeTarget
plugins {
kotlin("multiplatform")
}
kotlin {
//select iOS target platform depending on the Xcode environment variables
val iOSTarget: (String, KotlinNativeTarget.() -> Unit) -> KotlinNativeTarget =
if (System.getenv("SDK_NAME")?.startsWith("iphoneos") == true)
::iosArm64
else
::iosX64
iOSTarget("ios") {
binaries {
framework {
baseName = "shared"
}
}
}
jvm("android")
sourceSets["commonMain"].dependencies {
implementation("org.jetbrains.kotlin:kotlin-stdlib-common")
}
sourceSets["androidMain"].dependencies {
implementation("org.jetbrains.kotlin:kotlin-stdlib")
}
}
期望与实际
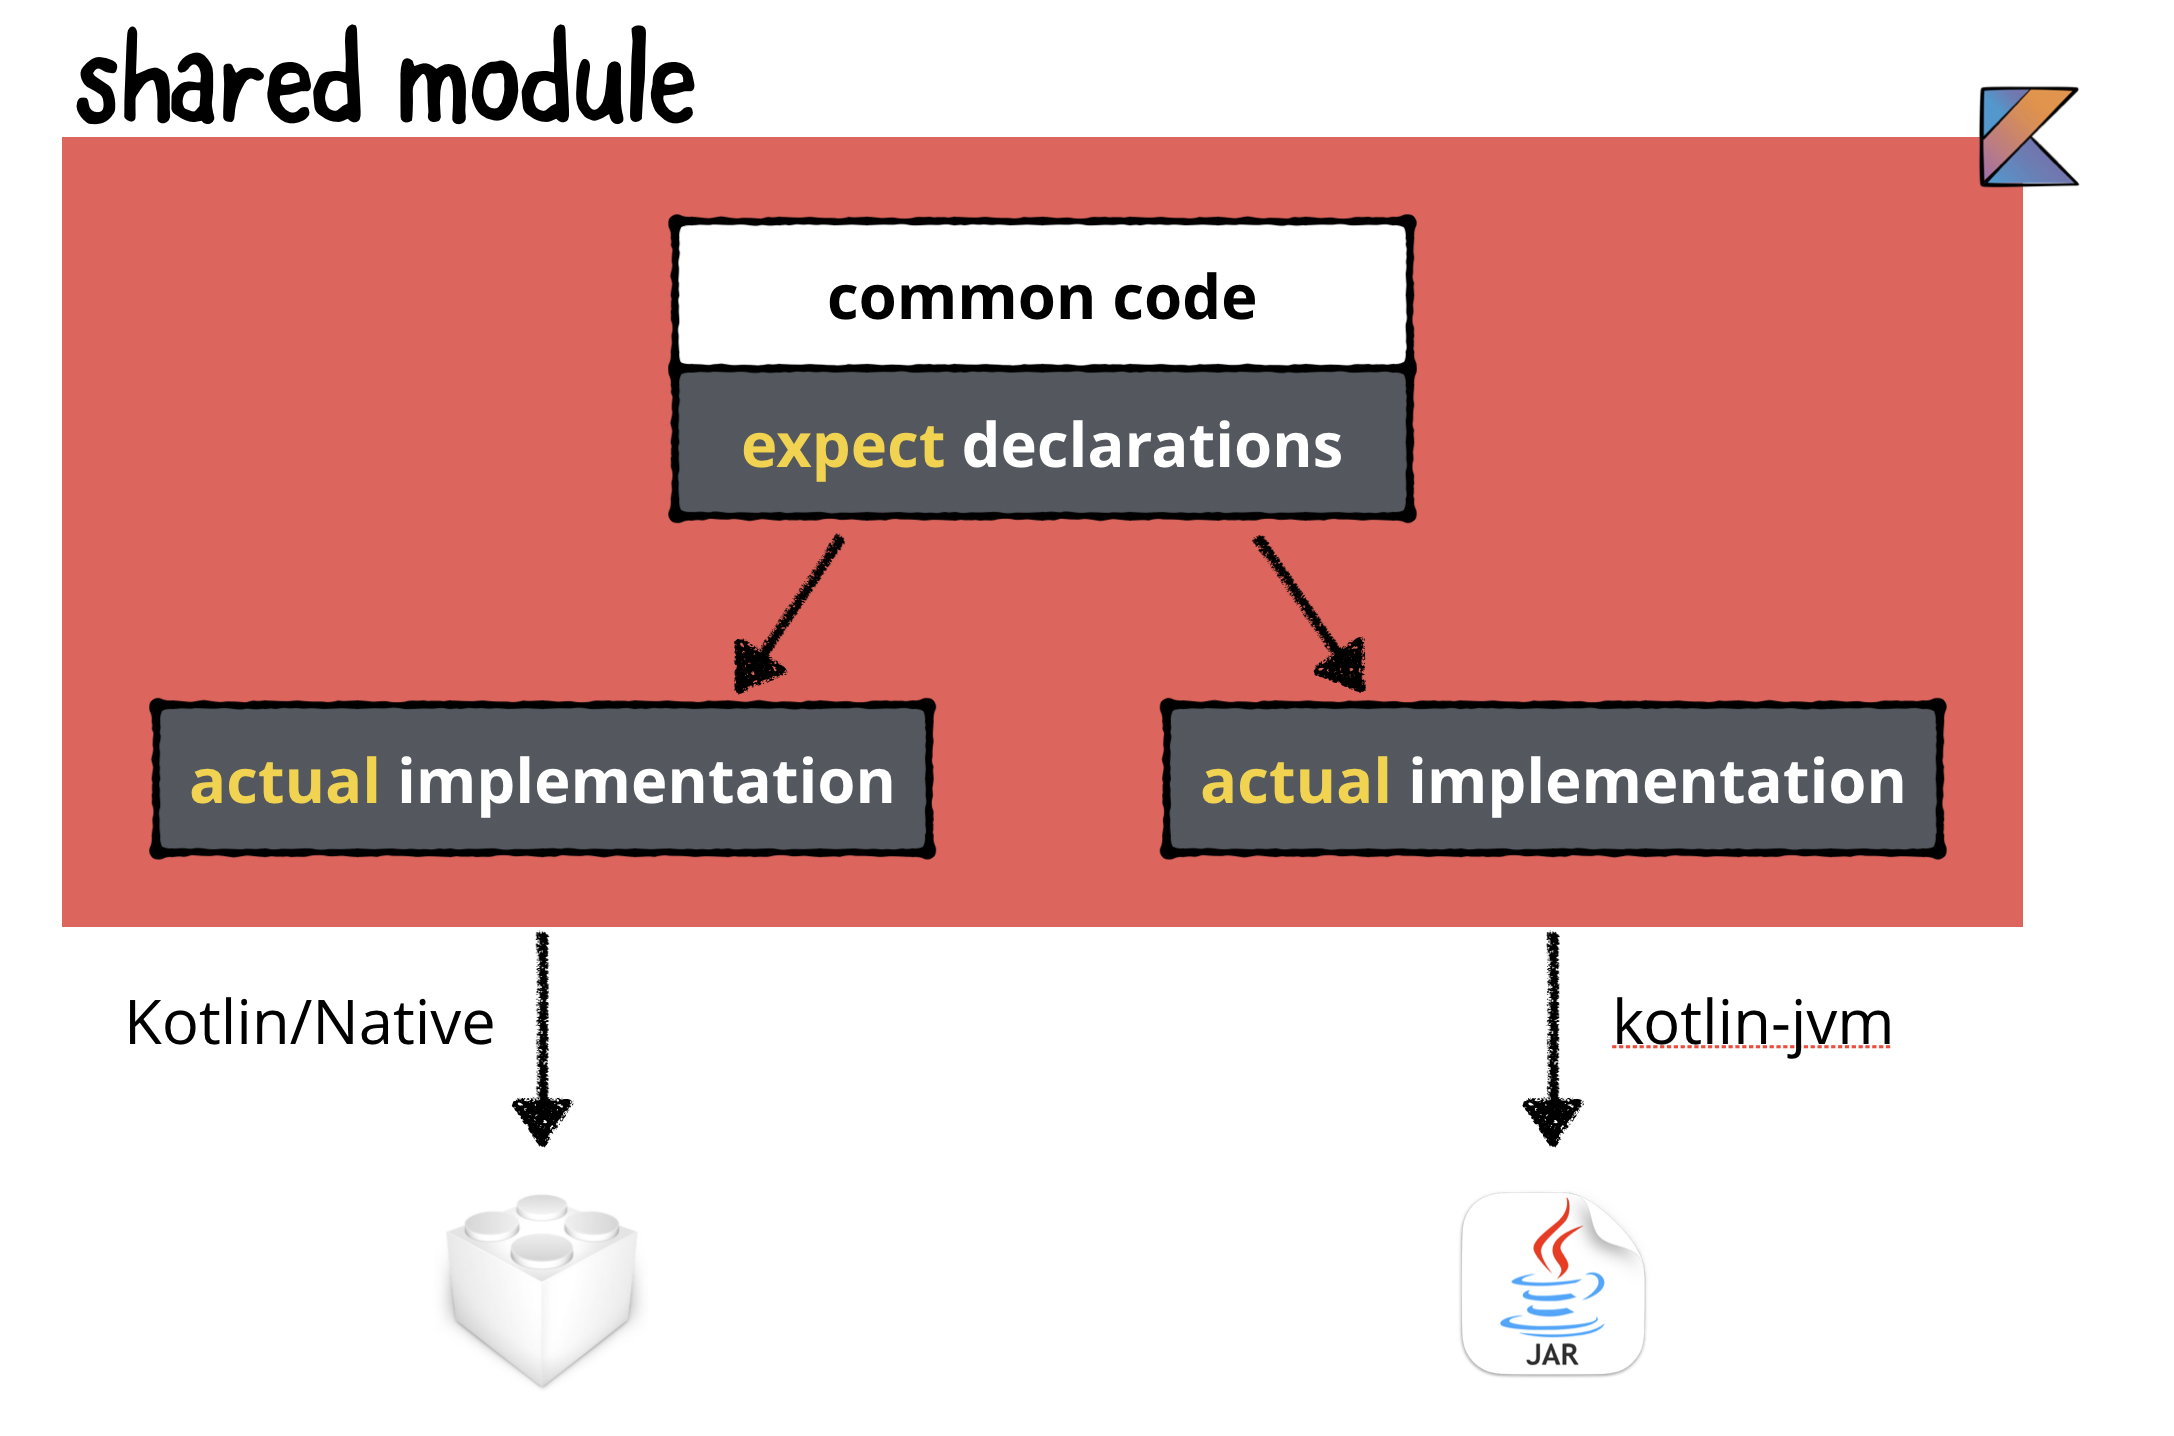
shared/src/commonMain/kotlin/common.kt
package com.iosdevlog
expect fun platformName(): String
class Greeting {
fun greeting(): String = "Hello, ${platformName()}"
}
shared/src/androidMain/kotlin/android.kt
package com.iosdevlog
actual fun platformName(): String {
return "Android"
}
shared/src/ios/kotlin/ios.kt
package com.iosdevlog
import platform.UIKit.UIDevice
actual fun platformName(): String {
return UIDevice.currentDevice.systemName()
}
Gradle/shared/Tasks/build/build
Shared code from Android 来自 Android 的共享代码
androidApp/build.gradle
plugins {
id 'com.android.application'
id 'kotlin-android'
id 'kotlin-android-extensions'
}
android {
// ...
packagingOptions {
exclude 'META-INF/*.kotlin_module'
}
}
dependencies {
implementation fileTree(dir: 'libs', include: ['*.jar'])
implementation project(':shared')
// ...
}
androidApp/src/main/res/layout/activity_main.xml
android:id="@+id/greeting"
The iOS app
mkdir iosApp
Xcode 12.2: File / New / Project / iOS / App / Next / SwiftUI
Packing the iOS framework
shared/build.gradle.kts
val packForXcode by tasks.creating(Sync::class) {
val targetDir = File(buildDir, "xcode-frameworks")
/// selecting the right configuration for the iOS
/// framework depending on the environment
/// variables set by Xcode build
val mode = System.getenv("CONFIGURATION") ?: "DEBUG"
val framework = kotlin.targets
.getByName<KotlinNativeTarget>("ios")
.binaries.getFramework(mode)
inputs.property("mode", mode)
dependsOn(framework.linkTask)
from({ framework.outputDirectory })
into(targetDir)
doLast {
val gradlew = File(targetDir, "gradlew")
gradlew.writeText("#!/bin/bash\n"
+ "export 'JAVA_HOME=${System.getProperty("java.home")}'\n"
+ "cd '${rootProject.rootDir}'\n"
+ "./gradlew \$@\n")
gradlew.setExecutable(true)
}
}
tasks.getByName("build").dependsOn(packForXcode)
Shared Gradle build
$ ls -l shared/build/xcode-frameworks
total 8
-rwxr--r-- 1 iosdevlog wheel 140 12 11 14:03 gradlew
drwxr-xr-x 6 iosdevlog wheel 192 12 11 14:03 shared.framework
drwxr-xr-x 3 iosdevlog wheel 96 12 11 14:03 shared.framework.dSYM
General / Embedded Binaries / Add Other / shared/build/xcode-frameworks/shared.framework
Build Settings / Enable Bitcode: NO
Build Settings / Framework Search Paths / $(SRCROOT)/../../shared/build/xcode-frameworks
Build Phases / Run Script
cd "$SRCROOT/../../shared/build/xcode-frameworks"
./gradlew :shared:build -PXCODE_CONFIGURATION=${CONFIGURATION}
Shared code from iOS
ContentView.swift
import SwiftUI
import shared
struct ContentView: View {
var body: some View {
Text(Greeting().greeting())
.padding()
}
}
struct ContentView_Previews: PreviewProvider {
static var previews: some View {
ContentView()
}
}
要点
- Kotlin Multiplatform 是跨平台应用程序开发的一种快速发展的新方法。
- KMP 使您可以在 iOS,Android,Web,服务器等之间共享Kotlin代码。
- KMP 有许多优点,包括开发人员熟悉 Kotlin,原生性能,原生 UI 代码以及将您的应用程序业务逻辑合并到所有平台上的共享模块中。
- 您可以使用期望关键字和实际关键字在共享代码中创建一个公共接口,该接口依赖于所需的不同平台上的具体实现。