07 - Lists
Multiple checklists 多个核对清单
The steps for this section are: 这一期的步骤是
- Add a new screen that shows all the checklists.
- 添加一个新的屏幕显示所有的清单。
- Create a screen that lets users add/edit checklists.
- 创建一个屏幕,用户可以添加/编辑清单。
- Show the to-do items that belong to a particular checklist when you tap the name of that list.
- 当你点击列表的名称时显示待办项属于一个特定的清单。
- Save all the checklists to a file and load them in again.
- 保存所有清单文件并再次加载它们。
Two new screens means two new view controllers:
- AllListsViewController shows all the user’s lists, and
- ListDetailViewController allows adding a new list and editing the name and icon of an existing list.
In AllListsViewController.swift, remove the numberOfSectionsInTableView() method. Without it, there will always be a single section in the table view.
Change the tableView(numberOfRowsInSection) method to:
override func tableView(tableView: UITableView, numberOfRowsInSection section: Int) -> Int {
    return 3
}
Implement the tableView(cellForRowAtIndexPath) method to put some text into the cells, just so there is something to see. Note that the template already contains a commented-out version of this method. You can uncomment it by removing the /* and */ surrounding the method, and make your changes there.
override func tableView(tableView: UITableView, cellForRowAtIndexPath indexPath: NSIndexPath) -> UITableViewCell {
    let cell = cellForTableView(tableView)
    cell.textLabel!.text = "List \(indexPath.row)"
    return cell
}
In ChecklistViewController the table view used prototype cells that you designed in Interface Builder. Just for the fun of it, in AllListsViewController you are taking a different approach where you’ll create the cells in code instead.
That requires you to add the following helper method:
func cellForTableView(tableView: UITableView) -> UITableViewCell {
    let cellIdentifier = "Cell"
    if let cell = tableView.dequeueReusableCellWithIdentifier(cellIdentifier) {
        return cell
    } else {
        return UITableViewCell(style: .Default, reuseIdentifier: cellIdentifier)
    }
}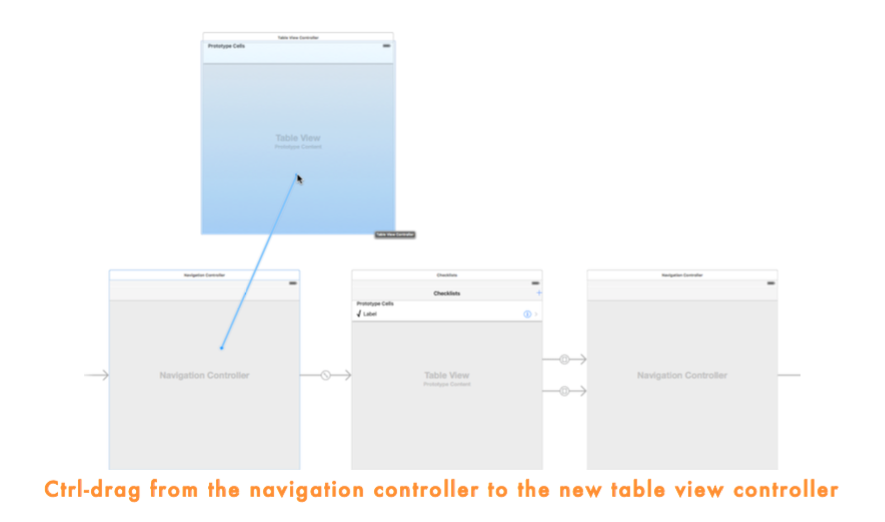
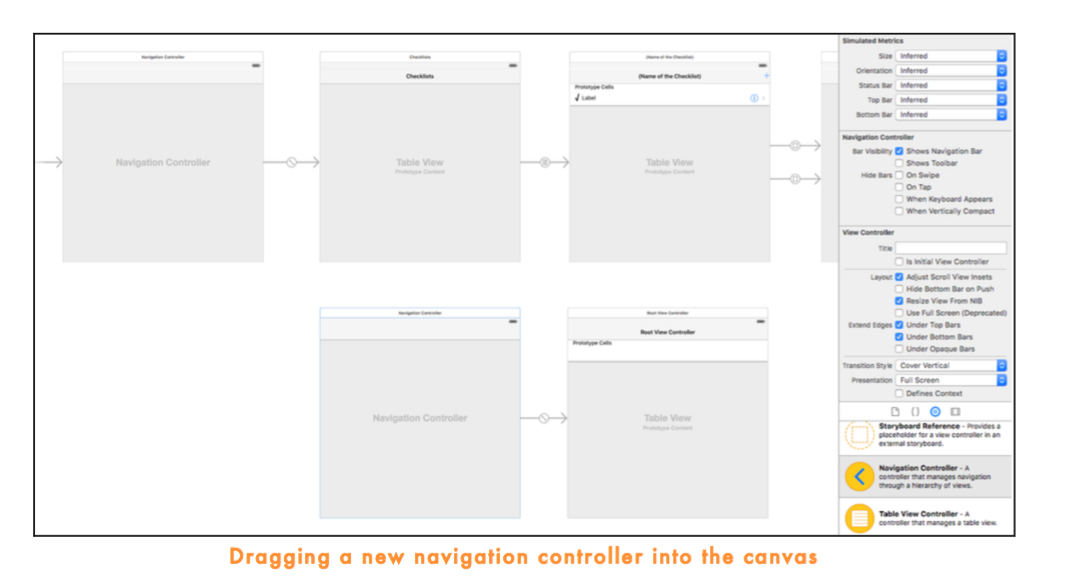
Select the new table view controller and set its Class in the Identity inspector to AllListsViewController.
Double-click the view controller’s navigation bar and change its title to Checklists.
Delete the empty prototype cell from the All Lists View Controller. (Simply select the Table View Cell and press delete on your keyboard.)
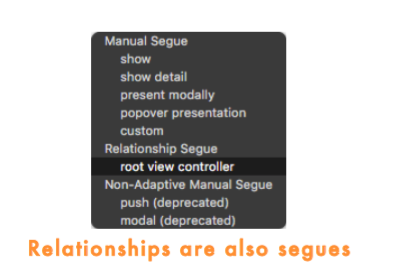
Ctrl-drag from the yellow circle icon at the top of All Lists View Controller into the Checklist View Controller and create a show segue.
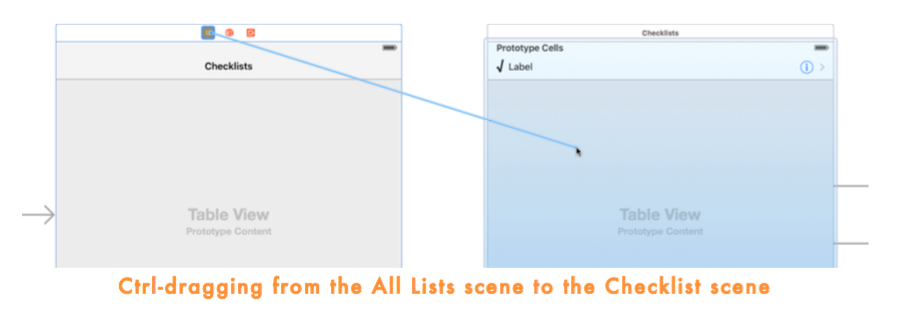
Note that the new segue isn’t attached to any button or table view cell.
注意新的 segue 并没有与任何 button 或者 TableViewCell 关联。
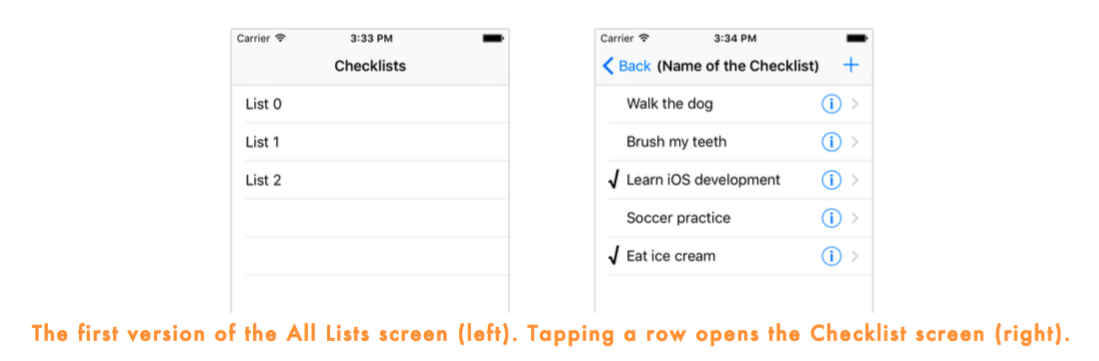
In AllListsViewController.swift, add the tableView(didSelectRowAtIndexPath) method:
override func tableView(tableView: UITableView, didSelectRowAtIndexPath indexPath: NSIndexPath) {
    performSegueWithIdentifier("ShowChecklist", sender: nil)
}
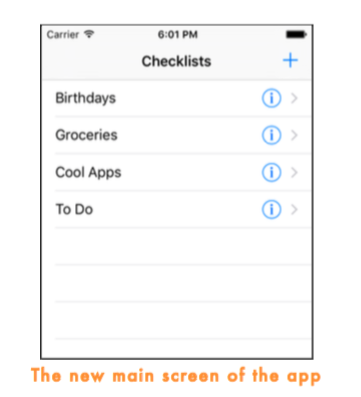
Putting lists into the All Lists screen
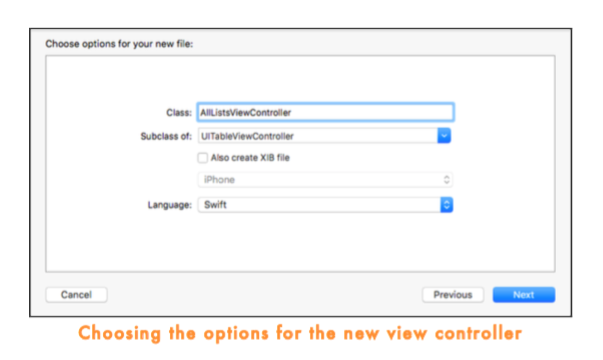
Add a new file to the project based on the Cocoa Touch Class template. Name it Checklist and make it a subclass of NSObject.
Give Checklist.swift a name property:
import UIKit

class Checklist: NSObject {
    var name = ""
}
Add a new instance variable to AllListsViewController.swift:
var lists: [Checklist]In AllListsViewController.swift you could add the following init?(coder) method (don’t actually add it just yet, just read along with the description):
required init?(coder aDecoder: NSCoder) {
    // 1
    lists = [Checklist]()

    // 2
    super.init(coder: aDecoder)

    // 3
    var list = Checklist()
    list.name = "Birthdays"
    lists.append(list)

    // 4
    list = Checklist()
    list.name = "Groceries"
    lists.append(list)

    list = Checklist()
    list.name = "Cool Apps"
    lists.append(list)

    list = Checklist()
    list.name = "To Do"
    lists.append(list)
}- Give the lists variable a value. You can also write this as lists = Array
() – that does the exact same thing. I just like the square brackets better. - Call super’s version of init?(coder). Without this, the view controller won’t be properly loaded from the storyboard. But don’t worry too much about forgetting to call super; if you don’t, Xcode gives an error message.
- Create a new Checklist object, give it a name, and add it to the array.
- Here you create three more Checklist objects. Because you declared the local variable list as var instead of let, you can re-use it.
Go to Checklist.swift and add the new init method:
init(name: String) {
    self.name = name
    super.init()
}
Go back to AllListsViewController.swift and add init?(coder), for real this time:
required init?(coder aDecoder: NSCoder) {
    lists = [Checklist]()

    super.init(coder: aDecoder)

    var list = Checklist(name: "Birthdays")
    lists.append(list)

    list = Checklist(name: "Groceries")
    lists.append(list)

    list = Checklist(name: "Cool Apps")
    lists.append(list)

    list = Checklist(name: "To Do")
    lists.append(list)
}
Change the tableView(numberOfRowsInSection) method to return the number of objects in the new array:
override func tableView(tableView: UITableView, numberOfRowsInSection section: Int) -> Int {
    return lists.count
}
Finally, change tableView(cellForRowAtIndexPath) to fill in the cells for the rows:
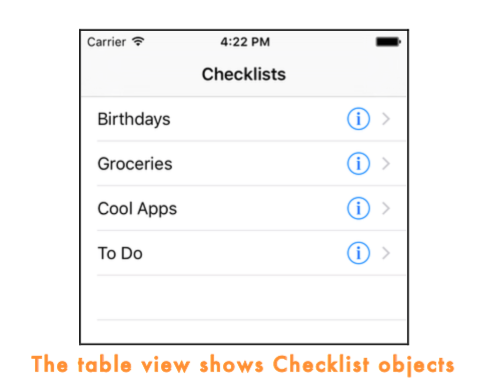
override func tableView(tableView: UITableView, cellForRowAtIndexPath indexPath: NSIndexPath) -> UITableViewCell {
    let cell = cellForTableView(tableView)

    let checklist = lists[indexPath.row]
    cell.textLabel!.text = checklist.name
    cell.accessoryType = .DetailDisclosureButton

    return cell
}
There are four ways that you can make table view cells: 以下有四种方式创建 TableViewCell
- Using prototype cells. This is the simplest and quickest way. You did this in ChecklistViewController. 使用原型 Cell(动态)
- Using static cells. You did this for the Add/Edit Item screen. Static cells are limited to screens where you know in advance which cells you’ll have. The big advantage with static cells is that you don’t need to provide any of the data source methods (cellForRowAtIndexPath and so on). 使用静态 Cell
- Using a nib file. A nib (also known as a XIB) is like a mini storyboard that only contains a single customized UITableViewCell object. This is very similar to using prototype cells, except that you can do it outside of a storyboard. 使用 nib 文件
- By hand, what you did above. This is how you were supposed to do it in the early days of iOS. Chances are you’ll run across code examples that do it this way, especially from older articles and books. It’s a bit more work but also offers you the most flexibility. 手工创建(开发 iOS 早期使用)
Viewing the checklists
Add a new instance variable to ChecklistViewController.swift:
var checklist: Checklist!Change the viewDidLoad() method in ChecklistViewController.swift to:
override func viewDidLoad() {
    super.viewDidLoad()

    title = checklist.name
}
In AllListsViewController.swift, update tableView(didSelectRowAtIndexPath) to the following:
override func tableView(tableView: UITableView, didSelectRowAtIndexPath indexPath: NSIndexPath) {
let checklist = lists[indexPath.row]
performSegueWithIdentifier("ShowChecklist", sender: checklist)
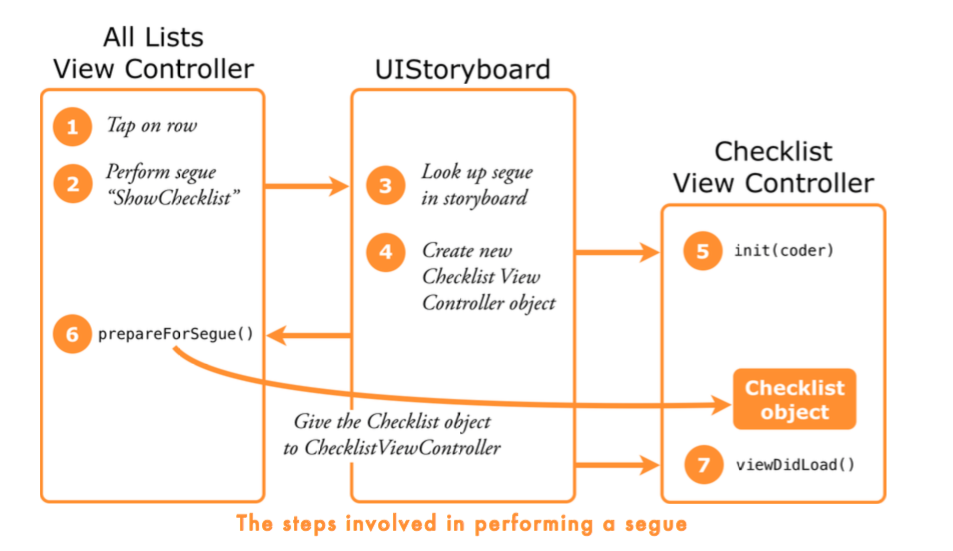
}Add the prepareForSegue(sender) method to AllListsViewController.swift:
override func prepareForSegue(segue: UIStoryboardSegue, sender: AnyObject?) {
    if segue.identifier == "ShowChecklist" {
        let controller = segue.destinationViewController as! ChecklistViewController
        controller.checklist = sender as! Checklist
    }
}

Adding and editing checklists
Add a new file to the project, ListDetailViewController.swift. You can either use the Cocoa Touch Class template or the Swift File template for this.
Replace the contents of ListDetailViewController.swift with:
import UIKit

protocol ListDetailViewControllerDelegate: class {
func listDetailViewControllerDidCancel(controller: ListDetailViewController)
func listDetailViewController(controller: ListDetailViewController, didFinishAddingChecklist checklist: Checklist)
func listDetailViewController(controller: ListDetailViewController, didFinishEditingChecklist checklist: Checklist)
}

class ListDetailViewController: UITableViewController, UITextFieldDelegate {
    @IBOutlet weak var doneBarButton: UIBarButtonItem!
    @IBOutlet weak var textField: UITextField!

    weak var delegate: ListDetailViewControllerDelegate?

    var checklistToEdit: Checklist?
}
Add the viewDidLoad() method:
override func viewDidLoad() {
    super.viewDidLoad()

    if let checklist = checklistToEdit {
        title = "Edit Checklist"
        textField.text = checklist.name
        doneBarButton.enabled = true
    }
}
Also add the viewWillAppear() method to pop up the keyboard:
override func viewWillAppear(animated: Bool) {
    super.viewWillAppear(animated)

    textField.becomeFirstResponder()
}
Add the action methods for the Cancel and Done buttons:
@IBAction func cancel() {
    delegate?.listDetailViewControllerDidCancel(self)
}

@IBAction func done() {
    if let checklist = checklistToEdit {
        checklist.name = textField.text!
        delegate?.listDetailViewController(self, didFinishEditingChecklist: checklist)
    } else {
        let checklist = Checklist(name: textField.text!)
        delegate?.listDetailViewController(self, didFinishAddingChecklist: checklist)
    }
}
Also make sure the user cannot select the table cell with the text field:
override func tableView(tableView: UITableView, willSelectRowAtIndexPath indexPath: NSIndexPath) -> NSIndexPath? {
    return nil
}
And finally, add the text field delegate method that enables or disables the Done button depending on whether the text field is empty or not.
func textField(textField: UITextField, shouldChangeCharactersInRange range: NSRange, replacementString string: String) -> Bool {
    let oldText: NSString = textField.text!
    let newText: NSString = oldText.stringByReplacingCharactersInRange( range, withString: string)
    doneBarButton.enabled = (newText.length > 0)

    return true
}
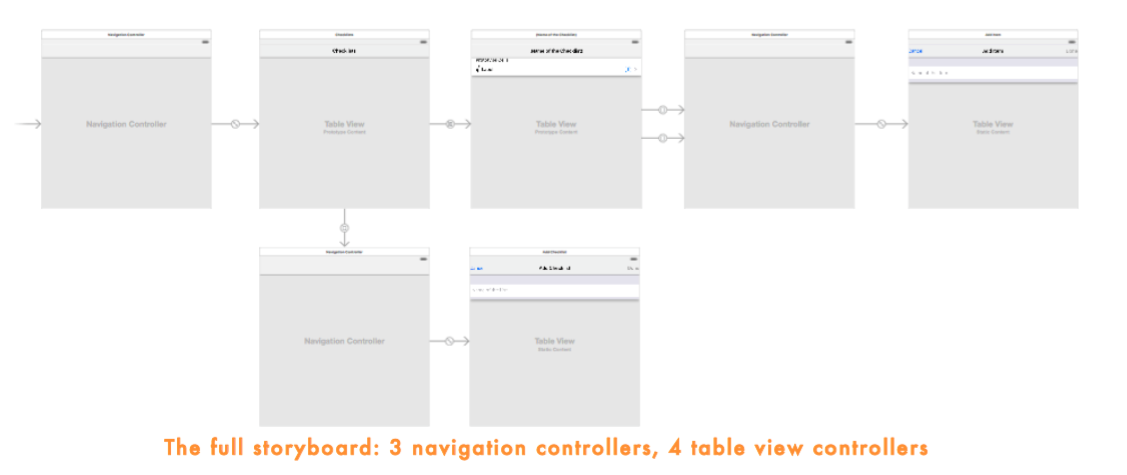
Select the new Table View Controller (the one named “Root View Controller”) and go to the Identity inspector. Change its class to ListDetailViewController.
Change the navigation bar title from “Root View Controller” to Add Checklist.
(If double-clicking the navigation bar doesn’t work, select the Root View Controller navigation item in the outline pane and use the Attributes inspector.)
Add Cancel and Done bar button items and hook them up to the action methods in the view controller. Also connect the Done button to the doneBarButton outlet and uncheck its Enabled option.
Change the table view to Static Cells, style Grouped. You only need one cell, so remove the bottom two.
Drop a new Text Field into the cell. Here are the configuration options:
- Border Style: none
- Font size: 17
- Placeholder text: Name of the List o Adjust to Fit: disabled
- Capitalization: Sentences
- Return Key: Done
- Auto-enable Return key: check
Ctrl-drag from the view controller to the Text Field and connect it to the textField outlet.
Then Ctrl-drag the other way around, from the Text Field back to the view controller, and choose delegate under Outlets. Now the view controller is the delegate for the text field.
Connect the text field’s Did End on Exit event to the done action on the view controller.

Declare the All Lists view controller to conform to the delegate protocol by adding ListDetailViewControllerDelegate to its class line.
class AllListsViewController: UITableViewController, ListDetailViewControllerDelegate {Also in AllListsViewController.swift, first extend prepareForSegue to:
override func prepareForSegue(segue: UIStoryboardSegue, sender: AnyObject?) {
    if segue.identifier == "ShowChecklist" {
        // ...
    } else if segue.identifier == "AddChecklist" {
        let navigationController = segue.destinationViewController as! UINavigationController
        let controller = navigationController.topViewController as! ListDetailViewController
        controller.delegate = self
        controller.checklistToEdit = nil
    }
}
At the bottom of the AllListsViewController.swift, implement the following delegate methods.
func listDetailViewControllerDidCancel(controller: ListDetailViewController) {
dismissViewControllerAnimated(true, completion: nil)
}
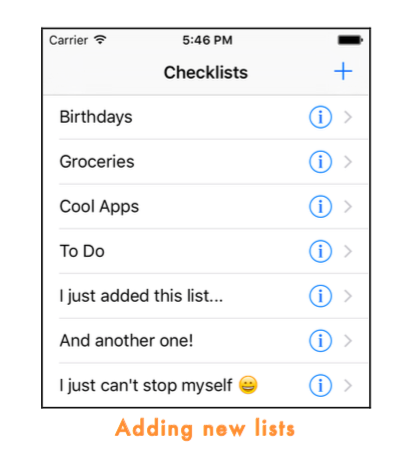
func listDetailViewController(controller: ListDetailViewController, didFinishAddingChecklist checklist: Checklist) {
let newRowIndex = lists.count lists.append(checklist)
let indexPath = NSIndexPath(forRow: newRowIndex, inSection: 0)
let indexPaths = [indexPath] tableView.insertRowsAtIndexPaths(indexPaths, withRowAnimation: .Automatic)
dismissViewControllerAnimated(true, completion: nil)
}
func listDetailViewController(controller: ListDetailViewController, didFinishEditingChecklist checklist: Checklist) {
if let index = lists.indexOf(checklist) {
let indexPath = NSIndexPath(forRow: index, inSection: 0)
if let cell = tableView.cellForRowAtIndexPath(indexPath) {
cell.textLabel!.text = checklist.name
}
}
dismissViewControllerAnimated(true, completion: nil)
}
Also add the table view data source method that allows the user to delete checklists:
override func tableView(tableView: UITableView, commitEditingStyle editingStyle: UITableViewCellEditingStyle, forRowAtIndexPath indexPath: NSIndexPath) {
    lists.removeAtIndex(indexPath.row)

    let indexPaths = [indexPath]
    tableView.deleteRowsAtIndexPaths(indexPaths, withRowAnimation: .Automatic)
}
Add the tableView(accessoryButtonTappedForRowWithIndexPath) method to AllListsViewController.swift.
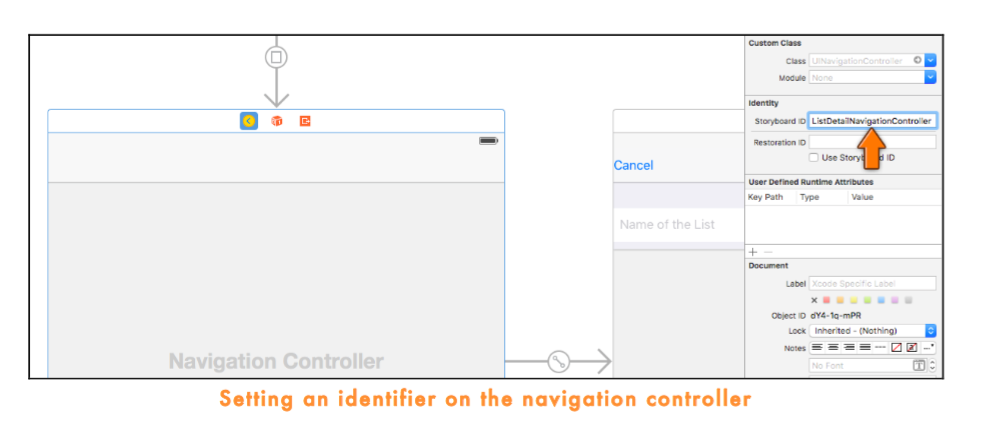
override func tableView(tableView: UITableView, accessoryButtonTappedForRowWithIndexPath indexPath: NSIndexPath) {
    let navigationController = storyboard!.instantiateViewControllerWithIdentifier("ListDetailNavigationController") as! UINavigationController

    let controller = navigationController.topViewController as! ListDetailViewController
    controller.delegate = self

    let checklist = lists[indexPath.row]
    controller.checklistToEdit = checklist

    presentViewController(navigationController, animated: true, completion: nil)
}