第1章 Interface Bundle 概要
Bundle
一种标准化的层次结构,保存了可执行代码及代码所需要的资源。
nib
Next Interface Builder
Interface Builder 的优点
- 开发和维护效率高
- 减少大量的 UI 代码和“胶水代码”
- 适配变得十分简单
- IB 也可以做一些非 UI 的事情
- 利用 IB 学习控件可以达到事半功倍的效果
Interface Builder 的缺点
- IB 的执行效率没有纯代码高
- 使用 IB 开发的过程中容易出现一些小问题
- 有一定的学习成本
- 文件易冲突
- 没有代码表达清晰
- 不利于代码的封闭和工程架构的组织
Interface Builder 学习的特点
- 简单,容易入门
- 容易犯错误
- 有很多的“坑”,需要积累属于自己的经验
Interface Builder 的发展
xib -> sb -> AutoLayout -> LaunchScreen.storyboard
苹果越来越重视 IB。
CocoaPods
# 1 最新版本
pod 'AFNetworking'

# 2 最新的2.x版本
pod 'AFNetworking', '~>2.5.3'

# 3 指定版本
pod 'AFNetworking', '2.5.3'
试用
$ pod try AFNetworking
Podfile文件与CocoaPods的三种依赖方式
- 远程依赖
# master
pod 'Alamofile', :git => 'https://github.com/Alamofile/Alamofile.git'

# branch
pod 'Alamofile', :git => 'https://github.com/Alamofile/Alamofile.git', :branch -> 'dev'

# commit
pod 'Alamofile', :git => 'https://github.com/Alamofile/Alamofile.git', :commit => '0f506b1c45'
- 本地依赖
pod 'AFNetworking', :path => '../externals/libs/AFNetworking'
- 私有依赖
pod 'AFNetworking', :podspec => '../externals/libs/AFNetworking.podspec'
“:podspec=>”用于指定本地的一个xxx.podspec文件。
podspec文件
$ pod init
$ cat Podfile
第2章 使用 Interface Builder
解决冲突
- 解决普通IB文件冲突
Open As -> Source Code
<<<<<<<

=======

>>>>>>>
编辑好,再删除这三行就可以了。
- 解决 Xcode 8 引起的 IB 文件冲突
如果用 Source Code 不能打开,就用文件编辑器(vim, etc)打开,把systemVersion等冲突解决。
关联 xib 文件与源文件
- 关联 xib 文件与 UIView 子类的源文件
- 新建一个空的xib文件,拖一个UIView上去
- 新建一个继承自UIView的源文件
- 选中xib文件里的View,把class改为上面
@IBOutlet 与 @IBAction
连线
设计模式之MVC

理解 File’s Owner
关联 xib 文件与 UIViewController 子类的源文件
- 自定义一个 VC 的 View 的两种方法
- 在 IB 文件中选中 VC 所在的 View,在 Show the Identity inspector 中设置 Class 标签的值为自定义的 View 的类名。
- 在源文件的 loadView() 方法里设置该 VC 的 View 属性为这个自定义的 View。
override func loadView() {
    self.view = CustomView.init(frame: UIScreen.main.bounds)
}
-
File’s Owner 指向 VC
-
VC 的 View 连线
xib 既可以与 UIView 关联,也可以与 UIViewController 关联,也可以同时关联 UIView 与 UIViewController
使用 xib
- 通过 Bundle 方式加载
- 通过 UINib 方式加载
使用与UIView子类源文件关联的xib
Bundle
- (NSArray *)loadNibNamed:(NSString *)name
                    owner:(id)owner
                  options:(NSDictionary *)options;
func loadNibNamed(_ name: String,
            owner: Any?,
          options: [AnyHashable : Any]? = nil) -> [Any]?
Parameters 参数
- name The name of the nib file, which need not include the .nib extension. nib名称
- owner The object to assign as the nib’s File’s Owner object. 如果xib文件有File’s Owner,一定传其实例对象,否则传nil
- options A dictionary containing the options to use when opening the nib file. For a list of available keys for this dictionary, see UIKit Nib Loading Options.
Bundle Demo
let testView = Bundle.main.loadNibNamed("TestView", owner: nil, options: nil)?[0] as! UIView
view.addSubview(testView)
UINib
NS_CLASS_AVAILABLE_IOS(4_0) @interface UINib : NSObject

// If the bundle parameter is nil, the main bundle is used.
// Releases resources in response to memory pressure (e.g. memory warning), reloading from the bundle when necessary.
+ (UINib *)nibWithNibName:(NSString *)name bundle:(nullable NSBundle *)bundleOrNil;

// If the bundle parameter is nil, the main bundle is used.
+ (UINib *)nibWithData:(NSData *)data bundle:(nullable NSBundle *)bundleOrNil;

// Returns an array containing the top-level objects from the NIB.
// The owner and options parameters may both be nil.
// If the owner parameter is nil, connections to File's Owner are not permitted.
// Options are identical to the options specified with -[NSBundle loadNibNamed:owner:options:]
- (NSArray *)instantiateWithOwner:(nullable id)ownerOrNil options:(nullable NSDictionary *)optionsOrNil;
@end
@available(iOS 4.0, *)
open class UINib : NSObject {


    // If the bundle parameter is nil, the main bundle is used.
    // Releases resources in response to memory pressure (e.g. memory warning), reloading from the bundle when necessary.
    public /*not inherited*/ init(nibName name: String, bundle bundleOrNil: Bundle?)


    // If the bundle parameter is nil, the main bundle is used.
    public /*not inherited*/ init(data: Data, bundle bundleOrNil: Bundle?)


    // Returns an array containing the top-level objects from the NIB.
    // The owner and options parameters may both be nil.
    // If the owner parameter is nil, connections to File's Owner are not permitted.
    // Options are identical to the options specified with -[NSBundle loadNibNamed:owner:options:]
    open func instantiate(withOwner ownerOrNil: Any?, options optionsOrNil: [AnyHashable : Any]? = nil) -> [Any]
}
UINib Demo
let testViewNib = UINib.init(nibName: "TestView", bundle: Bundle.main)
func loadTestView() {
    let testView = UINib.instantiate(withOwner: nil, options: nil)[0] as! UIView
    view.addSubview(testView)
}
使用与 UIViewController 子类源文件关联的 xib
Demo HomeViewController.swift <==> HomeController.xib
let homeVC = HomeViewController()
class HomeViewController {
    var aName: String?

    override init(nibName nibNameOrNil: String?, bundle nibBundleOrNil: Bundle?) {
        super.init(nibName: "HomeController", bundle: nil)
    }

    init(aName: String) {
        name = aName
        super.init(nibName: "HomeController", bundle: nil)
    }

    required init?(coder aDecoder: NSCoder) {
        fatalError("init(coder:) has not been implemented")
    }
}
嵌套 xib
https://github.com/iOSDevLog/iOSDevLog/tree/master/228.%20NestedXib


使用 storyboard
@available(iOS 5.0, *)
open class UIStoryboard : NSObject {


    public /*not inherited*/ init(name: String, bundle storyboardBundleOrNil: Bundle?)


    open func instantiateInitialViewController() -> UIViewController?

    open func instantiateViewController(withIdentifier identifier: String) -> UIViewController
}
storyboard Demo
extension UIViewController {
    class func storyboardID() -> String {
        return String(describing: self)
    }
}

let userStoryBoard = UIStoryboard(name: "User", bundle: nil)
let profileVC = userStoryBoard.instantiateInitialViewController(withIdentifier: ProfileController.storyboardID())
第3章 全面学习 xib
Autoresizing
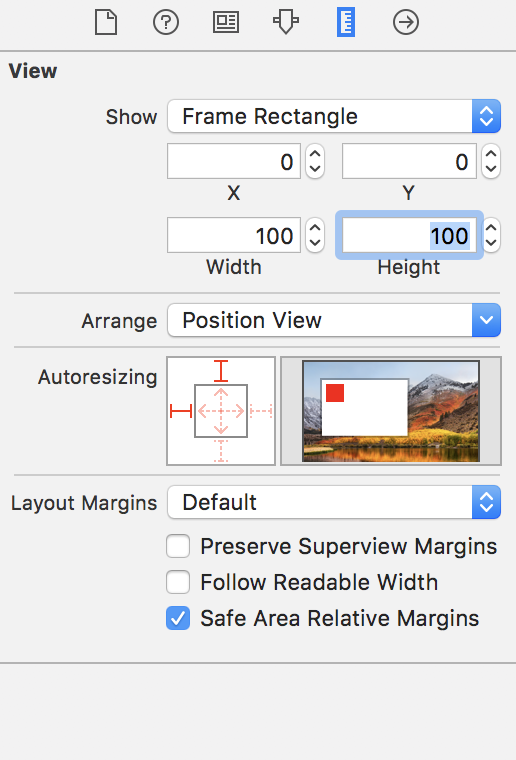
默认选中左,上。
对应代码为:
testView.autoresizingMask = [.flexibleRightMargin, .flexibleBottomMargin]
外框的 上、下、左、右如果选中,则UIView的边框与父View边框距离保持不变。
中间带箭头的选中表示UIView边框是随屏幕尺寸变化的。 否则UIView大小保持不变。
也可以看右侧的动画查看显示效果。
第4章 在 Interface Builder 中使用 Auto Layout
在 IB 中使用 Auto Layout 的优缺点
- 设置约束十分简单
- 如果约束不恰当,IB 提供很好的实时反馈
-
如果约束不恰当,IB 可以帮忙改正。改正操作十分简单、方便、快捷。
- 难以理解
约束
Auto Layout 的数学公式
item1.attribute1 = multiplier * item2.attribute2 + constant
约束属性
public enum NSLayoutAttribute : Int {
    case left
    case right
    case top
    case bottom
    case leading
    case trailing
    case width
    case height
    case centerX
    case centerY
    case lastBaseline
    @available(iOS 8.0, *)
    case firstBaseline
    @available(iOS 8.0, *)
    case leftMargin
    @available(iOS 8.0, *)
    case rightMargin
    @available(iOS 8.0, *)
    case topMargin
    @available(iOS 8.0, *)
    case bottomMargin
    @available(iOS 8.0, *)
    case leadingMargin
    @available(iOS 8.0, *)
    case trailingMargin
    @available(iOS 8.0, *)
    case centerXWithinMargins
    @available(iOS 8.0, *)
    case centerYWithinMargins
    case notAnAttribute
}
约束关系
public enum NSLayoutRelation : Int {
    case lessThanOrEqual
    case equal
    case greaterThanOrEqual
}
约束的优先级
public struct UILayoutPriority : RawRepresentable, Equatable, Hashable {
    public init(_ rawValue: Float)
    public init(rawValue: Float)
}

extension UILayoutPriority {
    @available(iOS 6.0, *)
    public static let required: UILayoutPriority

    @available(iOS 6.0, *)
    public static let defaultHigh: UILayoutPriority // This is the priority level with which a button resists compressing its content.

    @available(iOS 6.0, *)
    public static let defaultLow: UILayoutPriority // This is the priority level at which a button hugs its contents horizontally.

    @available(iOS 6.0, *)
    public static let fittingSizeLevel: UILayoutPriority // When you send -[UIView systemLayoutSizeFittingSize:], the size fitting most closely to the target size (the argument) is computed.  UILayoutPriorityFittingSizeLevel is the priority level with which the view wants to conform to the target size in that computation.  It's quite low.  It is generally not appropriate to make a constraint at exactly this priority.  You want to be higher or
    lower.
}
Instrinsic Size 固有尺寸
默认设置了 Width 和 Height
Content Compression Resistance 压缩阻力
Content Hugging 内容吸附
NSLayoutConstraint 与 @IBOutlet 连线
设置约束的方法
- 在 IB 中设置 - 推荐
- 苹果原生 API - 最复杂,强烈不推荐
- 用 VFL (Visual Format Language) 设置约束 - 不推荐
- 第三方库(Masonry等)设置约束 - 代码设置最简单、最常用 推荐(如果不熟悉 Auto Layout)
UIStackView
Axis
- Vertical: 竖直布局
- Horizontal: 水平布局
Alignment
- Fill
- Top
- Leading
- Center
- Bottom
- Trailing
- First Baseline
- Last Base Line
Distribution
- Fill
- Fill Equal
- Fill Proportionally
- Equal Spacing
- Equal Centering
Space
Baseline Relative
FDStackView
NSUUID https://gist.github.com/OliverLetterer/4643294
Auto Layout 的异类 - UIScrollView
UIScrollView 的子 View 需要设置 6 个约束
scrollView.contentSize.width = subView.leading + subView.width + subView.trailing;
scrollView.contentSize.height = subView.top + subView.height+ subView.bottom;
设置 ScrollView 的子 View 约束时一定要让系统确定 ScrollView 的 contentSize。
第5章 storyboard 全面学习
Extra View
segue
Embed Segue
Unwind Segue
Launch Screen
https://github.com/iOSDevLog/iOSDevLog/tree/master/229.%20ScreenLunch
@interface AppDelegate ()

@property (nonatomic, strong) UIWindow* launchWindow;

@end

@implementation AppDelegate

- (BOOL)application:(UIApplication *)application didFinishLaunchingWithOptions:(NSDictionary *)launchOptions {
    self.launchWindow = [[UIWindow alloc] initWithFrame:UIScreen.mainScreen.bounds];
    self.launchWindow.hidden = NO;
    self.launchWindow.windowLevel = UIWindowLevelNormal + 1;
    self.launchWindow.rootViewController = [UIStoryboard storyboardWithName:@"Launch Screen" bundle:nil].instantiateInitialViewController;
    [UIView animateWithDuration:3 delay:0.5 options: UIViewAnimationOptionCurveEaseInOut animations:^{
        self.launchWindow.alpha = 0;
    } completion:^(BOOL finished) {
        self.launchWindow.hidden = YES;
        self.launchWindow.windowLevel = UIWindowLevelNormal - 1;
        self.launchWindow.alpha = 1;
    }];

    return YES;
}
@end
var launchWindow: UIWindow?

func application(_ application: UIApplication, didFinishLaunchingWithOptions launchOptions: [UIApplicationLaunchOptionsKey: Any]?) -> Bool {
    launchWindow = UIWindow(frame: UIScreen.main.bounds)
    launchWindow?.windowLevel = UIWindowLevelNormal + 1
    launchWindow?.isHidden = false
    launchWindow?.rootViewController = UIStoryboard(name: "LaunchScreen", bundle: nil).instantiateInitialViewController()
    UIView.animate(withDuration: 0.5, delay: 3, options: .curveEaseInOut, animations: {
        self.launchWindow?.alpha = 0
    }) { (finish) in
        if finish {
            self.launchWindow?.isHidden = true
            self.launchWindow?.windowLevel = UIWindowLevelNormal - 1
            self.launchWindow?.alpha = 1
        }
    }
    return true
}
第6章 Interface Builder 进阶
Use Trait Variations
| 设备 | 竖屏 | 横屏 |
|---|---|---|
| 3.5 iPhone | wC hR | wC hC |
| 4.0 iPhone | wC hR | wC hC |
| 4.7 iPhone | wC hR | wC hC |
| 5.5 iPhone | wC hR | wR hC |
| iPad | wR hR | wR hR |
User Define Runtime Attribute
| IB 中的类型 | Swift | Objective-C |
|---|---|---|
| Boolean | Bool | BOOL |
| Number | + | + |
| String | String | NSString |
| Localized String | String | NSString |
| Point | CGPoint | CGPoint |
| Size | CGSize | CGSize |
| Rect | CGRect | CGRect |
| Range | Range | NSRange |
| Color | UIColor | UIColor |
| Image | UIImage | UIImage |
| Nil | Nil | Nil |
Number 在 Swift 里面可以对应 Int、Double、Float。 在 Objective-C 里面可以对应 NSInteger、NSNumber 等。
extension UIView {
    var borderColor: UIColor {
        set {
            self.layer.borderColor = newValue.cgColor
        }
        get {
            return UIColor.init(cgColor: self.layer.borderColor!)
        }
    }
}
IB 文件的加载过程
Bundle 和 UINib
- 将 nib 加载到内存
- 解固化并实例化 nib 文件里对应的对象
- 建立 connections (outlet、action)
- 调用 awakeFromNib() 方法
- 将 nib 中可见的控件显示出来
本地化
两种策略
- App 本地化跟随系统语言
- App 内部有一个可以设置语言的选项
本地化介绍
Base
文本的本地化
- 利用 NSLocalizedString。 新建 Localizable.strings 文件
Localizable.strings(English)
"test" = "hello world";
Localizable.strings(Chinese(Simplified))
"test" = "你好,世界";
override func viewDidLoad() {
    super.viewDidLoad()
    // Localizable.string
    testLabel.text = NSLocalizedString("test", comment: "")
    // Home.strings
    // testLabel.text = NSLocalizedString("test", tableName: "Home", comment: "")
}
Info.plist 的本地化
新建 InfoPlist.strings,在 Show the File inspector 点击 Localize…
InfoPlist.strings(English)
CFBundleName = "hello world";
CFBundleDisplayName = "hello world";
InfoPlist.strings(Chinese(Simplified))
CFBundleName = "你好,世界";
CFBundleDisplayName = "你好,世界";
图片资源的本地化
- 方法1
Localizable.strings(English)
"testImageName" = "1";
Localizable.strings(Chinese(Simplified))
"testImageName" = "2";
testImageView.image = UIImage.init(named: NSLocalizedString("testImageName", comment: "")
- 方法2
选中图片,Show the File inspector 点击 localize…,替换 zh-Hans.lproj 中的资源文件。
App 内设置语言的本地化
https://github.com/iOSDevLog/iOSDevLog/tree/master/230.%20Localizations
extension Bundle {
    class func loadLocalizableString(languageBundleName: String, key: String) -> String? {
        let languageBundlePath = Bundle.main.path(forResource: languageBundleName, ofType: "lproj")

        guard languageBundlePath != nil else {
            return nil
        }

        let languageBundle = Bundle.init(path: languageBundlePath!)
        guard languageBundle != nil else {
            return nil
        }

        let value = languageBundle?.localizedString(forKey: key, value: "", table: "")

        return value
    }
}

func changeLanguage() {
    let kTestKey = "testKey"

    switch selectIndex {
    case 0:
        testLabel.text = Bundle.loadLocalizableString(languageBundleName: Language.simplifiedChinese.rawValue, key: kTestKey)
        break
    case 1:
        testLabel.text = Bundle.loadLocalizableString(languageBundleName: Language.english.rawValue, key: kTestKey)
        break
    case 2:
        testLabel.text = Bundle.loadLocalizableString(languageBundleName: Language.japanese.rawValue, key: kTestKey)
        break
    case 3:
        testLabel.text = Bundle.loadLocalizableString(languageBundleName: Language.korea.rawValue, key: kTestKey)
        break
    default:
        break
    }
}
Storyboard Reference 的使用
使用 RBStoryboardLink https://github.com/rob-brown/RBStoryboardLink
用 Object 重构 “神VC”
代码量庞大、结构臃肿、可维护性差的 VC。
使用 Object
- 通常 VC 会成为很多对象的 delegate,需要处理很多回调。用 Object 替 VC 实现 delegate。
- 将一些能用需求或交互模块化在对应的 Object 里。将需求或交互与 VC 解耦。
用 External Object 重构 VC
只能在于 xib
IB 中的关键字总结
Swift
- @IBAction
- @IBOutlet
- @IBDesignable
- @IBInspectable
Objective-C
- IBAction
- IBOutlet
- IB_DESIGNABLE
- IBInspectable
- IBOutletCollection(ClassName)
@IBDesignalbe
可以不运行程序的情况下把源文件中的一些代码实时渲染到 IB 中,但是源文件必须是 UIView 或者 NSView 的子类。
prepareForInterfaceBuild()
只需要将实时渲染的代码放到 prepareForInterfaceBuild() 方法中就可以了,该方法并不会在程序运行时调用。
@IBInspectable
用 @IBInspectable 修饰的属性会显示在 IB 的 Show the Attributes inspector。
extension UIView {
    private struct AssociatedKeys {
        static var name: String?
    }

    // 存储属性
    @IBInspectable var name: String {
        get {
            return objc_getAssociatedObject(self, &AssociatedKeys.name) as! String
        }
        set {
            objc_setAssociatedObject(self, &AssociatedKeys.name, newValue, .OBJC_ASSOCIATION_RETAIN)
        }
    }


    // 计算属性
    @IBInspectable var borderColor: UIColor {
        set {
            self.layer.borderColor = newValue.cgColor
        }
        get {
            return UIColor.init(cgColor: self.layer.borderColor!)
        }
    }
}
第7章 在 Interface Builder 开发中的技巧和 Bug
调整 View 的尺寸,使它与显示内容的尺寸相适应
comment + =
查看各个 View 之间的距离
选中 View, 按住 option,悬停在其它 View 上。
在 IB 中添加参考线
Editor -> Guides -> Add Horizontal Line
command + -
Editor -> Guides -> Add Vertical Line
command + ctrl + |
快速调整底层被挡住的 View 的位置
快速查看 View 的 UI 层次关系
command + shift + right click
连线小技巧
两个窗口
使用吸管快速设置颜色
IB 中的复制与粘贴
command + c
command + v
利用 Media Library 快速设置图片
IB 开发中遇到的一些小 bug
最好的做法就是重启 Xcode。
- 无法连线
IB 文件是否与源文件关联
- @IBAction 红色提示
先在源文件中定义好方法,再从源文件 拖 到 IB 文件进行 连线